Assigning a Call to the Case Owner
Studio makes it easy for you to collect data from Salesforce and use it to assign a call to the appropriate agent. A simple way to do this is by first requesting the caller to input their Case ID on the dial pad. Then, through a Data Dip in Salesforce, you will find out which agent owns the case. Lastly, you will use the Assignment and dial (A&D) component to assign the call to that agent.
Please follow these instructions to learn in detail how to assign a call using a data dip:
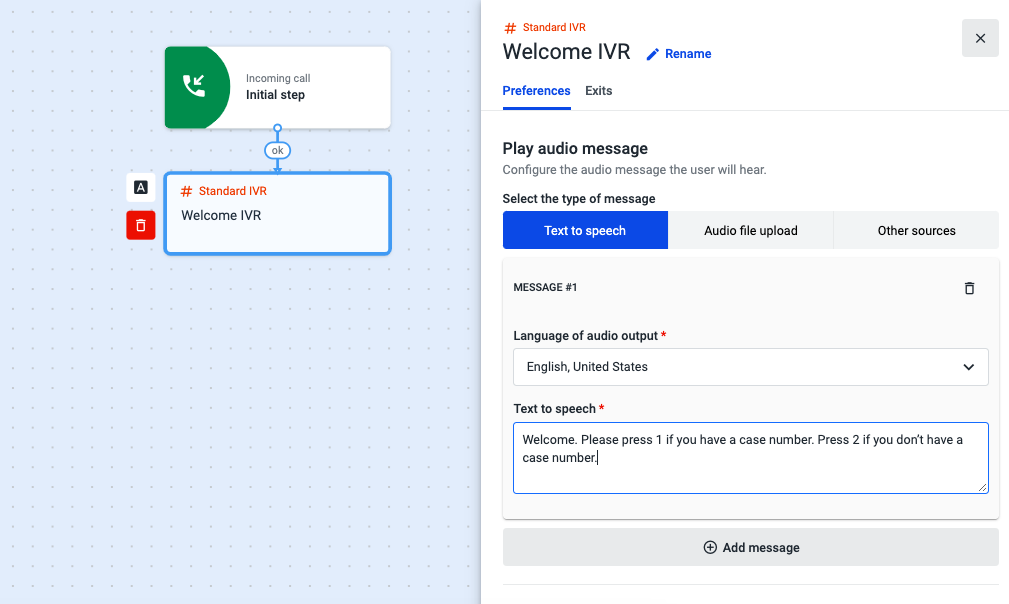
- Add the Standard IVR component to your flow.
- Open the Standard IVR component, and on the Preferences tab, choose Text to speech as the message type.
- Select the language in which you will write your message.
- In the “Text to speech” field, type in the message that will be played when the flow reaches the Standard IVR component.
Example: “Welcome. Please press 1 if you have a case number. Press 2 if you don’t have a case number.”
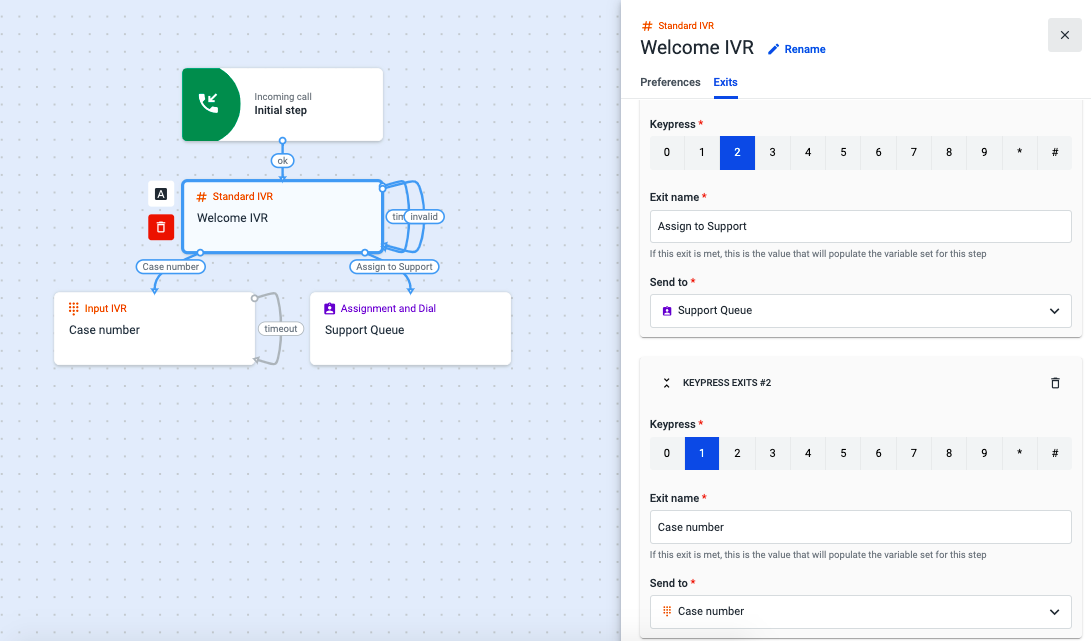
- Select the Exits tab and under “Custom Exits” choose 2 as the key that the caller should press to go straight to your support line.
- Give an appropriate name to the Exit and under “Send to” add the A&D component and name it “Support Queue”.
- Click on Add Exit and under “Keypress Exits #2”” choose 1 as the “Keypress”.
- Name the Exit and under “Send to” add the Input IVR component.
- Scroll down to the “Timeout” and “Invalid” sections and select the Standard IVR from the drop-down lists, creating a loop in both scenarios.
-
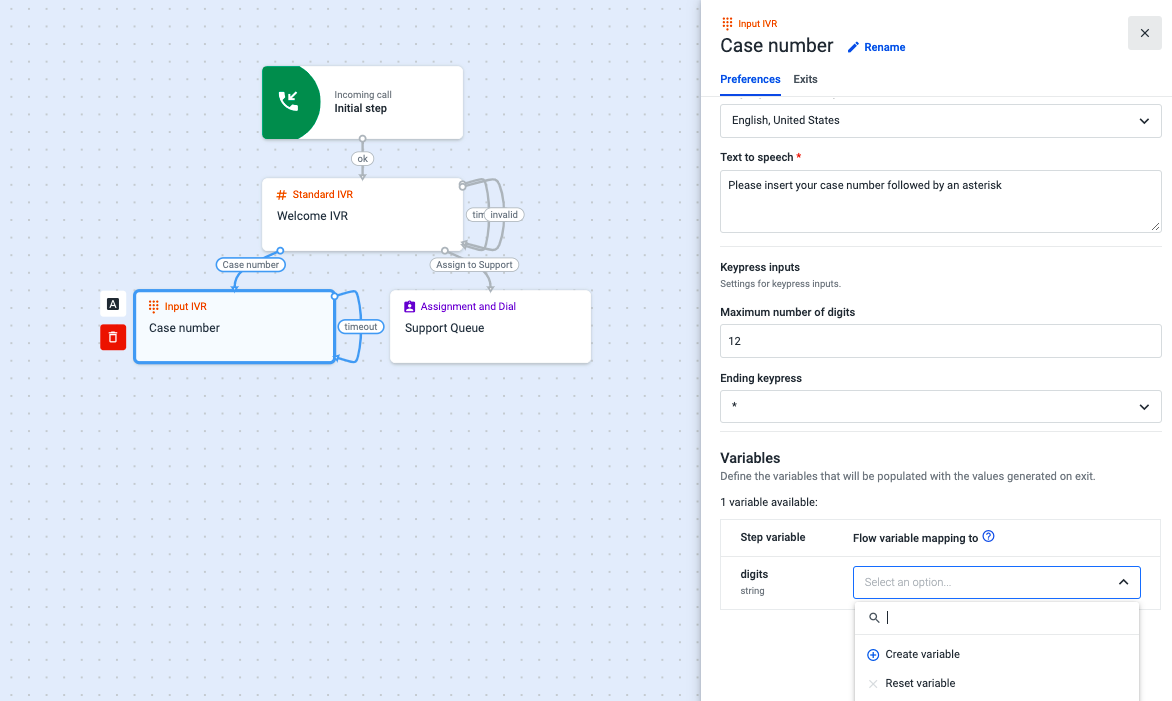
Open the Input IVR component, and on the Preferences tab, choose Text to speech as the message type.
-
In the “Text to speech” field, type in the message that will be played when the flow reaches the Input IVR component.
Example: “Please insert your case number followed by an asterisk.” -
Under “Keypress inputs”, configure the maximum number of digits your caller can input and which key should be used to finalize the input.
-
In the “Variables” section, click on the drop-down and then on Create variable.
-
Give a name to the variable. This variable will store the digits that your caller pressed, so we’ve named it “case_number”.
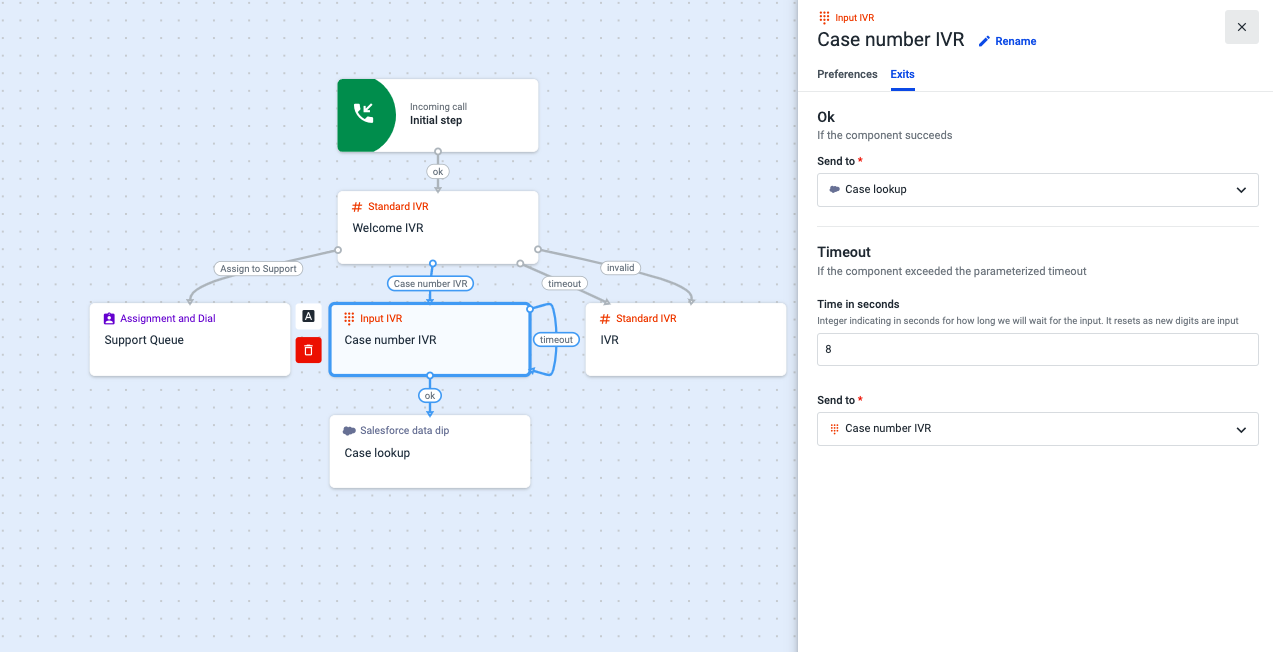
- Select the Exits tab, and under “Ok” add the Salesforce data dip component.
- Scroll down to the “Timeout” section and add the number of seconds the system will wait for an input before it times out.
- Under “Send to”, create a loop by selecting Input IVR from the drop-down.
- Open the Salesforce data dip component and paste the following query:
SELECT Id, CaseNumber, Owner.Email, CreatedDate FROM Case WHERE CaseNumber = '%{current_flow.case_number}' ORDER BY CreatedDate DESC LIMIT 1Note: If you have given a different name to your variable (step 14), replace “case_number” (the lower case instance only) with the name of your variable.
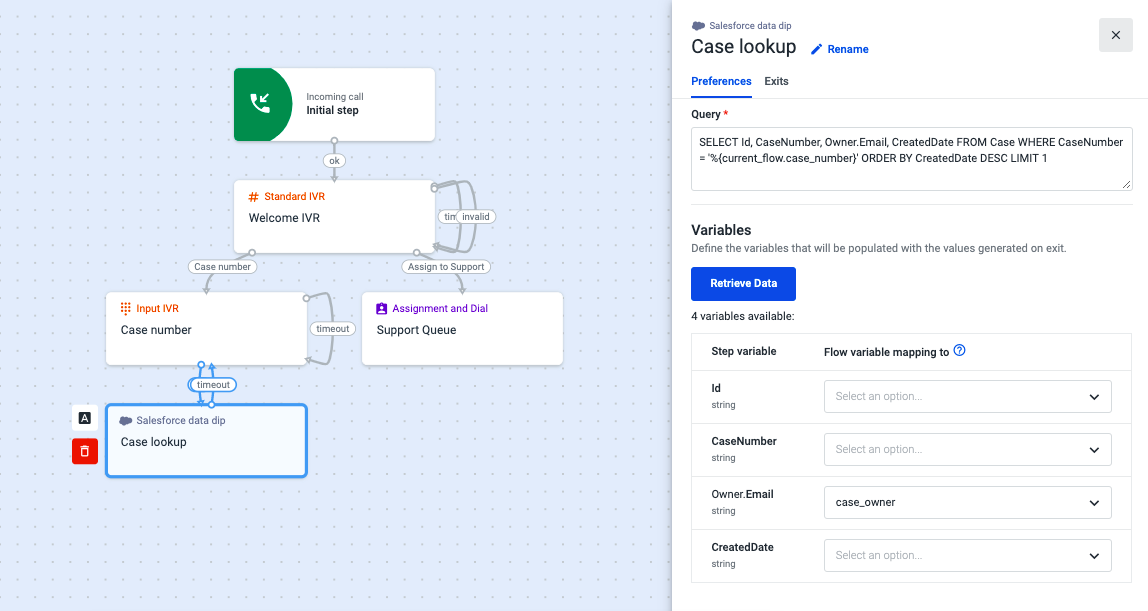
- Click on Retrieve Data.
- Click on the Owner.Email drop-down and add a new variable with the name “case_owner”.
The case number your caller inserted in the dial pad (and that was stored in the “case_number” variable) will be used to find in Salesforce the agent who owns the case. The agent’s information (email) will be stored in the “case_owner” variable, which will be used in step 27 to assign the call to that agent.
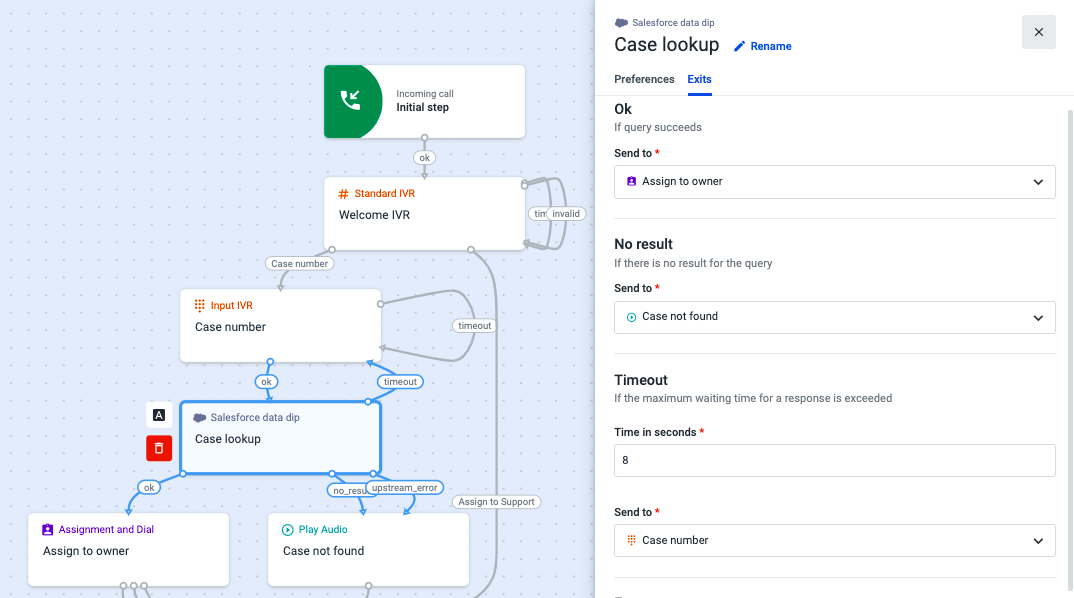
- Select the Exits tab, and add a new A&D component under “Ok”.
- Name it “Assign to Owner”.
- Add the Play Audio component in both the “No result” and “Error” sections. In this component, you will inform your callers that you were unable to find the case.
- Create a loop in the “Timeout” section by selecting the Input IVR “Case number IVR” in the “Send to” dropdown.
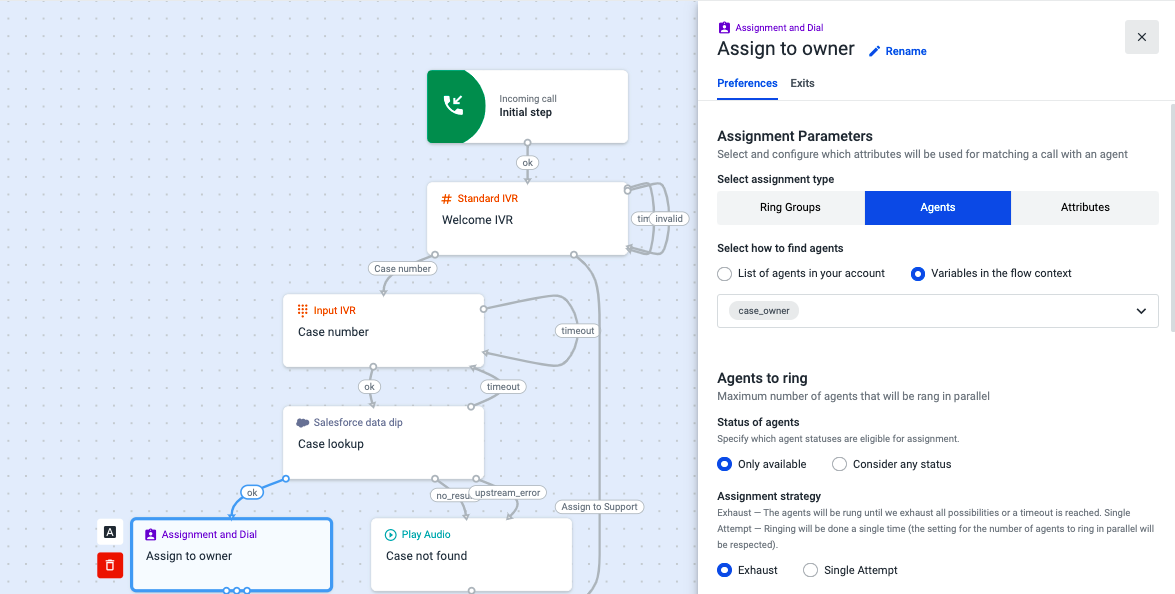
- Open the A&D component named “Assign to owner”.
- Select Agents as the assignment type.
- Under “Select how to find agents”, choose "Variables in the flow context" and select "case_owner" from the list.
- Fill out the remaining fields on the Preferences tab.
- Select the Exits tab and choose the support queue (A&D component) in all drop-downs.
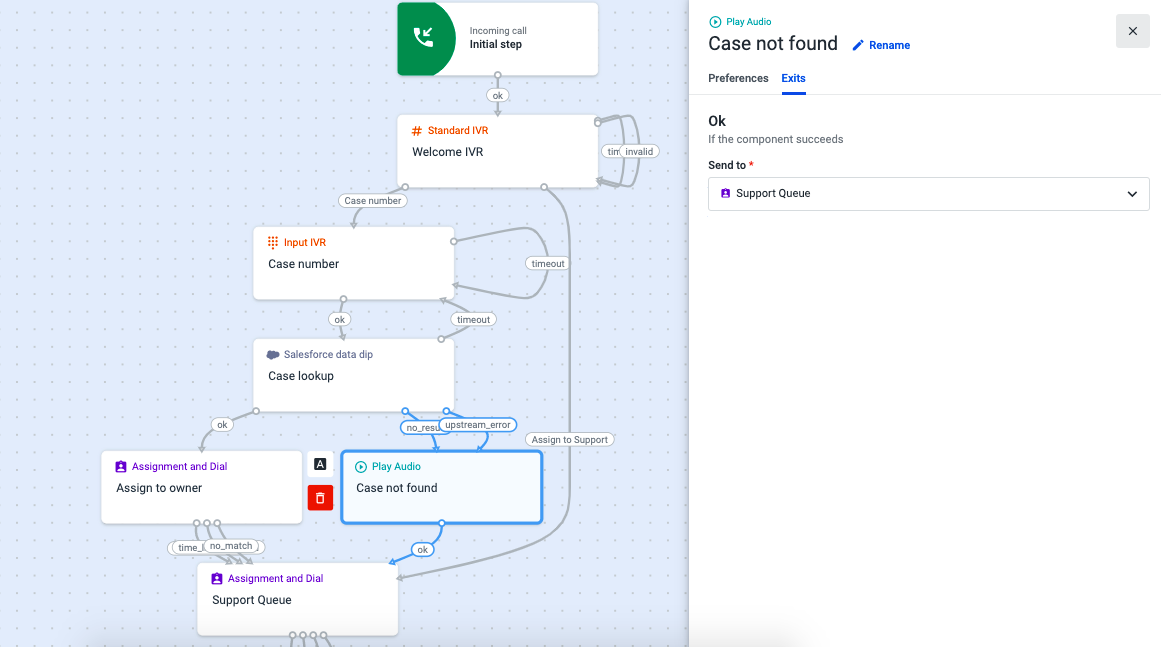
- Open the Play audio component.
- Select the Preferences tab, and in the “Text to speech” field, type the message that will be played when the flow reaches this component.
Example: “We apologize, but we were unable to find the Case ID.” - Select the Exits tab and route the call to the “Support Queue”.
- Complete the configuration of your A&D components and save your flow when you are finished.
From now on, if a caller inserts their Case ID when requested, the call will automatically be routed to the agent who owns the case in Salesforce. If the agent is offline or if the caller inserts an invalid Case ID, for example, the call will be directed to the “Support Queue”.
Updated 3 months ago