Using Request Direct Callbacks and Auto-answer in Studio API Flows
It is possible to trigger a callback from an Application Programming Interface (API) request. For example, you have a solution in place for your customers to request a callback from your website. In this case, you can trigger a Studio flow from an API request in order to perform a callback to a requesting customer.
Configuring Studio API Flows with Auto-answer and Request Direct Callbacks
- Select the Studio app.
- Click “Create flow” on the Flow Manager page and on the new window that is displayed.
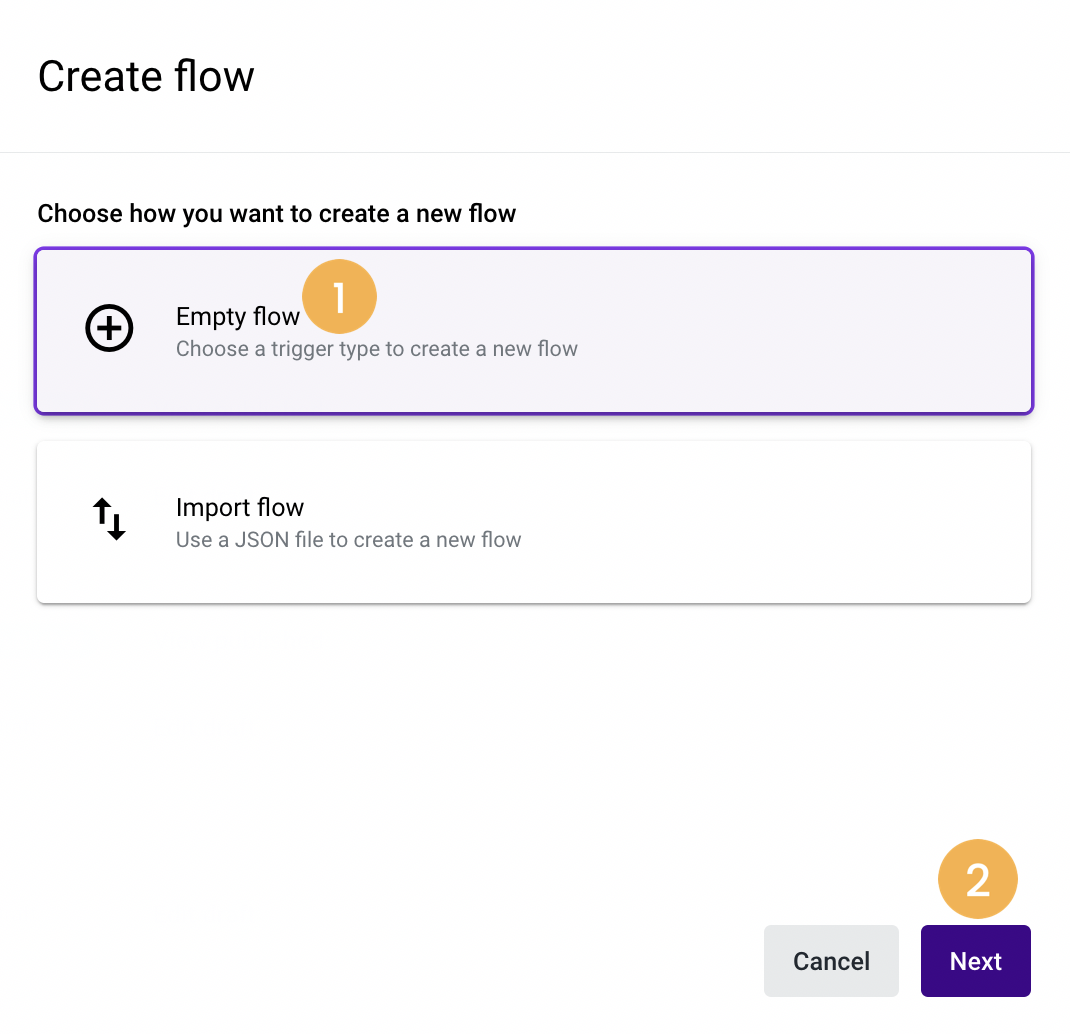
- Select Empty flow[1], followed by Next[2].
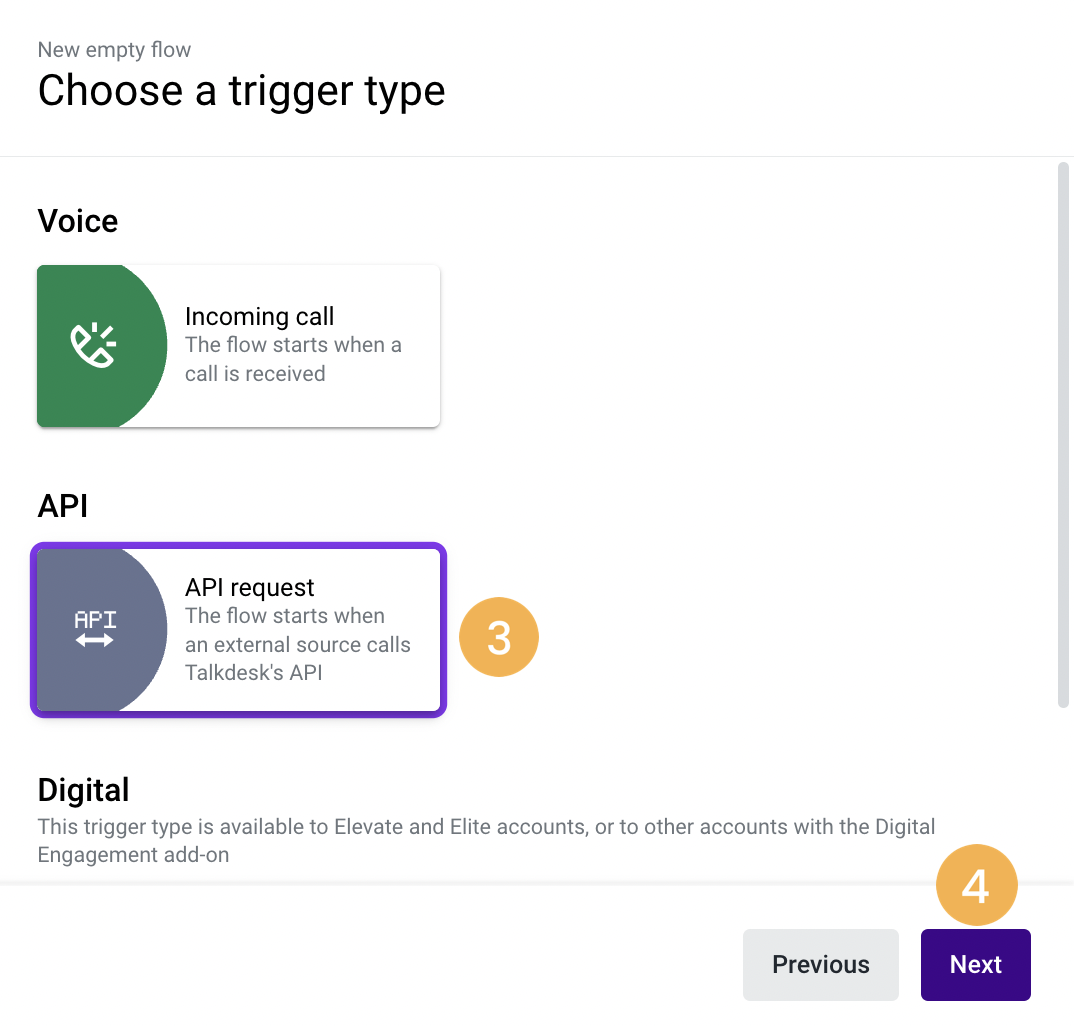
- Choose API request[3] flow type, and then, Next[4].
- On the next screen, provide a name and, optionally, a description for the flow.
The flow editor page will be displayed, and you will see the API request component as the flow initiator. Within it, you will need to configure the input arguments, i.e., the data to be sent in the body of the POST API request that will trigger the Studio flow. Each argument can be mapped to a variable that can then be used in the flow.
In our example, a caller requests a callback through the website of company ABC, by clicking on a button. This action will trigger the callback request so that the call can take place.
We have configured the arguments and variables in the following manner:
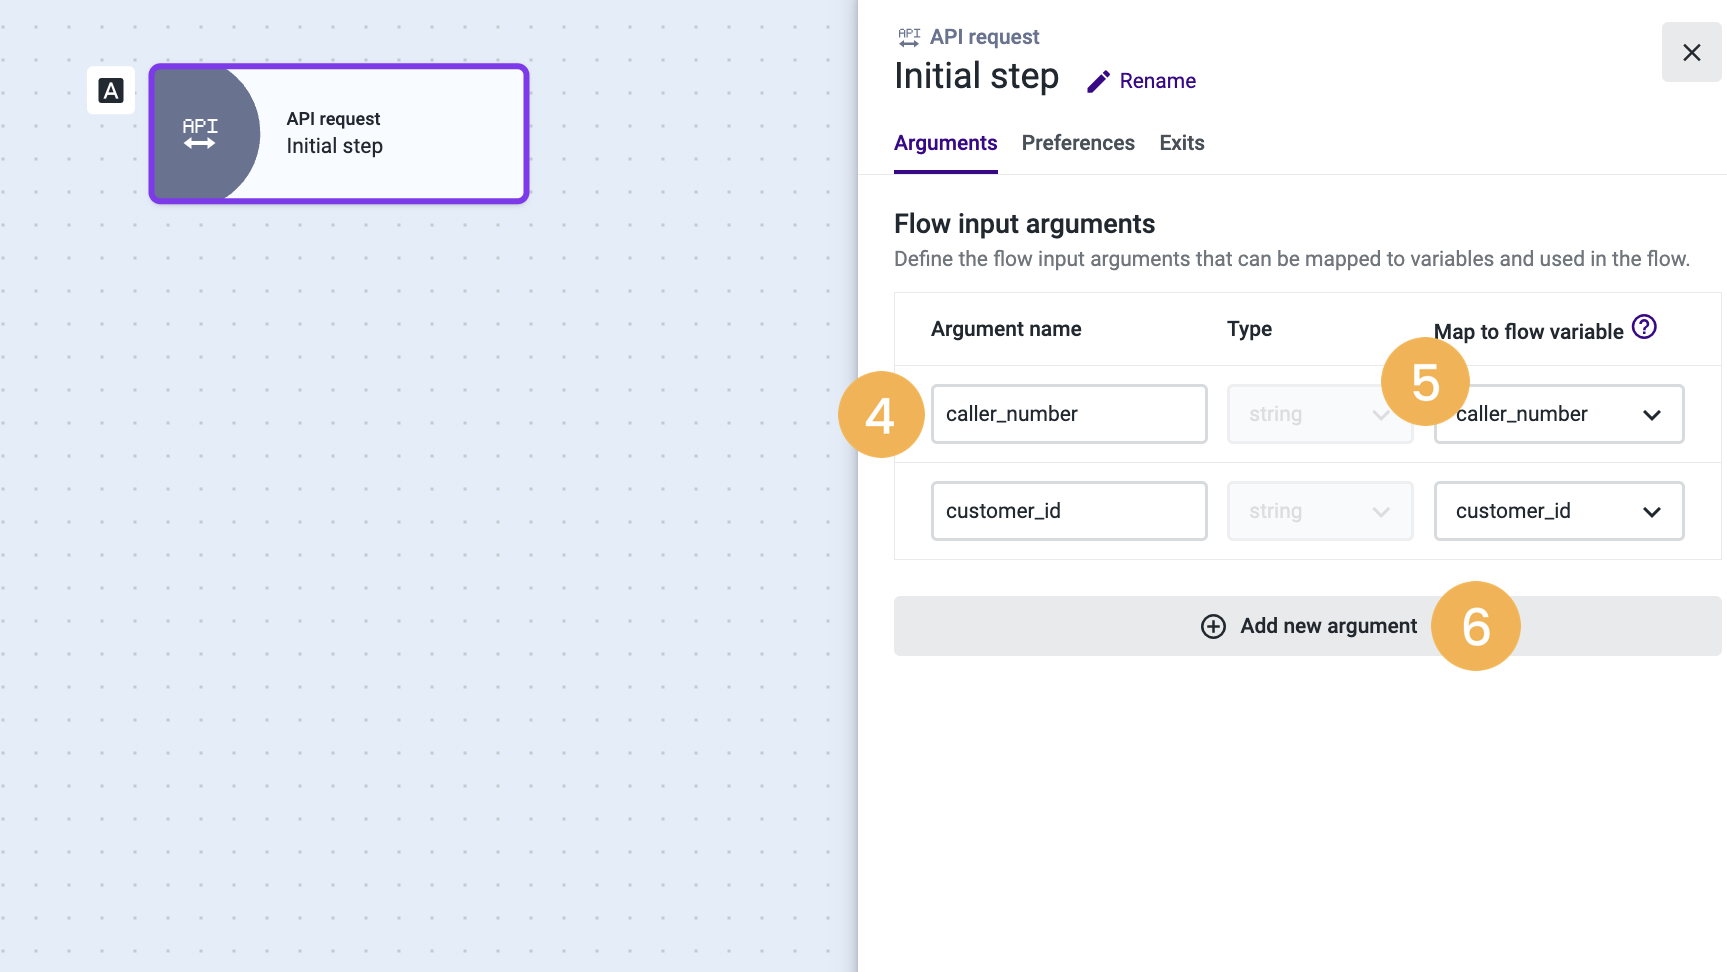
- Fill in the first text box with the argument name “caller_number” [4] that represents the caller’s number, i.e., the number of the person that has requested the callback.
- Create the corresponding variable that will be used in the Studio Flow - “caller_number” [5].
- Repeat the process and click Add new argument[6] to fill in other arguments and variables that you wish to use in your Studio Flow. In our example, the form to request the callback on our website also asks the requester for their customer ID. We will also use that in our Studio Flow.
If necessary, in the Preferences tab, create a variable to populate the “interaction_id” field, under the “Variables” section.
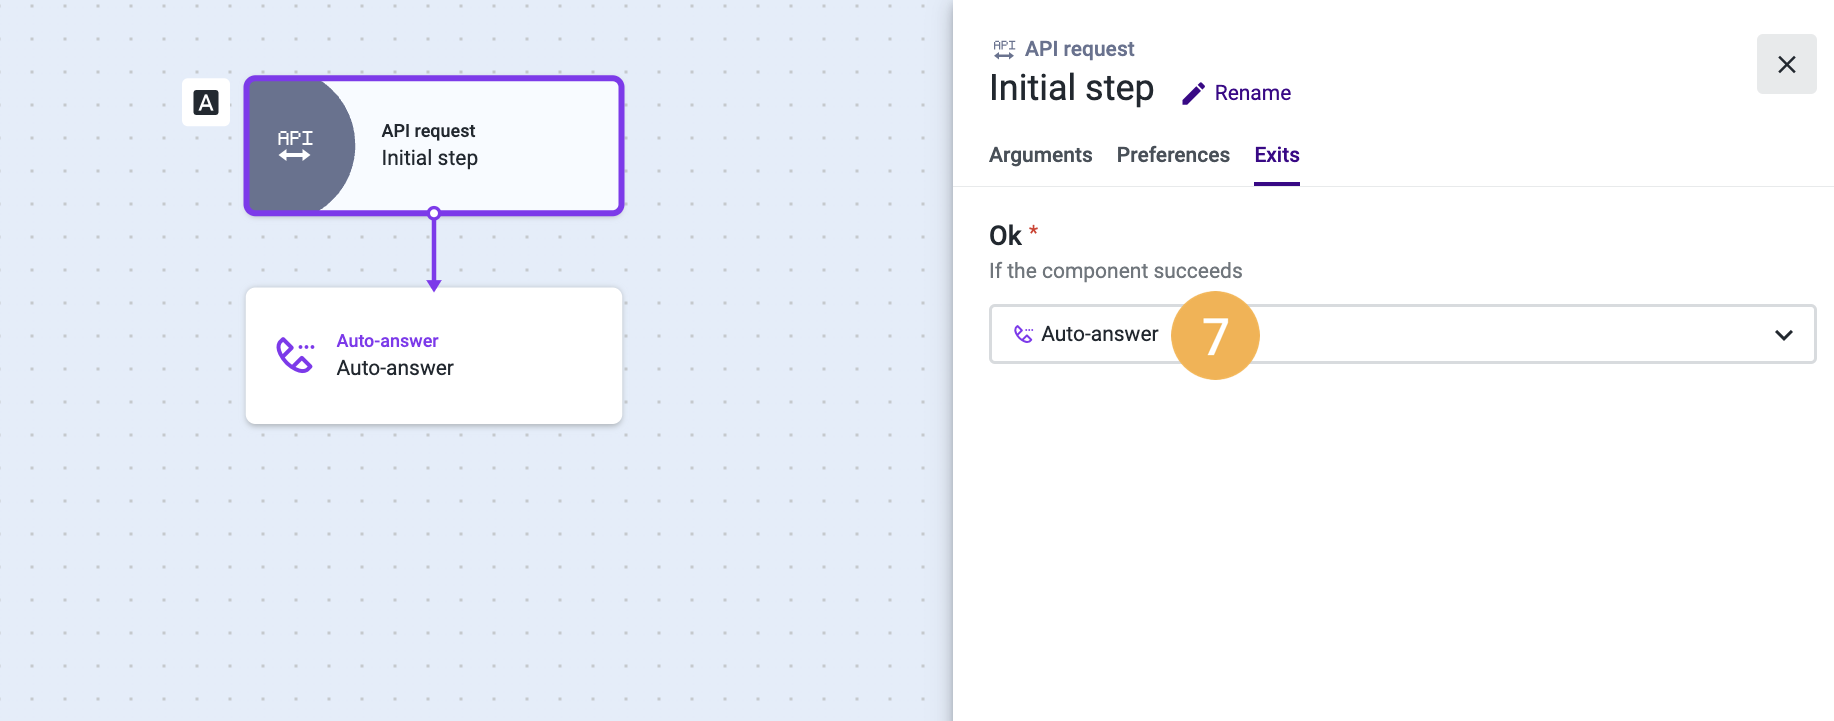
- Go to the Exits tab and add the “Auto-answer” component [7]. This component allows the callback to be automatically answered by the agent. If you do not wish to have “Auto-answer” enabled, you can instead add the "Request direct callback" component to the Exits tab, and you can then skip steps 10,11, and 12 in this instructions list, and proceed with adding the component.
- Click on the “Auto-answer” component.

- On the Preferences tab, you can define if it is “Enabled” or “Disabled” [8]. Additionally, you can define the “Timeout in seconds” [9] which represents the time limit in which the call will be automatically answered. You can specify a value of up to 40 seconds, which in our example, would be ten seconds.
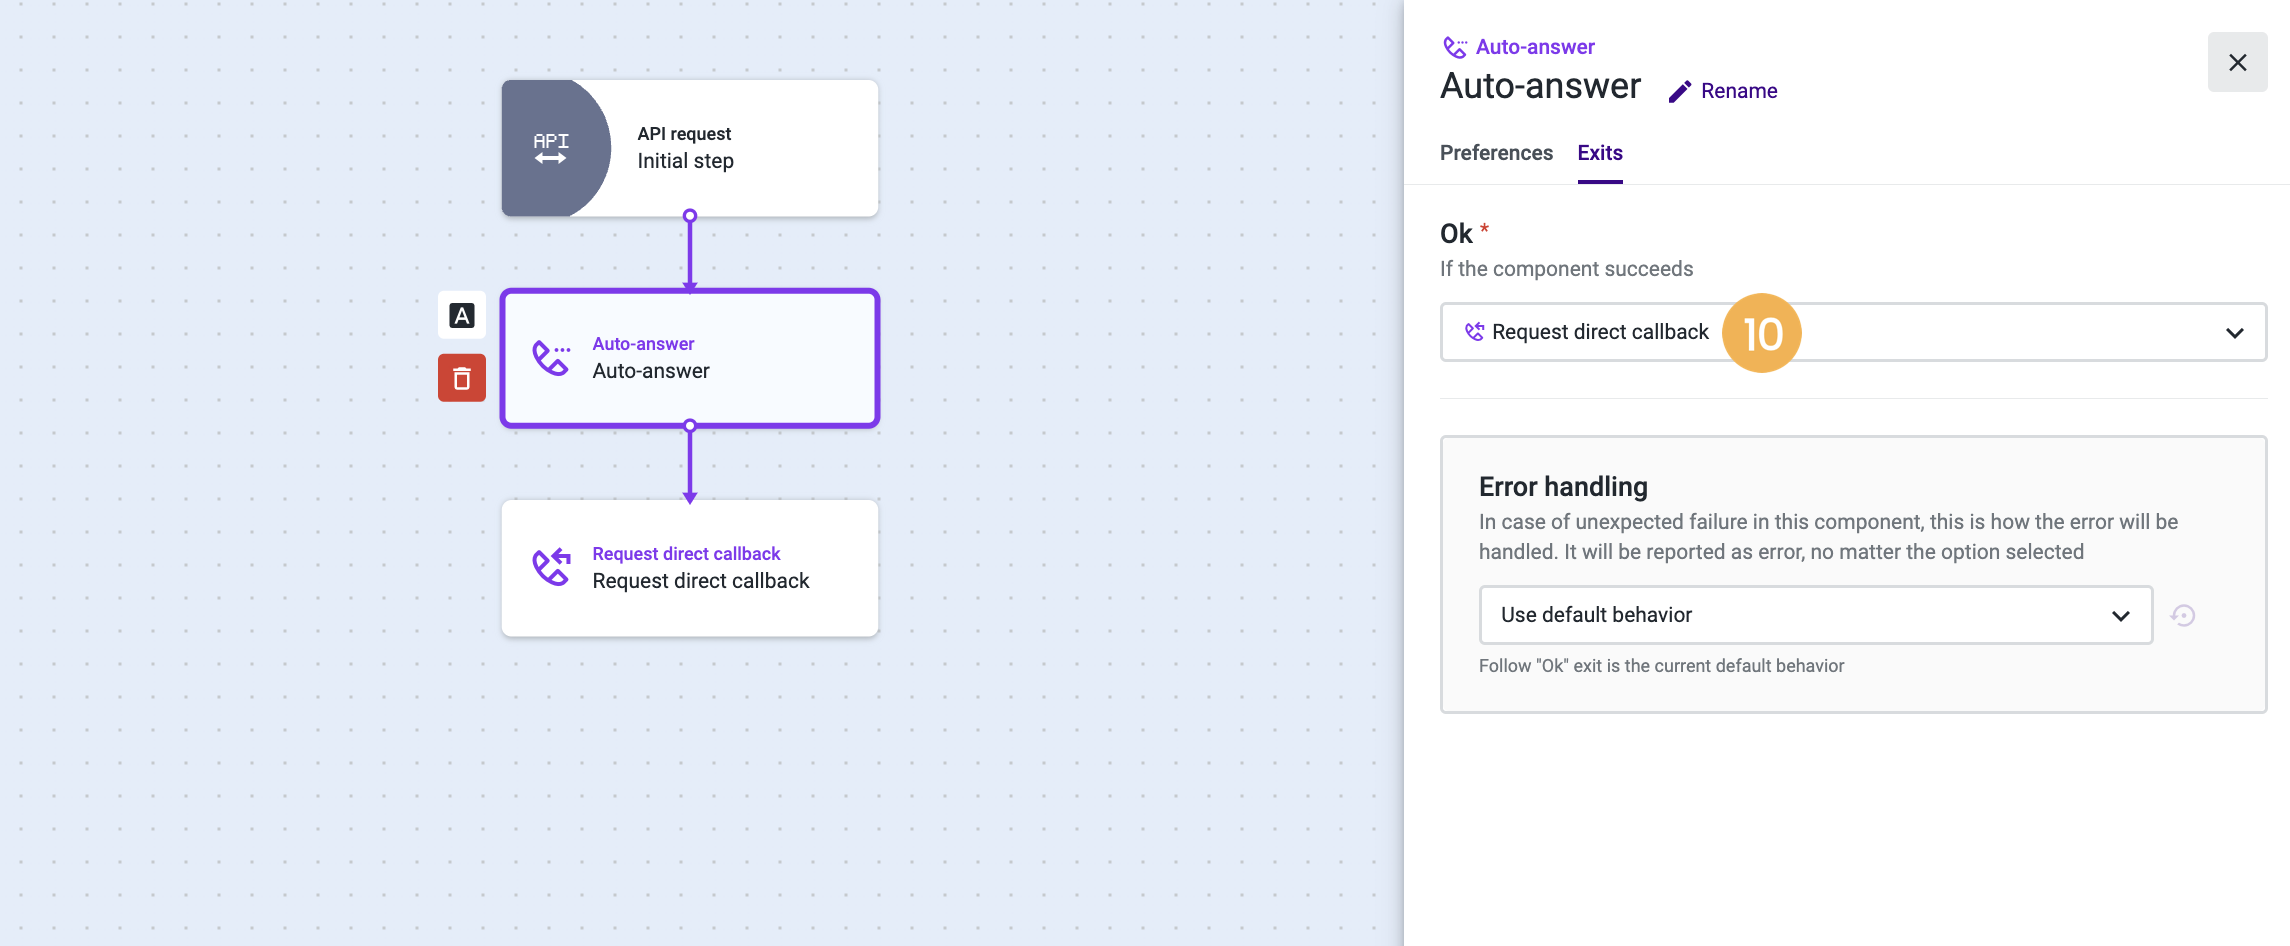
- On the Exits tab, add the “Request direct callback” component [10].
Configuring "Request Direct Callback" in Studio API Flows
Using the previous flow example and after adding the “Request direct callback” component:
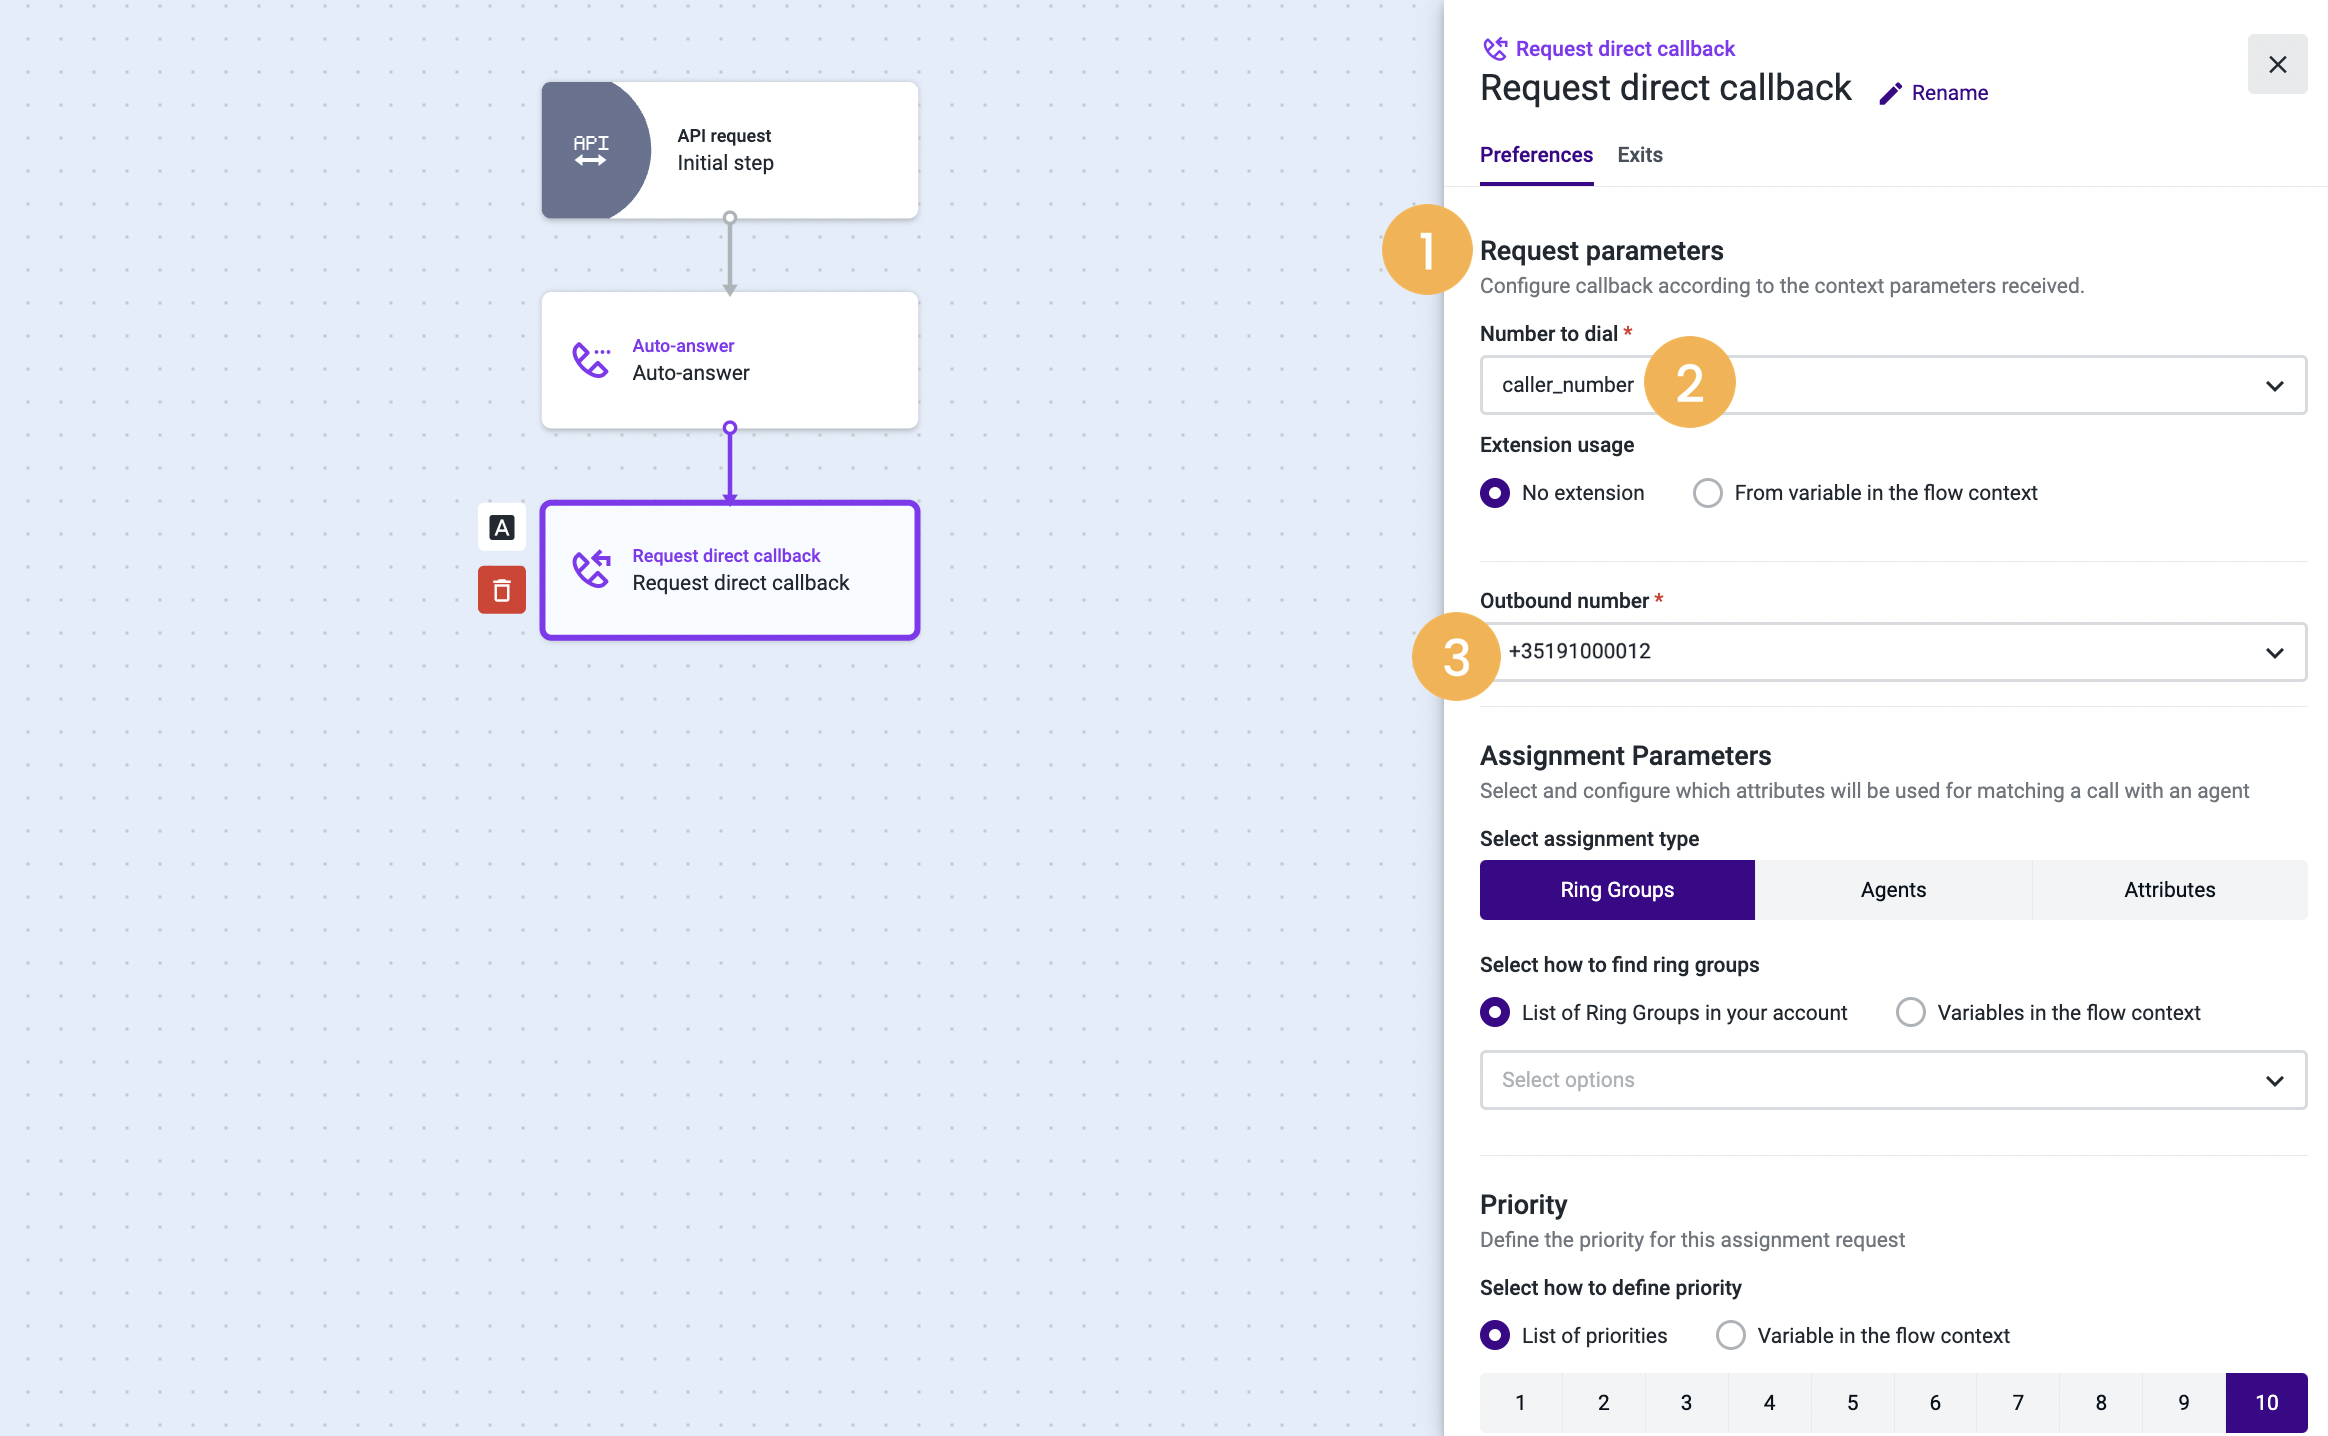
- Click on the “Request direct callback” component to start configuring it.
- On the Preferences tab, you will see the following fields:
- “Request parameters” section [1]:
- “Number to dial”: This represents the phone number of the person that requested the callback. In our example, we will select the previously created variable “caller_number” [2].
- “Outbound number”: This represents the phone number that will appear for the person that requested the callback. Select a number from your account, based on the presented drop-down list [3].
-
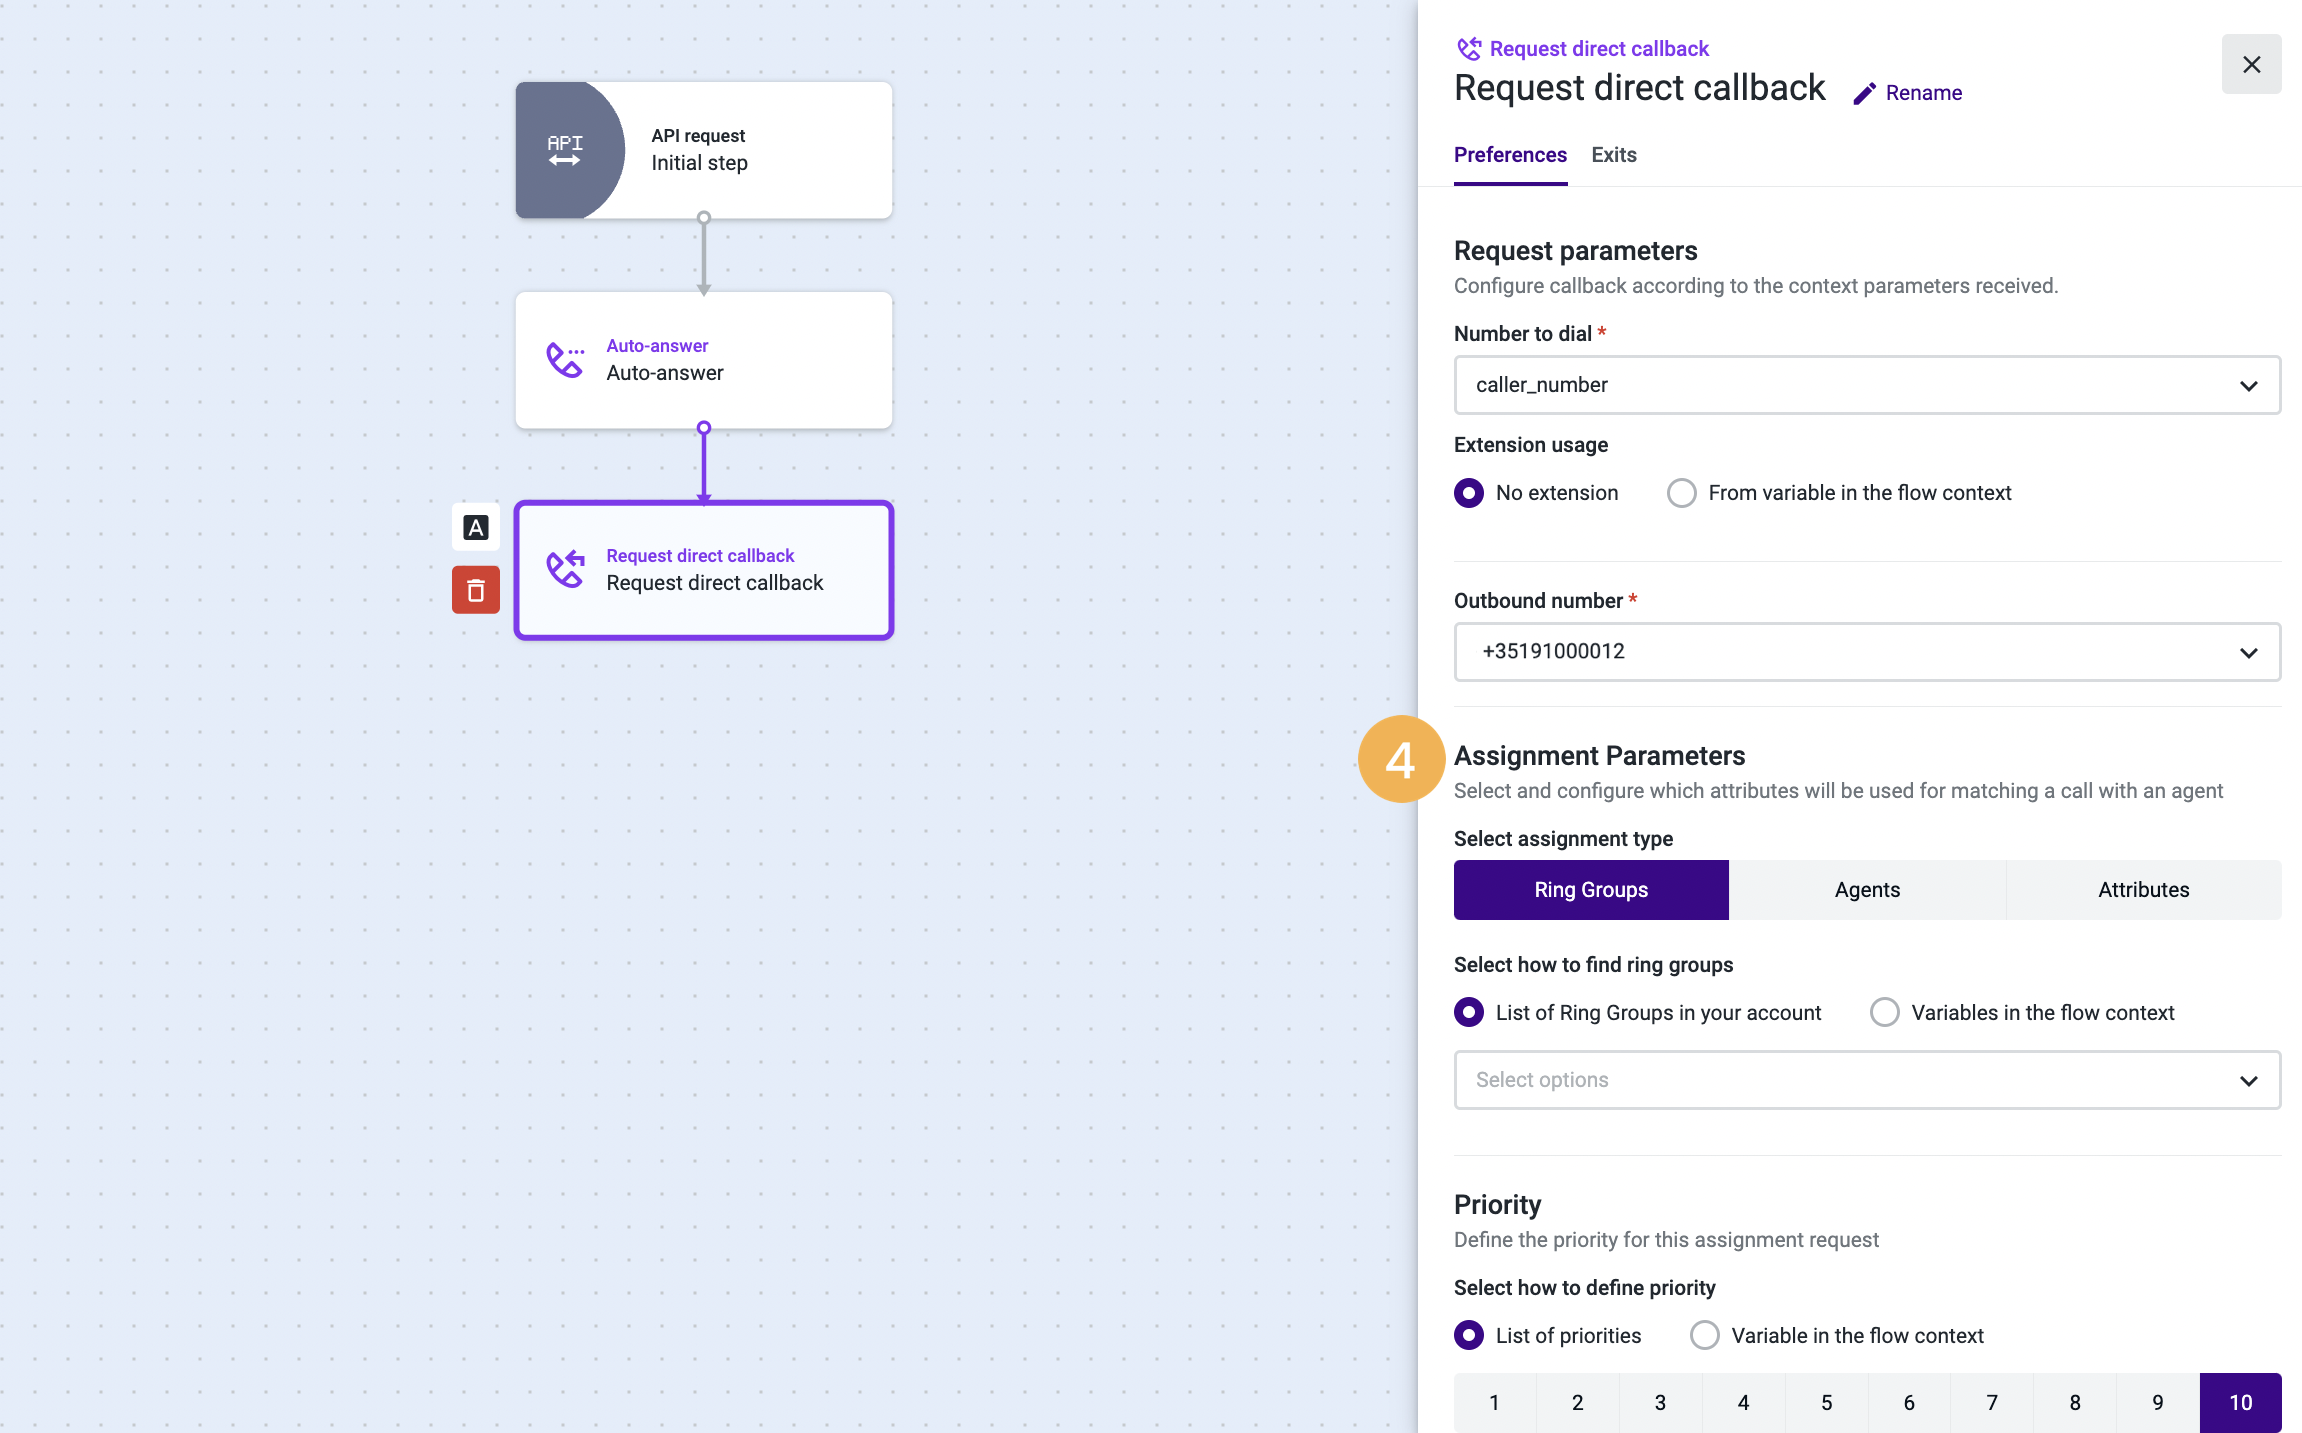
“Assignment Parameters” section [4]:
-
“Select Assignment Type”: You can select Ring Groups, Agents, or Attributes. In our example, we will select Ring Groups.
-
“Select how to find ring groups”: By selecting “List of Ring Groups in your account”, you are able to select the ring groups that will be handling the callback. We will select the Ring Group “agents” in our example.
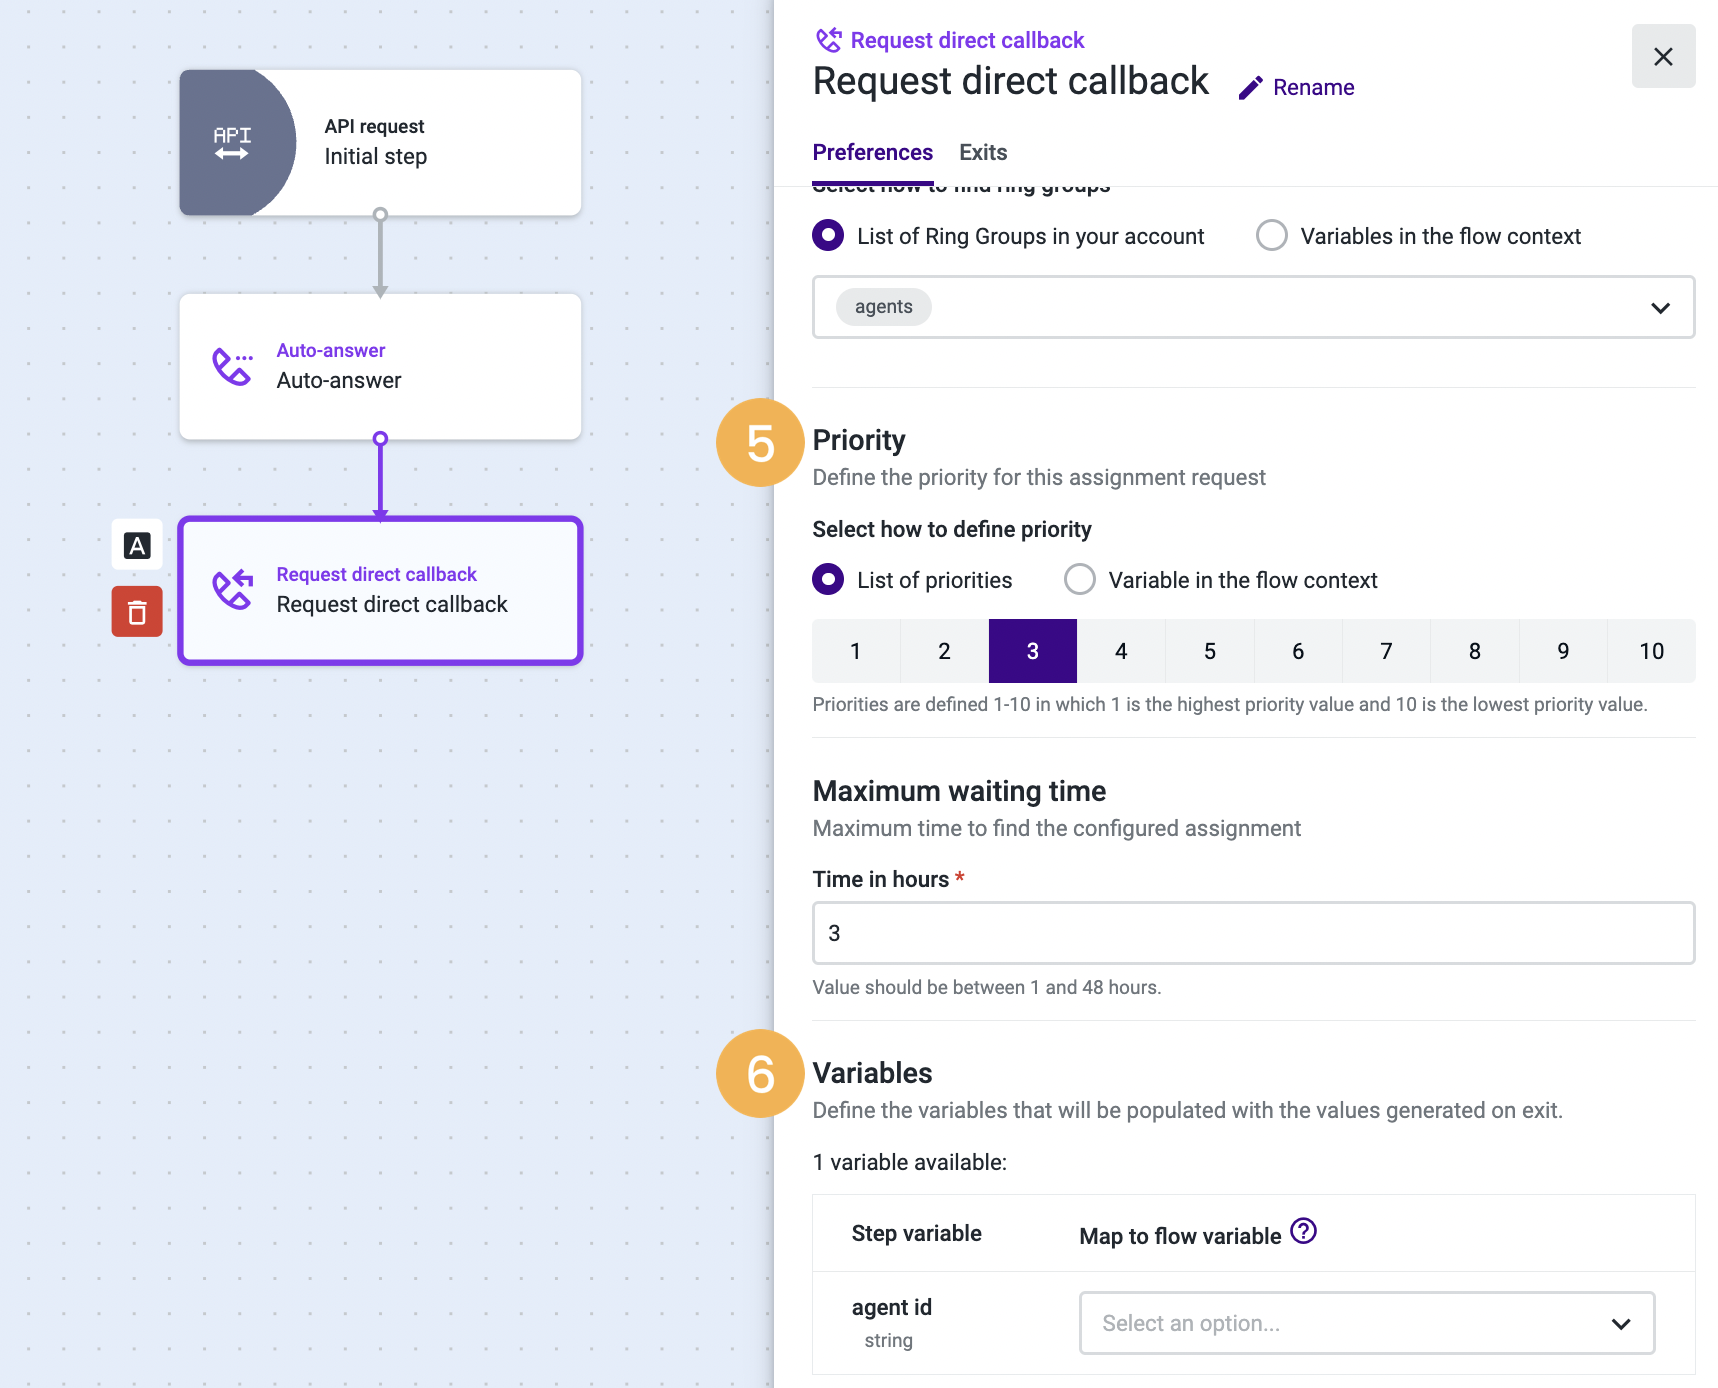
- “Priority” section [5]:
- “Select how to define priority”: You can select the priority of these callbacks through the definition of a value for its priority (from 1 to 10, 1 being the highest priority and 10 the lowest priority value), or through a variable in the flow context. In our example, we will define the priority through a “List of priorities” and define a 3 value.
- “Time in hours”: You can define the maximum time to find the configured assignment, defining a value between 1 and 48 hours. In our example, we will define a value of 3 hours.
- “Variables” section [6]: If you wish, you can also create a variable with the “agent id” that will handle the call.
- On the Exits tab, you will see the following Exits:
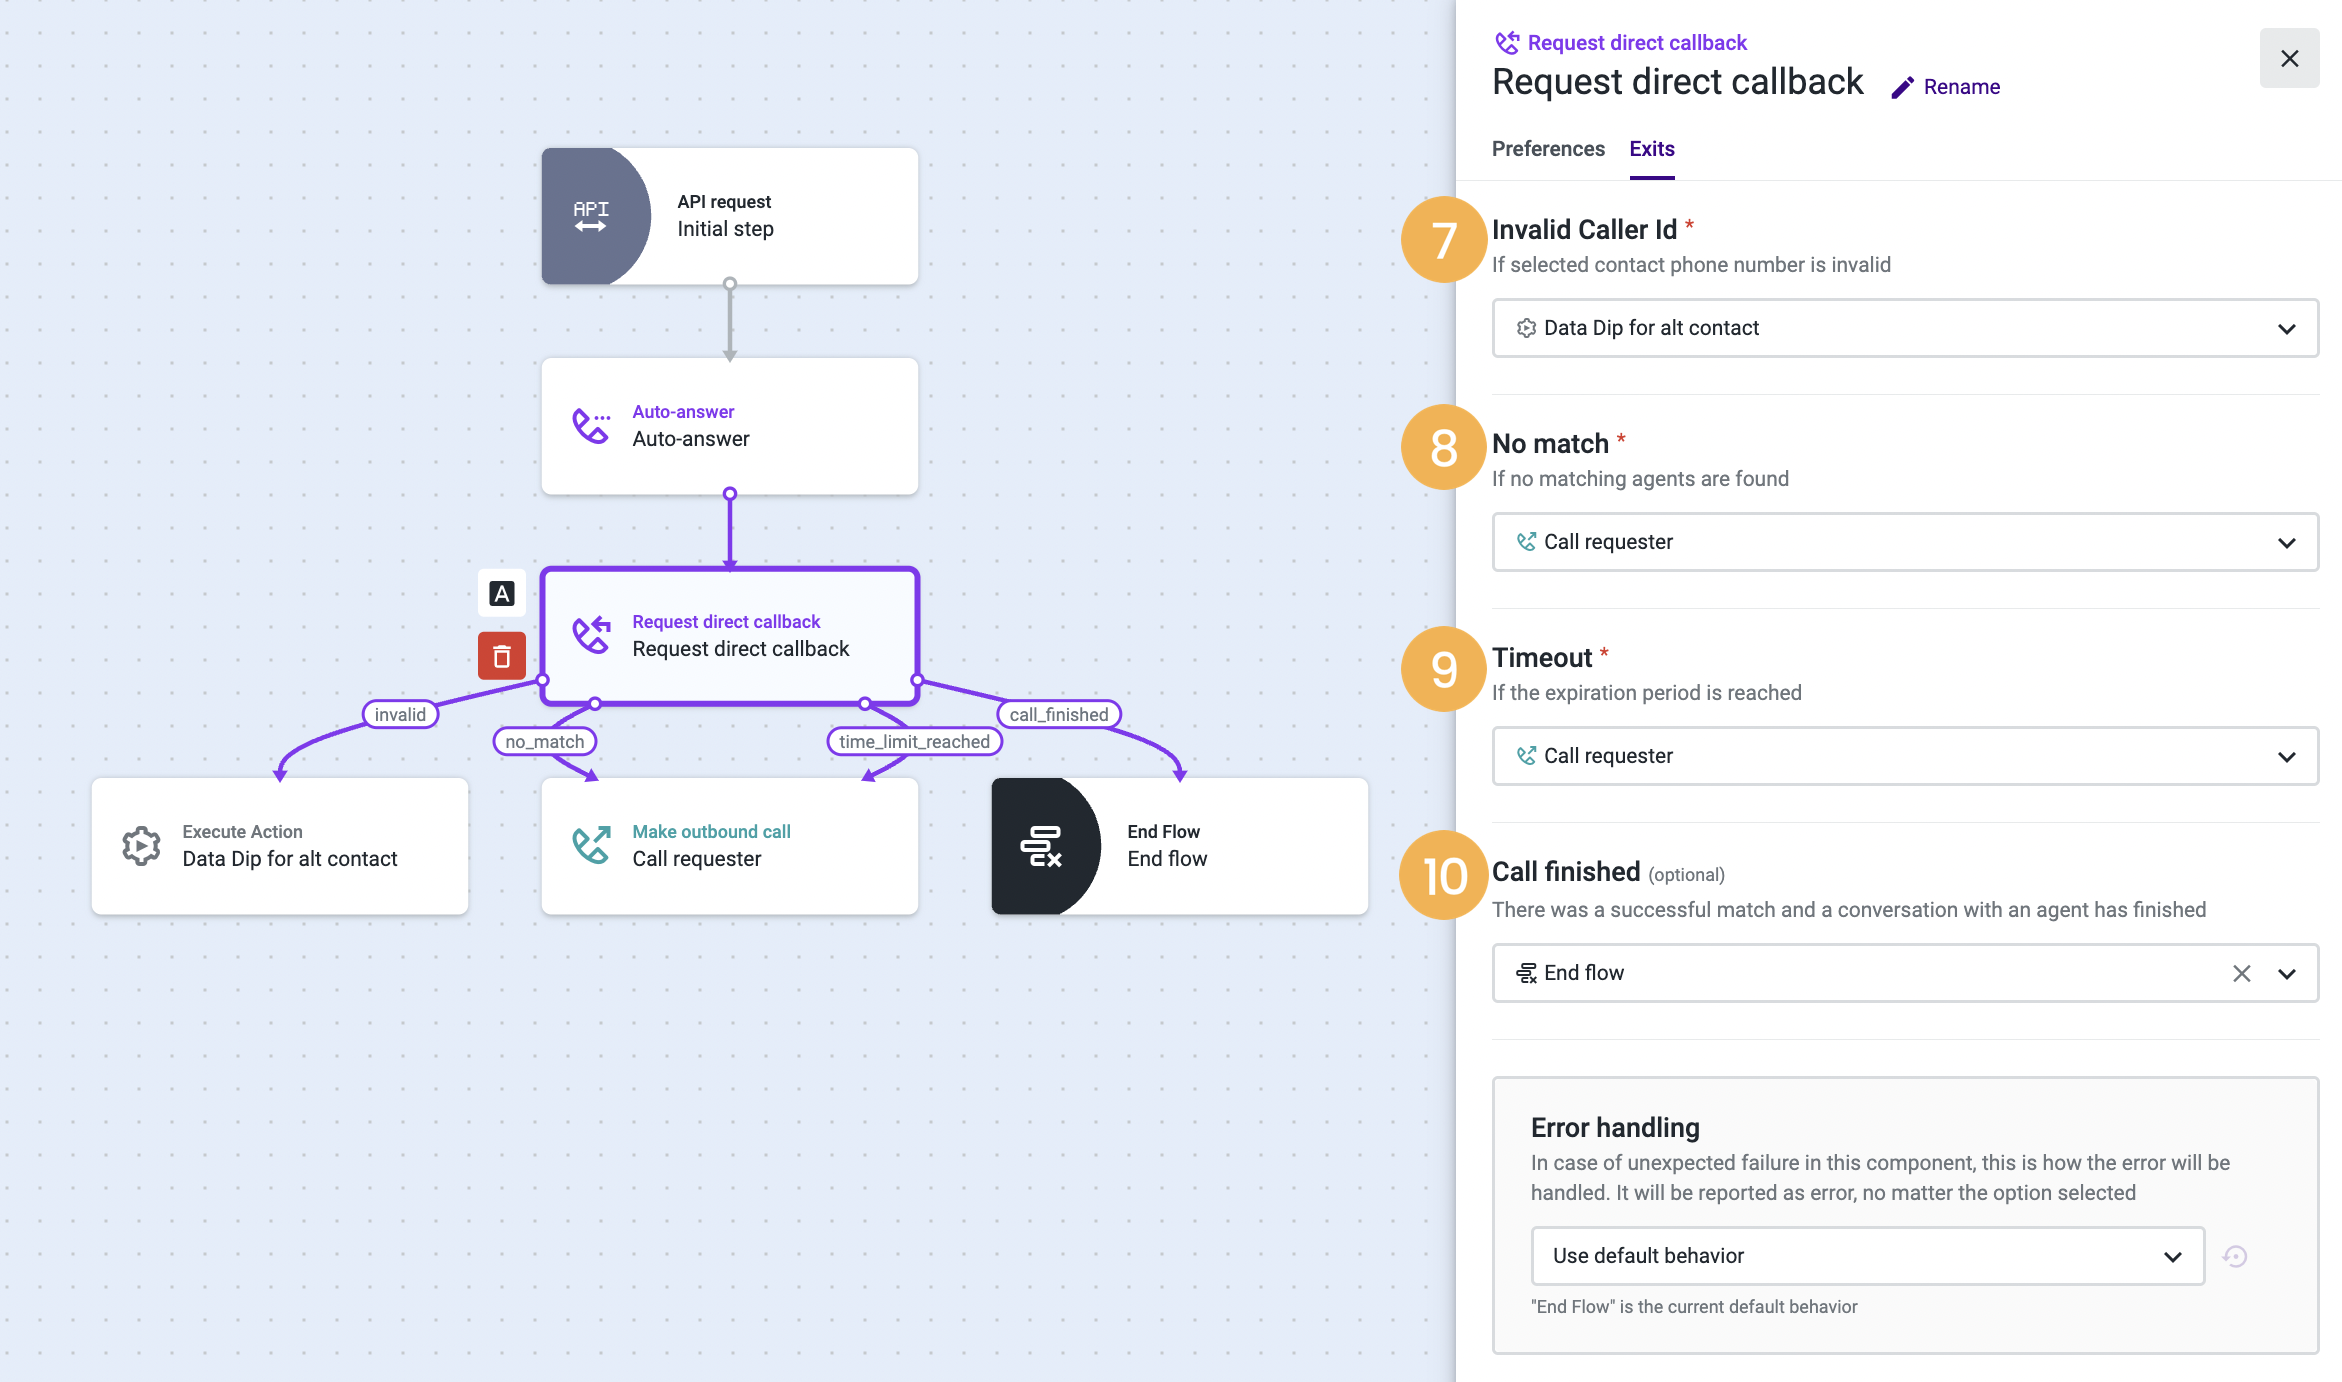
- “Invalid Caller Id” section [7]: Define the step’s exit if the number that should receive the callback is invalid. If the selected contact phone number is invalid (i.e, the person that requested the callback made a mistake inserting the phone number on a web form, for example), it may be useful to circumvent and see if it is possible to gather an alternative contact. In our example, the API request also provides the customer_id. We will use that to retrieve a contact number we have associated with that customer, in our CRM system. For that, we will use the Execute Action component.
- “No match” section [8]: Define the step’s exit if no matching agents to handle the callback are found. In our example, we will still trigger a call to the person that requested the callback, but we will play them an audio message indicating that it was not possible to connect them to an agent right now, and provide them with other forms that they can reach us, or to try requesting a callback later on. For that, we will add the “Make outbound call” step on the "No Match" exit.
- “Timeout” section [9]: Define the step’s exit if the maximum time to find the assignment is reached. In our example, we will be following the same behavior as defined for the “No Match” exit, so we will add the same “Make Outbound Call” step on the "Timeout" exit.
- “Call finished” section [10]: This is the exit that the flow will follow, after the person that requested the callback and the agent have finished their conversation. We will end the flow here.
Configuring the “Execute Action” component in Studio API Flows
To continue setting up the flow, we will configure the “Execute action” component:
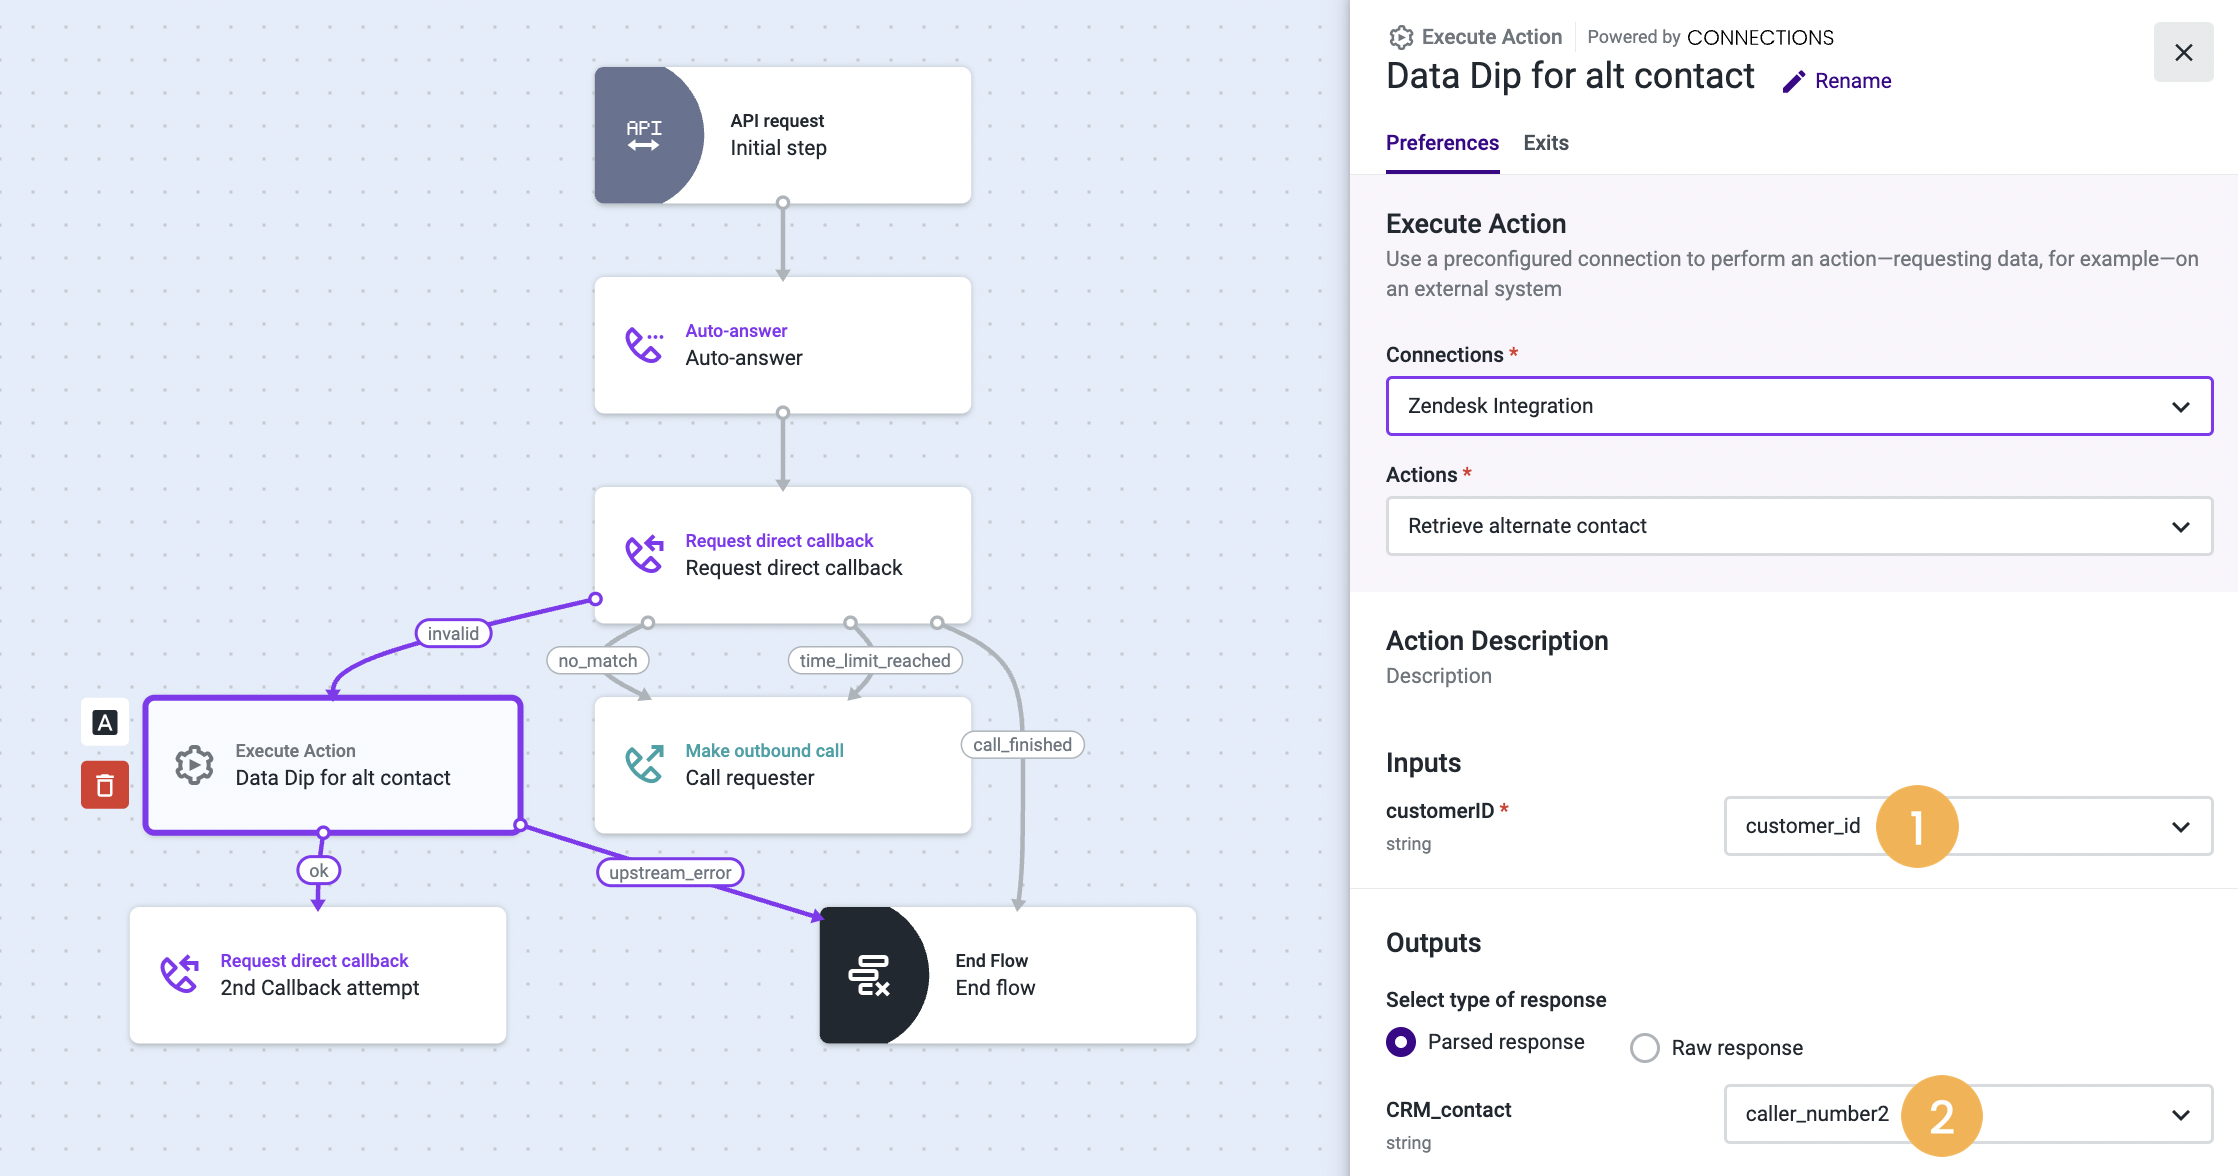
- Select the variable that we will use to perform the data dip (in our example corresponds to the “customer_id” [1] defined in the initial step) and create a new variable with the result of the data dip (in our example, we created a variable named “caller_number2” [2]).
As for the Exits, we will configure the “Ok” exit by adding a new “Request direct callback” component, and if an execution error occurs, we will end the flow.
NotePlease click here for more information on the “Execute action” component.
Configuring the “Make Outbound Call” component in Studio API Flows
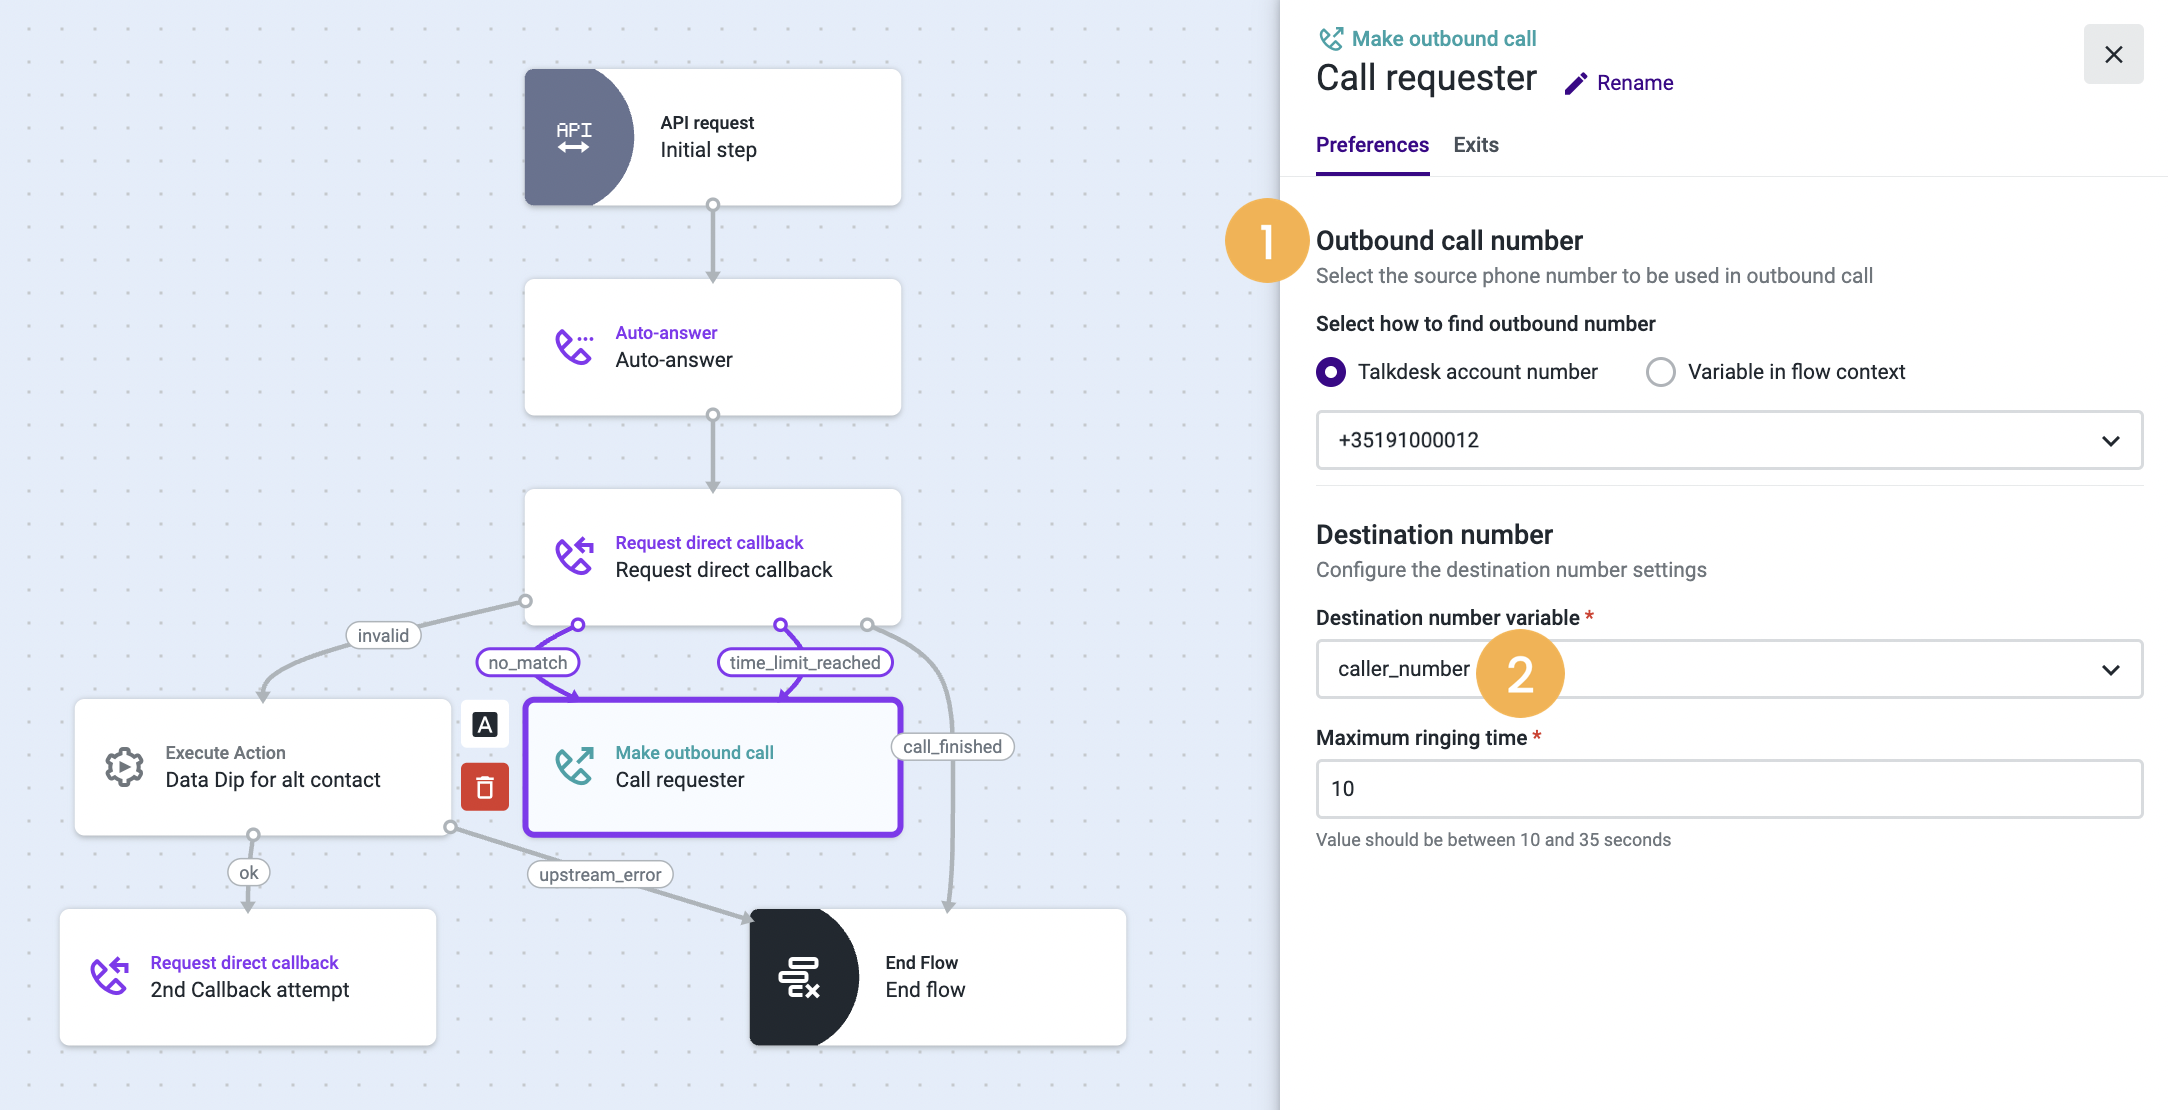
Regarding the configuration for the “Make outbound call” component:
- On the Preferences tab:
- Specify the “Outbound call number” [1] that should appear to the person that requested the callback, by selecting a phone number that belongs to the account based on the values presented in the drop-down list. In our examples, we will use the “caller_number” variable [2] to consider the “Destination number”, which is the number where the callback should be done, and defined the maximum ringing time as ten seconds.
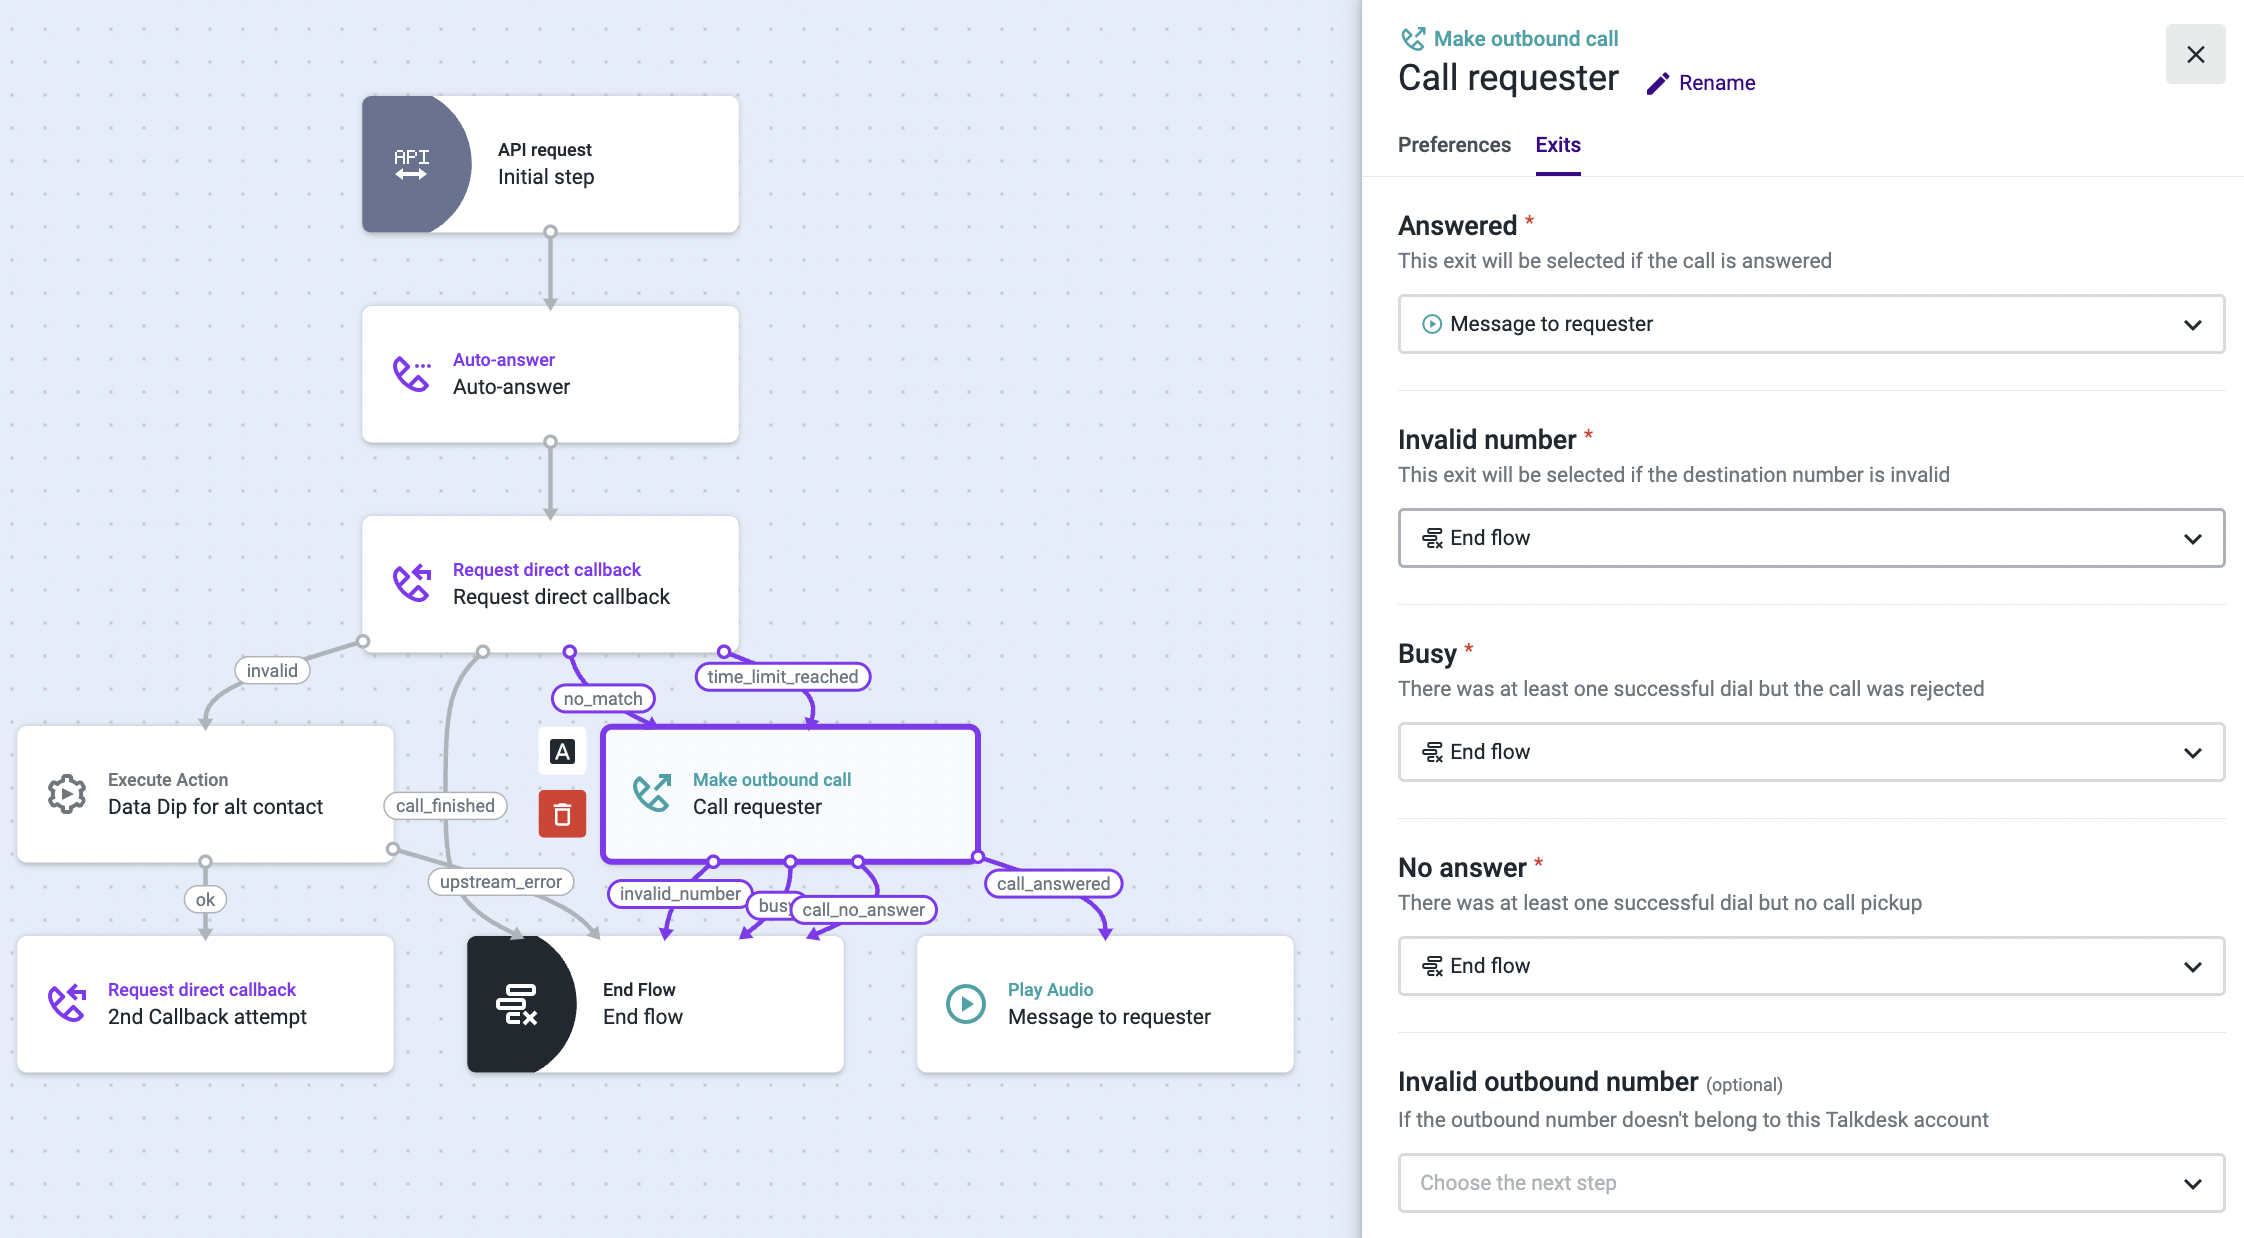
NoteThere is a set usage limit of one “Make outbound call” component per call path.
Configuring the “Play Audio” component in Studio API Flows
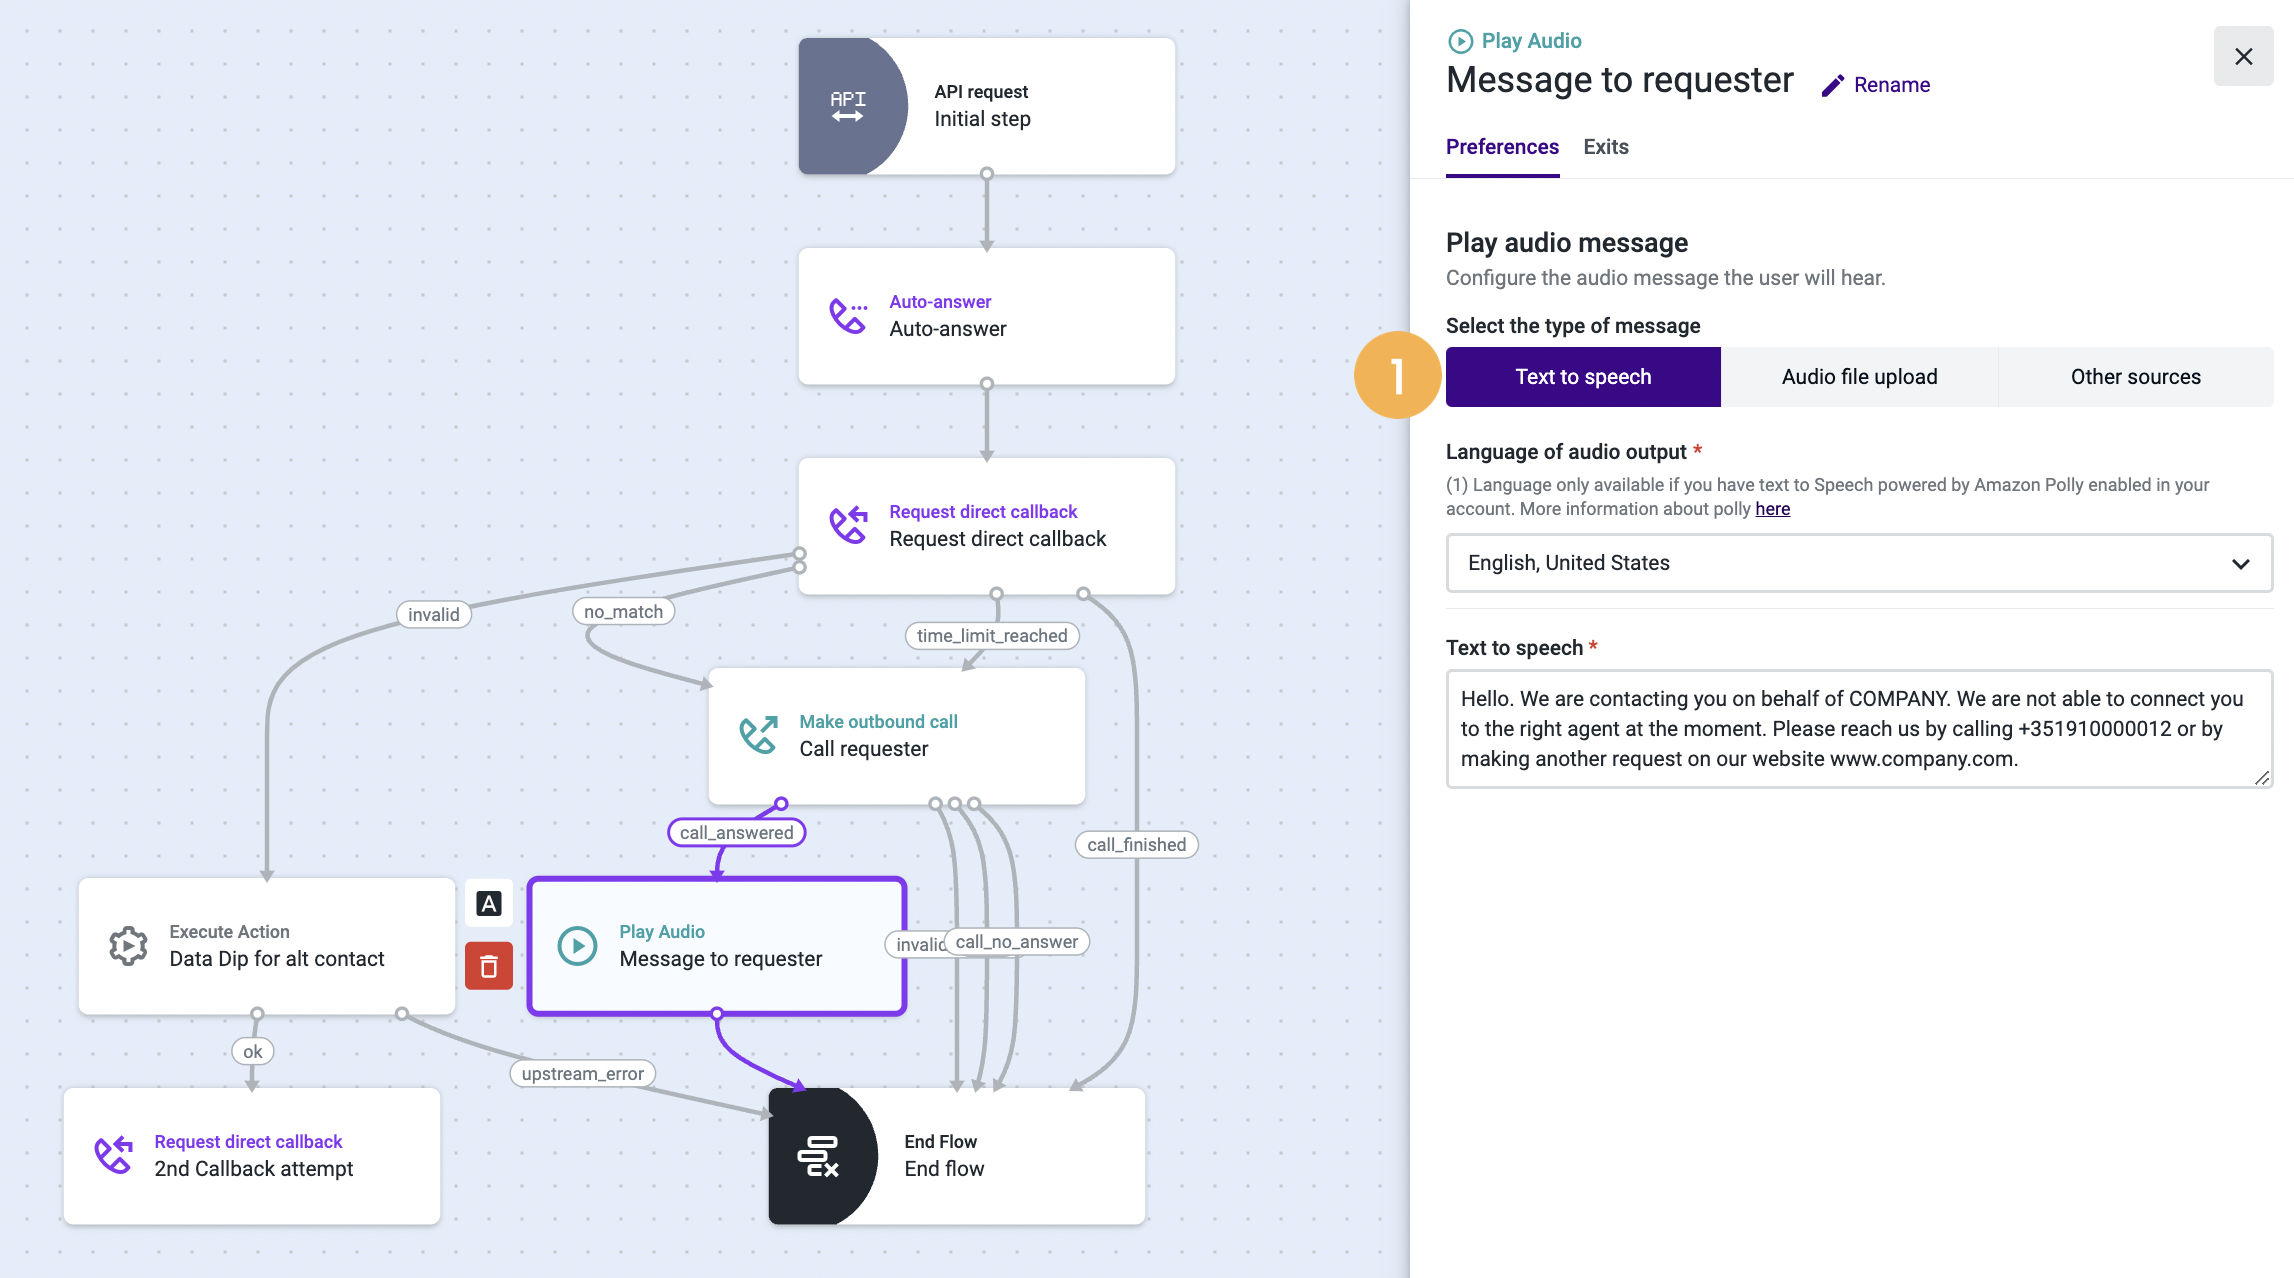
We configured the “Play audio” component by:
- Selecting the Text to speech option [1], and then, inserting the message we want to give to the requester.
We will end the flow after the message is played to the requester.
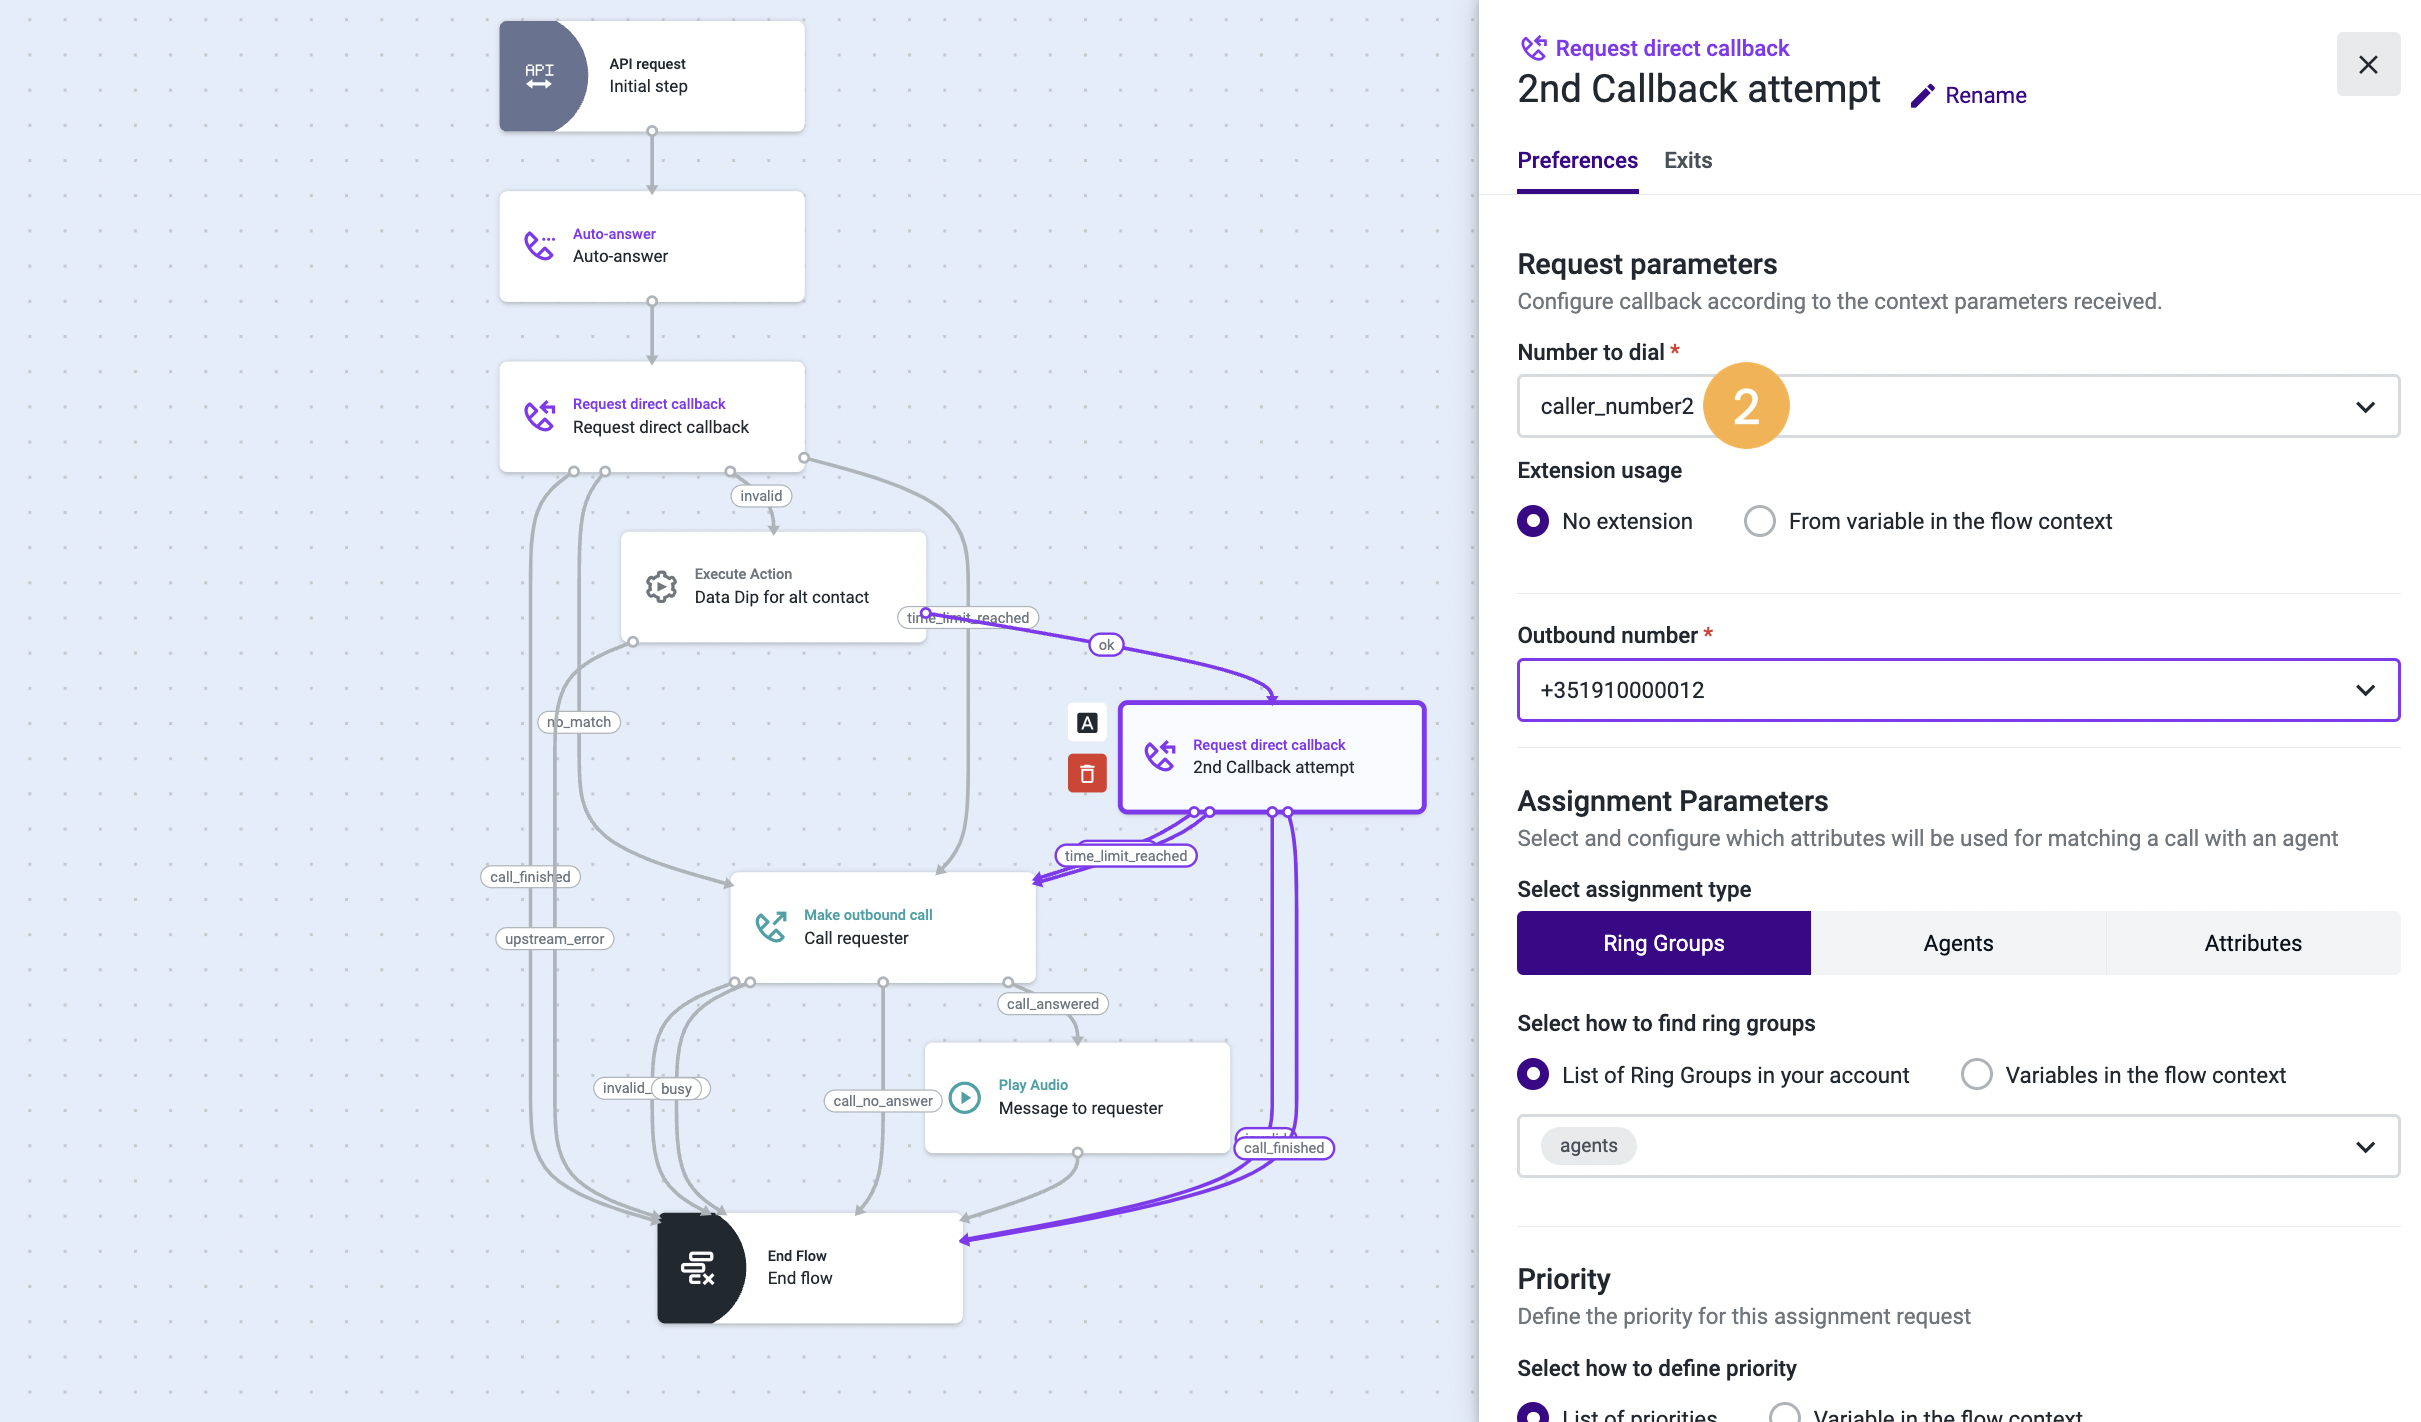
Then, we will configure the second “Request direct callback” attempt. We will define it the same way as we did in the previous Request direct callback component, with the following changes:
- Preferences tab > “Number to dial”: We will use the new “caller_number2” variable [2].
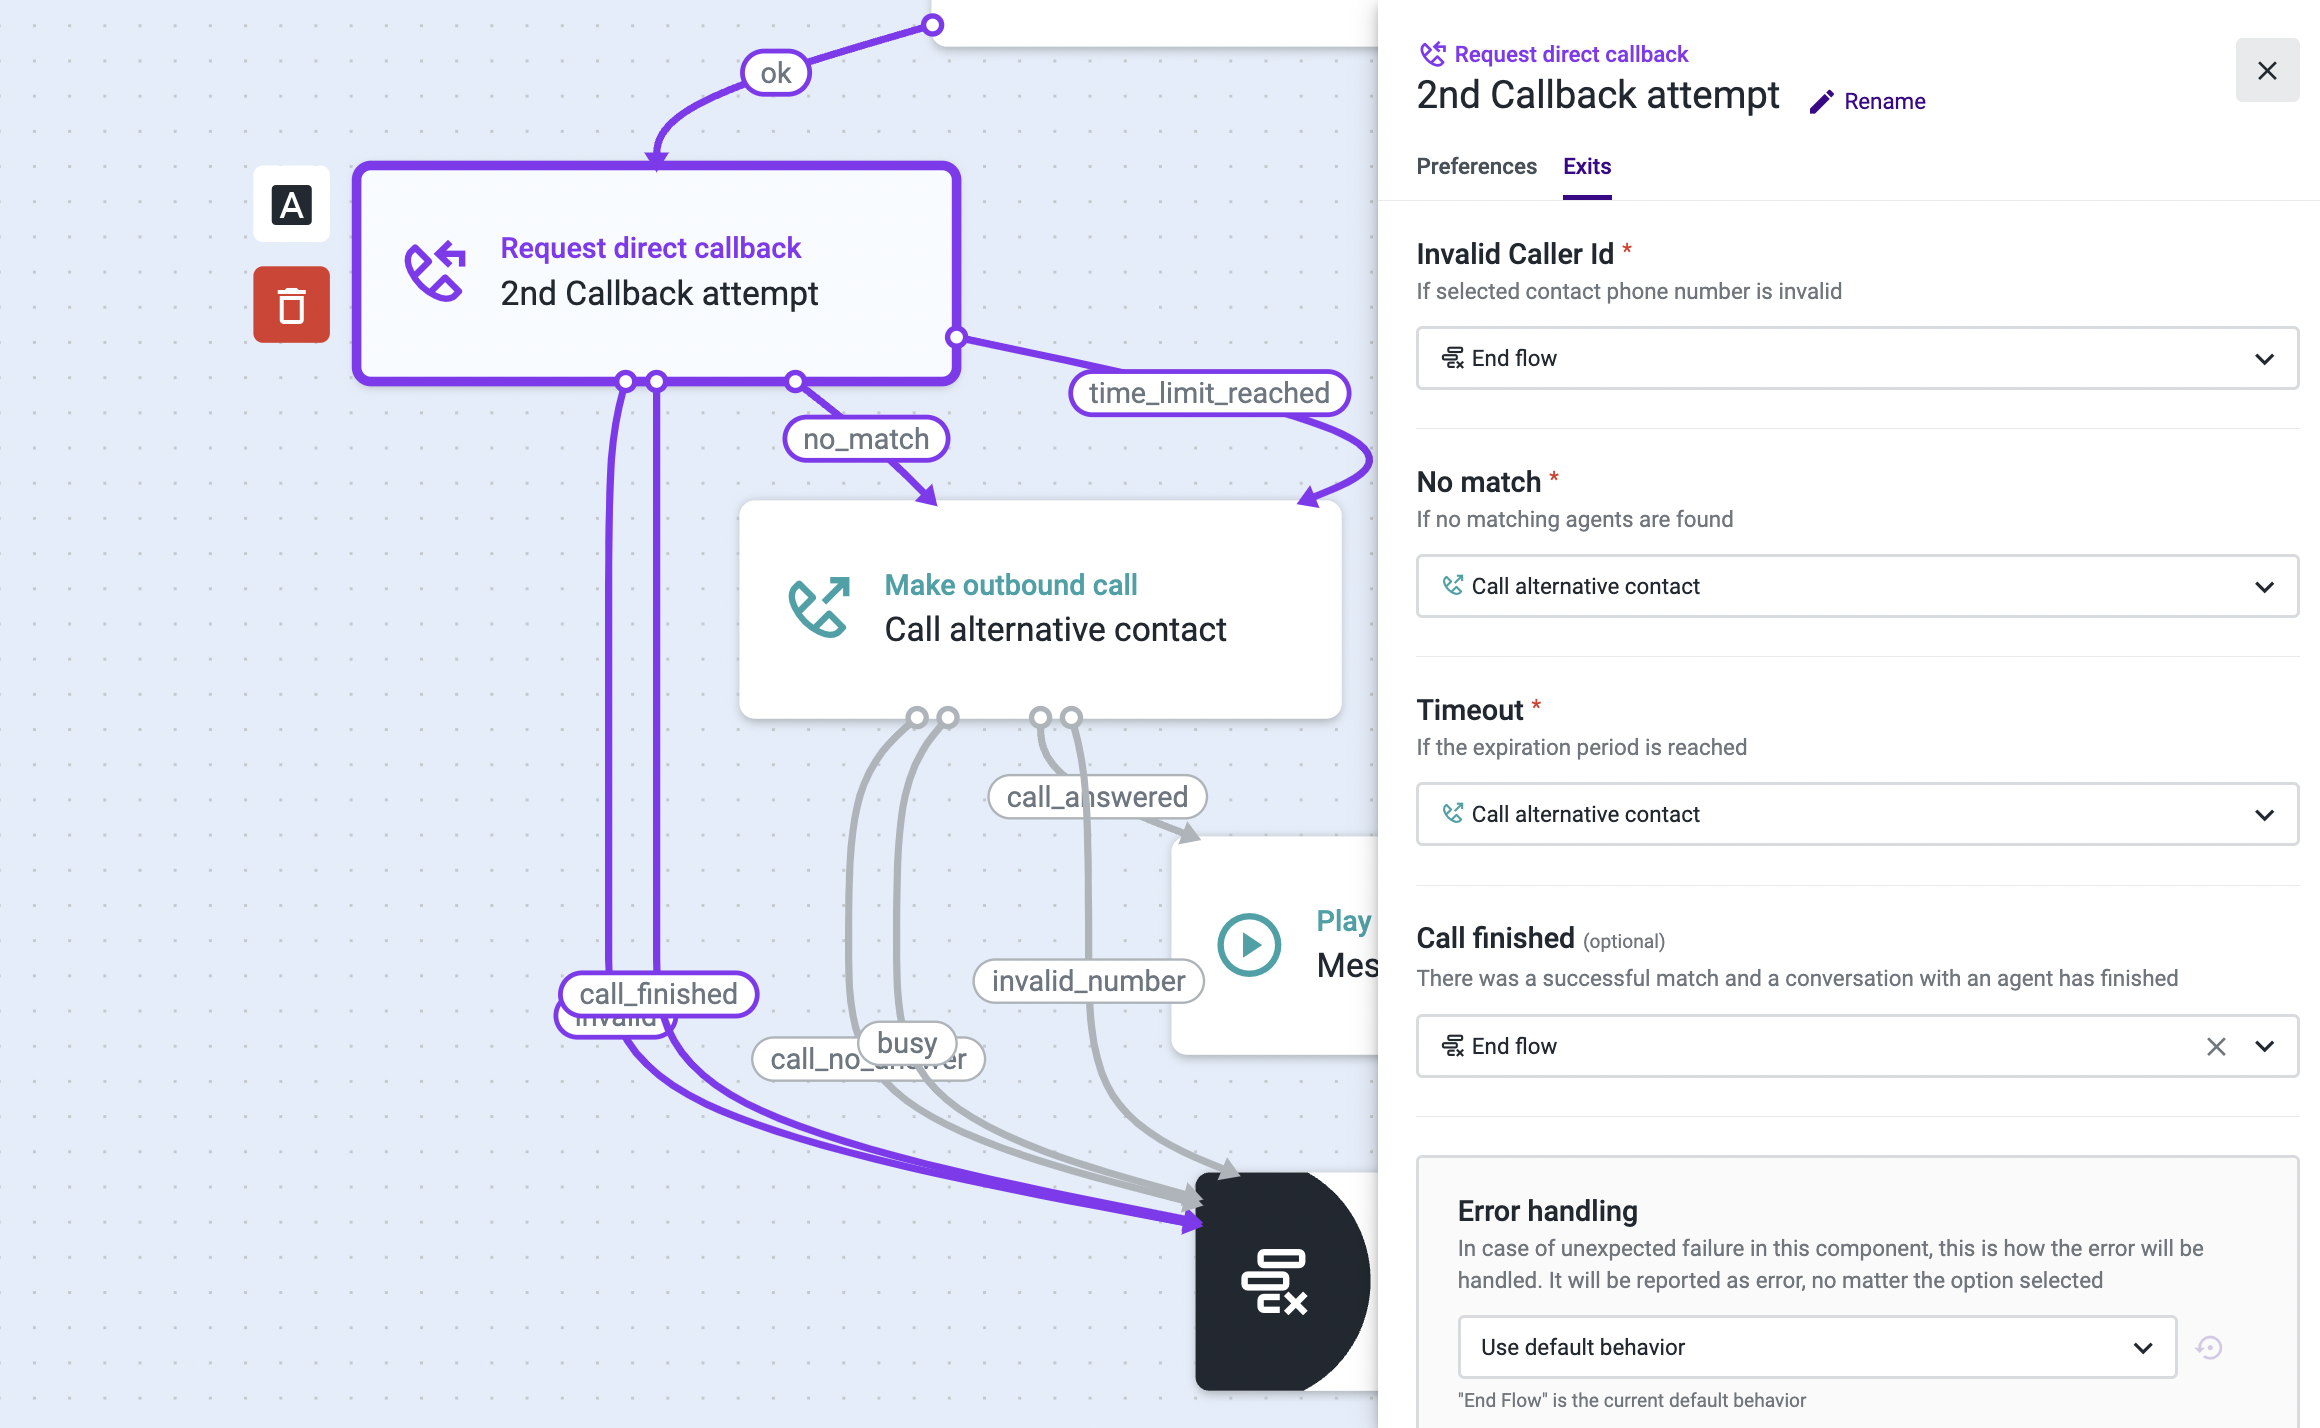
- Exits tab > “No match” and “Timeout” sections: Similarly to the first attempt, we want to inform the requester that it was not possible to connect them with an agent, so we will add a new “Make outbound call” component.
We can then configure the new “Make outbound call” component in the same way as we did previously, but with the following differences:
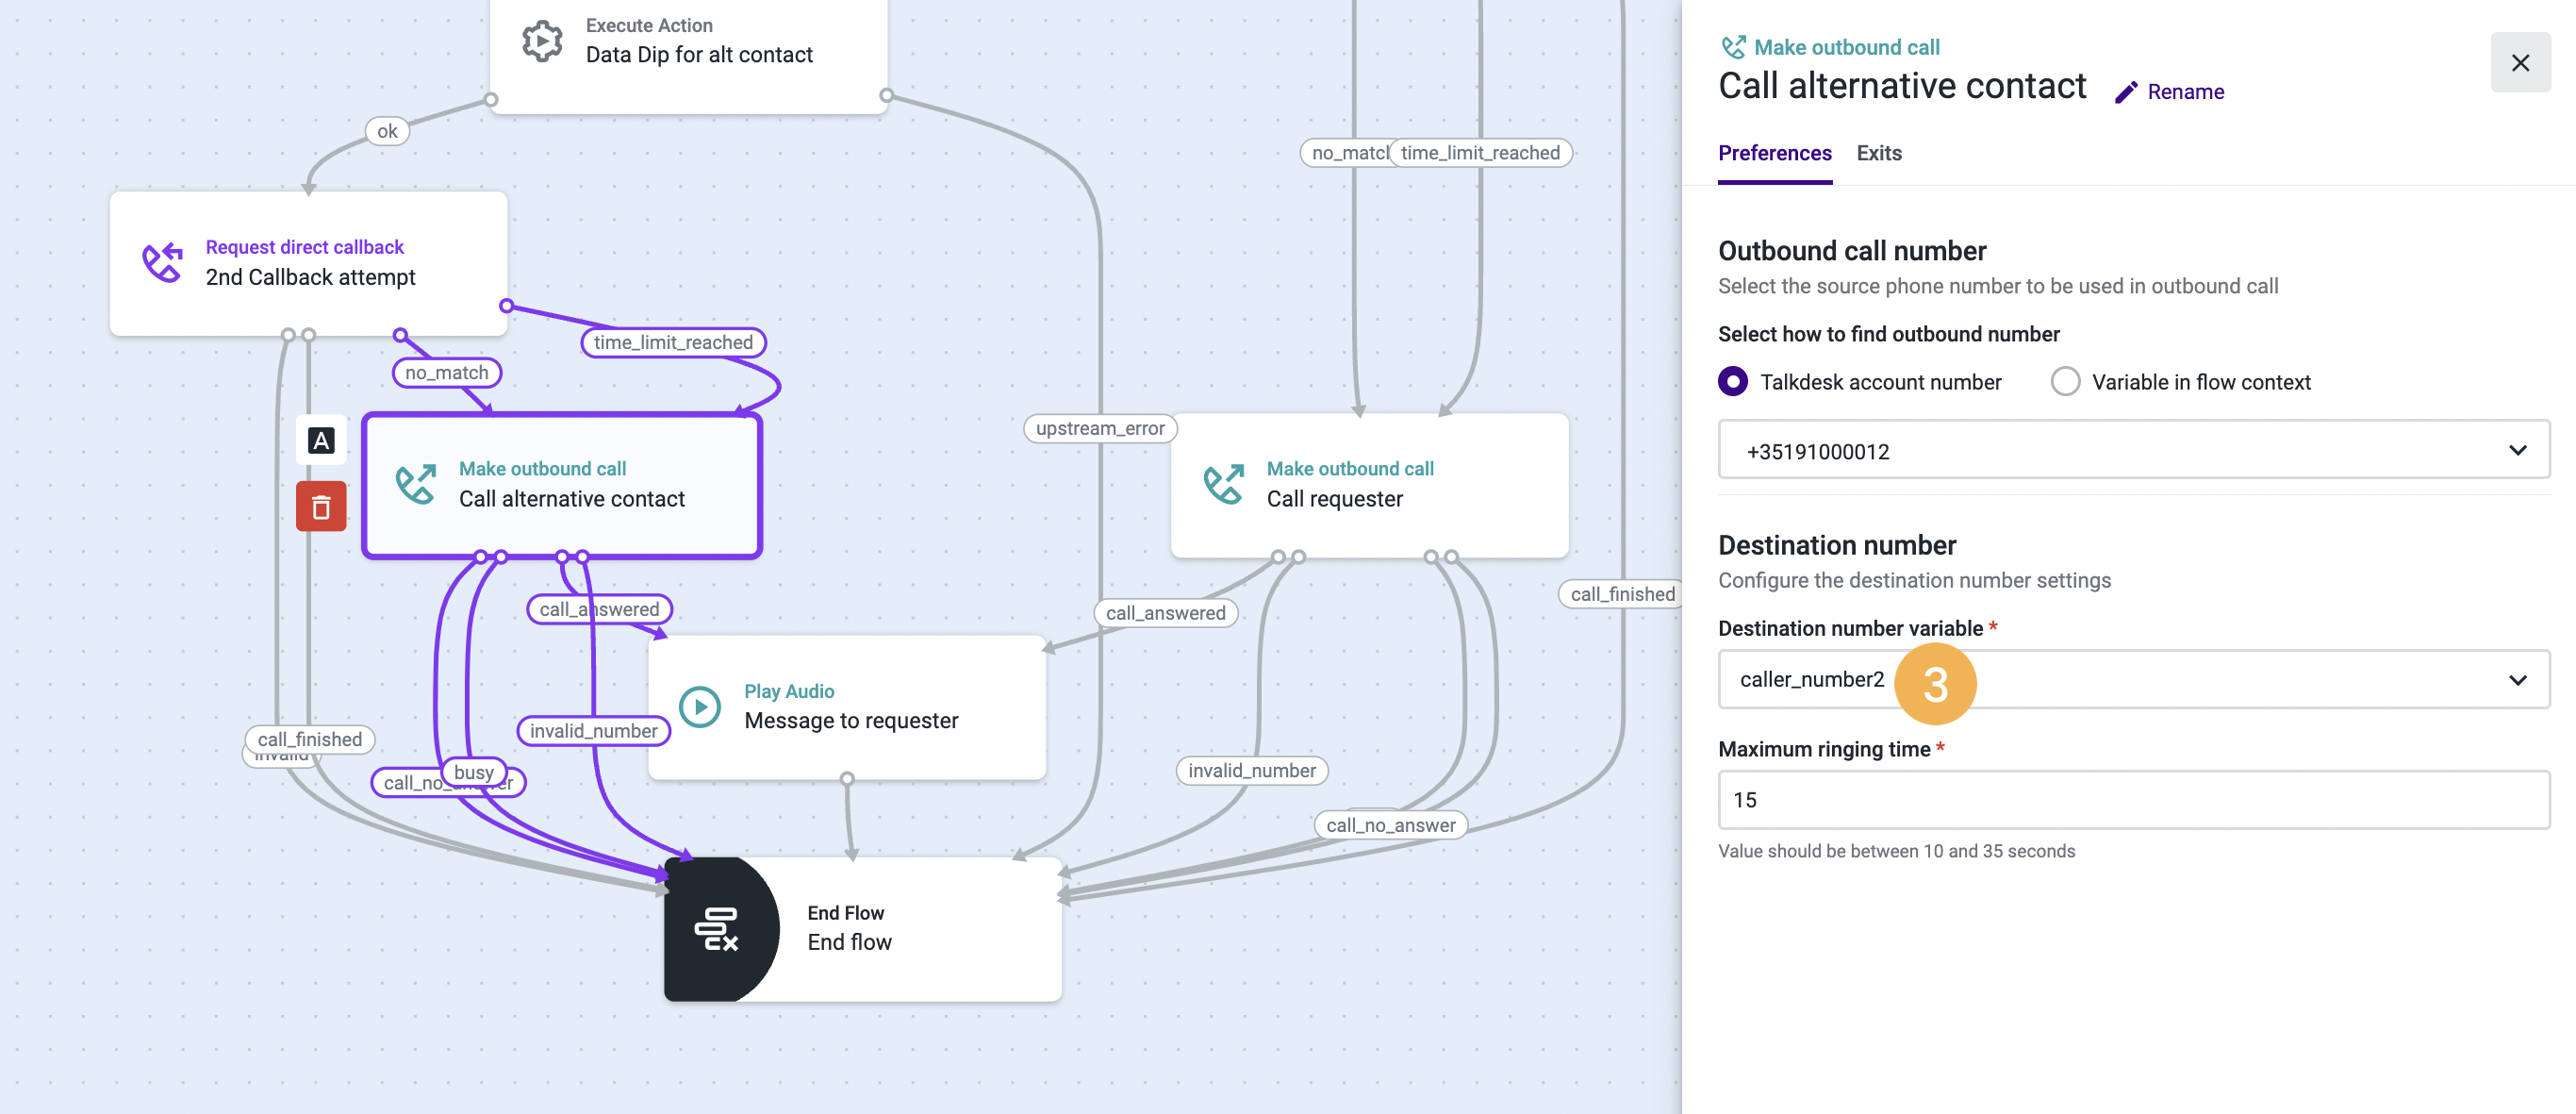
- Preferences tab > “Destination number variable”: We will use the “caller_number2” variable [3].
Then, you just need to Save the flow and then, hit the Publish button.
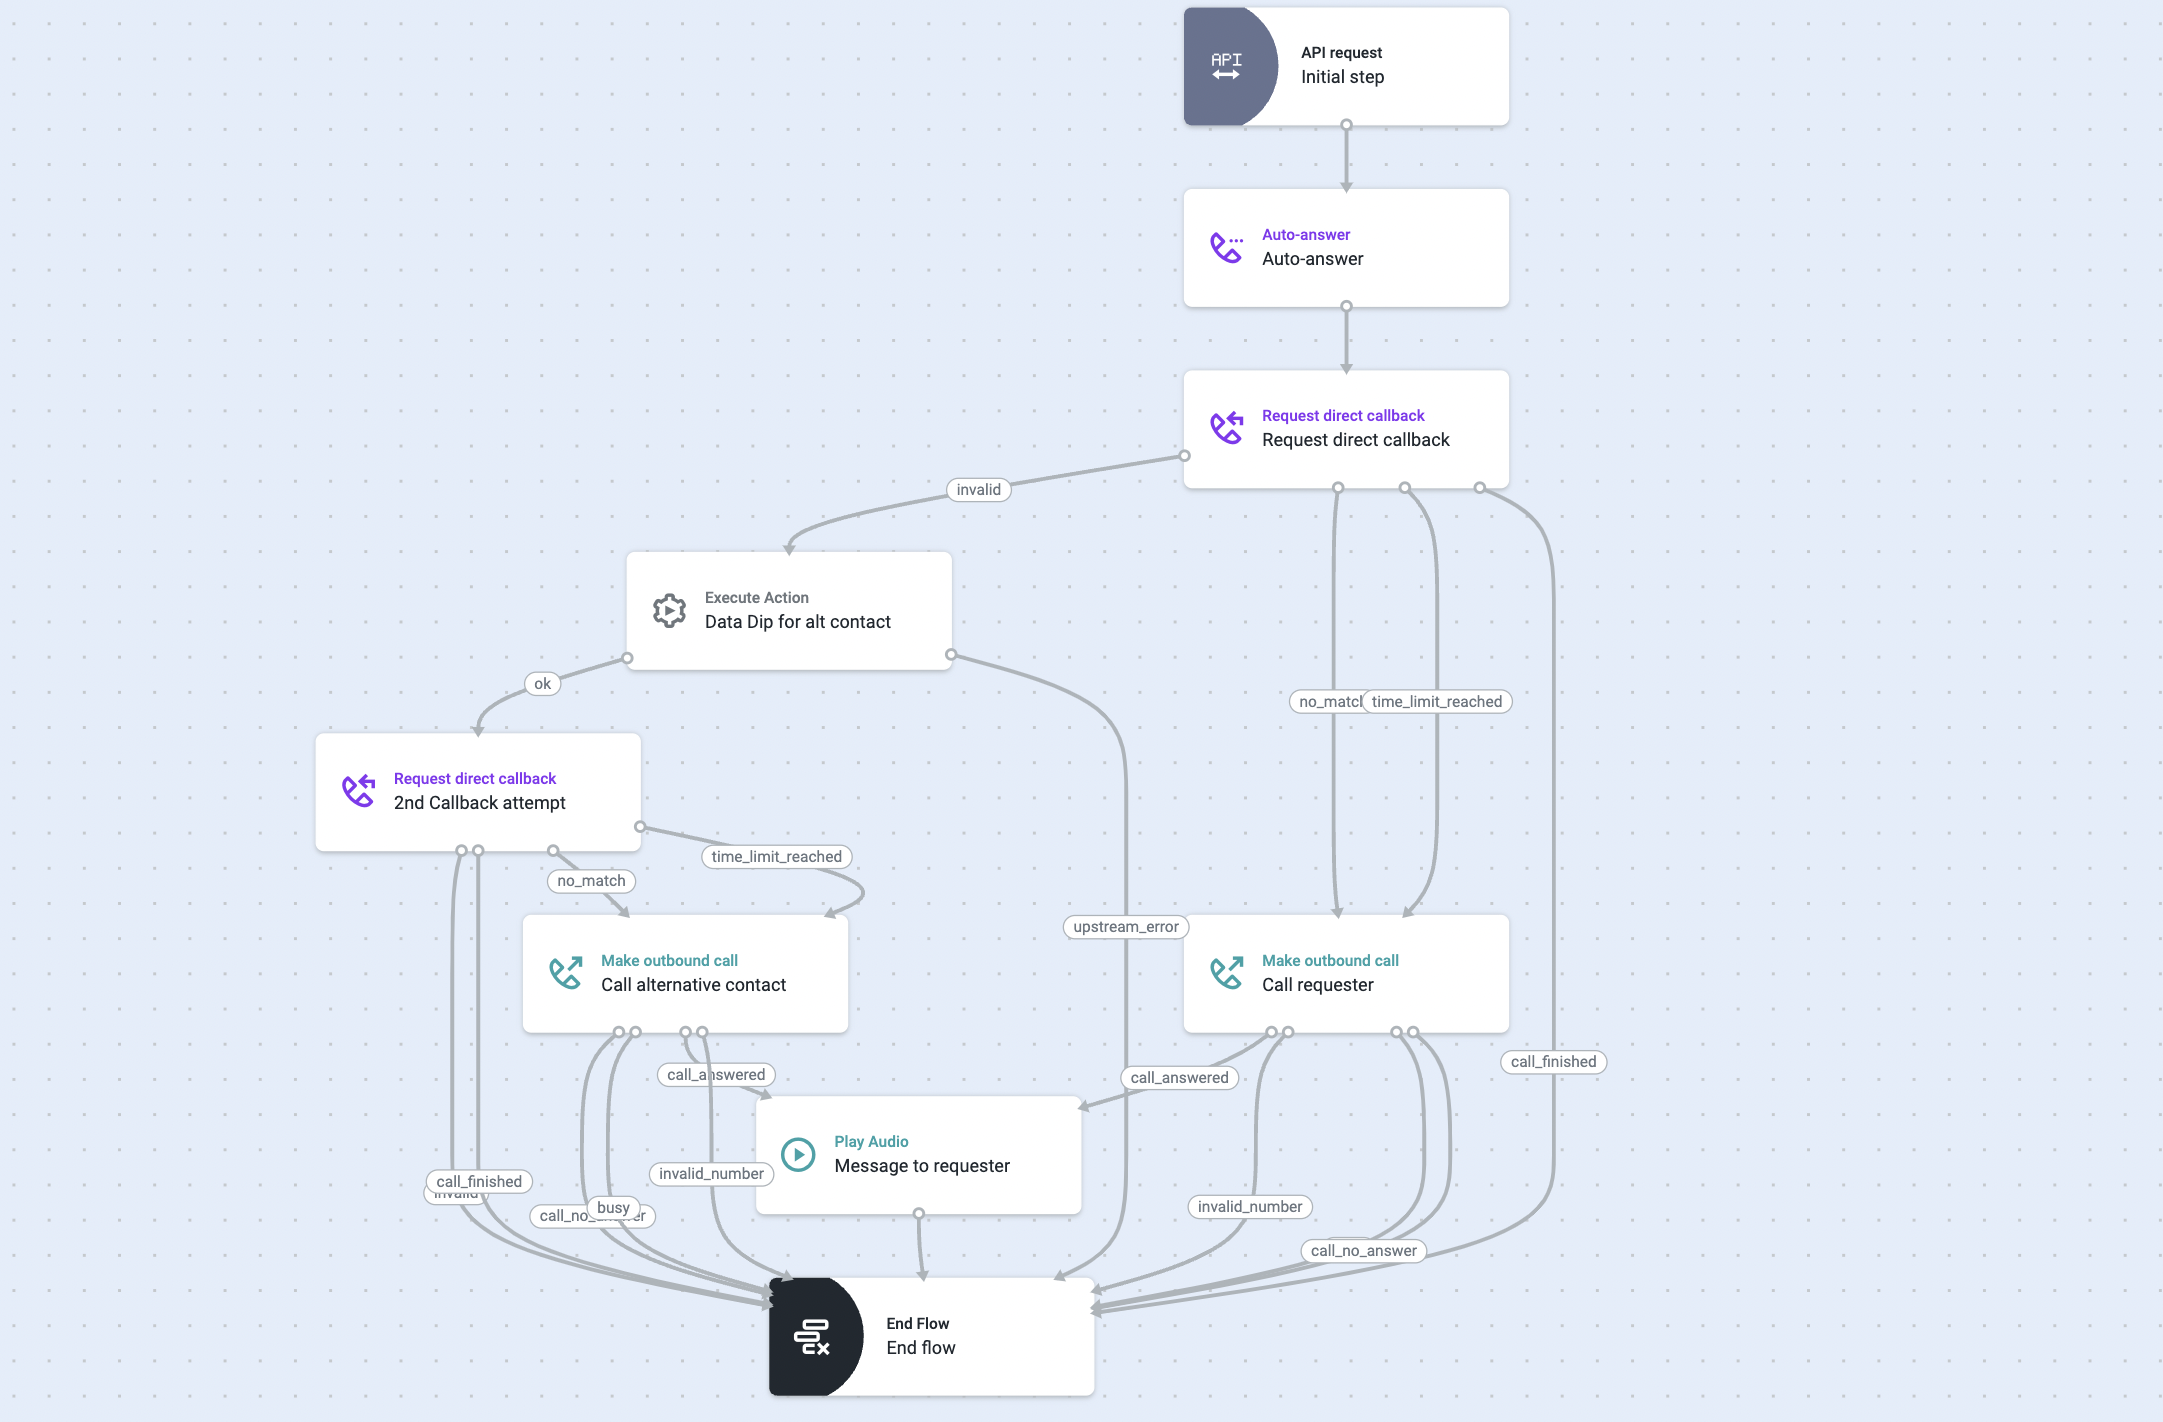
After configuring the flow, using Request direct callbacks and Auto-answer components, it will look like this:
Configuring the API Request
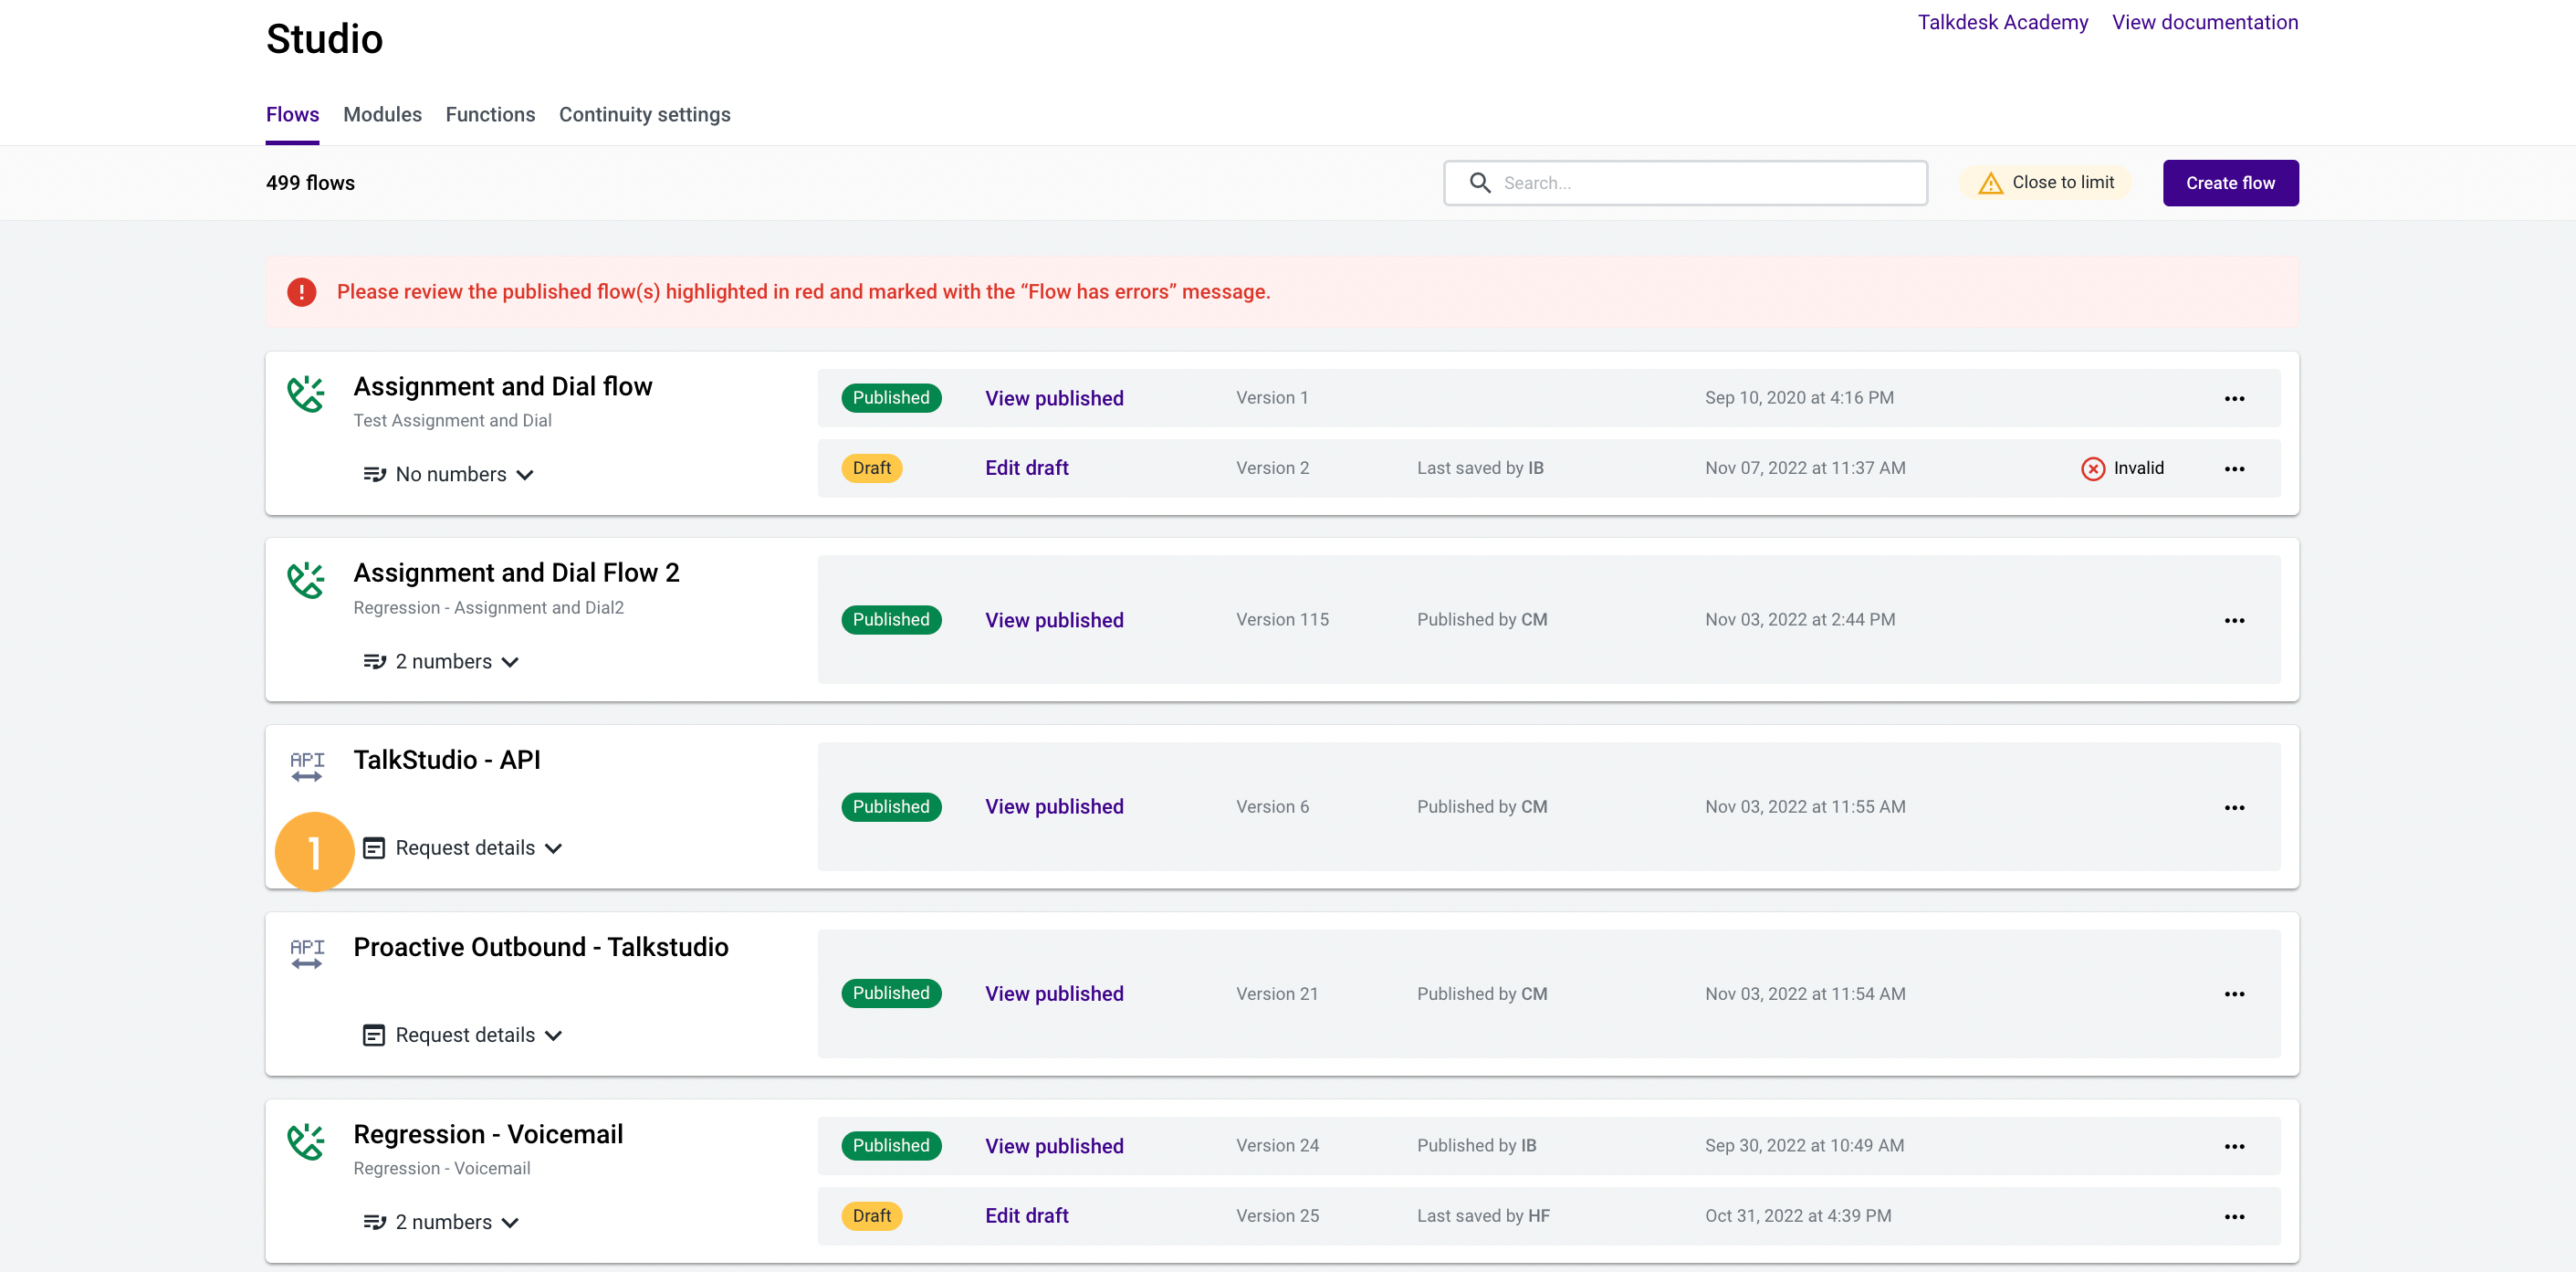
1. When you have finished configuring your flow, return to the Flow Manager page and click on the “Request details” option [1] of the flow you’ve just created.
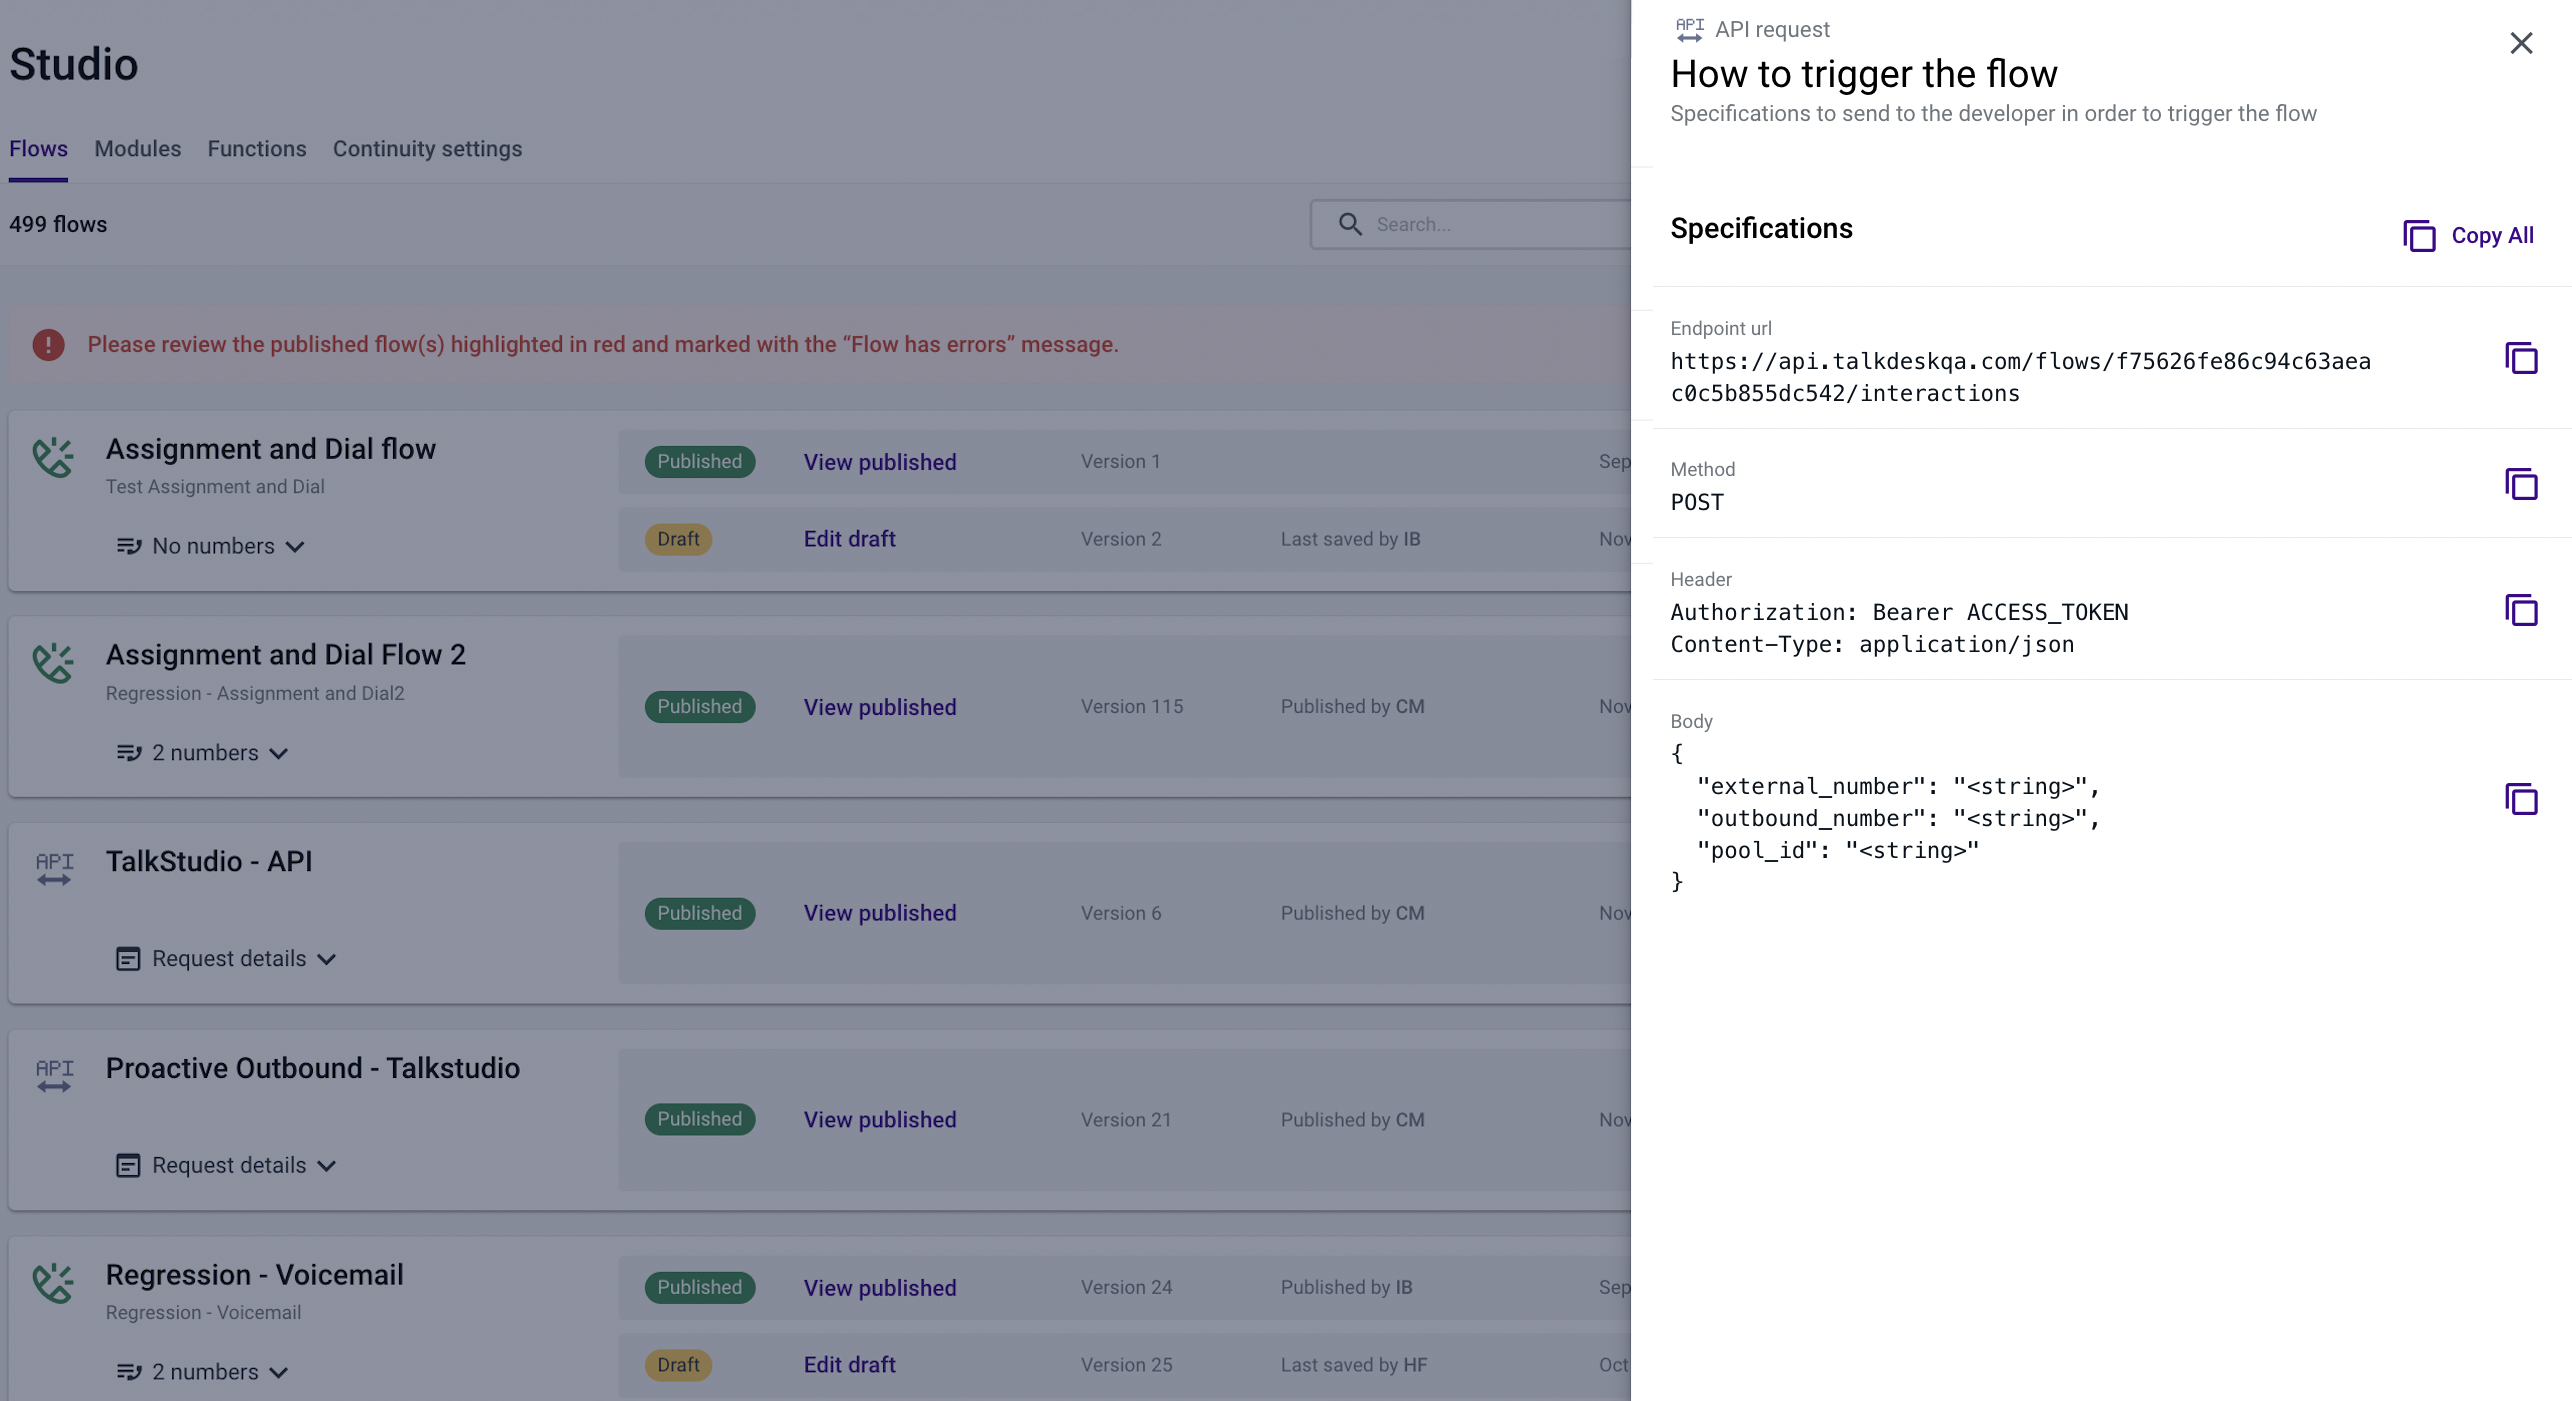
- A side panel containing relevant information for you to build the API request on your API development tool will be displayed.
Notes
- Through Talkdesk Builder™ it is possible to create an OAuth Client to get access to the Flows API. The scope for the Flow API, which starts an interaction that executes the published version of a given Studio flow, is flows-interactions:start. For more information about scopes, please refer to this article.
- String input arguments are the only data types that are currently supported. On your specific API request, the values will need to be replaced by the actual values to be sent in the request body.
- Additionally, check the instructions provided on this page in order to obtain all the necessary details about how to build the API request.
- Regarding "Request direct callback":
- The behavior of a callback is the following: The agent is ringed first, and then they accept the call. Upon accepting the call, the agent hears the following message, “This call is a callback request. Please hold, the customer will be connected to this call shortly”. The person that requested the callback is ringed only if the agent accepts the call.
- It is not possible to set the same “Request direct callback” component as an exit for “Invalid Caller ID”, “No Match”, and “Timeout” as it can originate endless loops.
- You cannot place another “Request direct callback” step immediately after the first “Request direct callback”.
Updated 3 months ago