Using Data from External APIs Containing Arrays
NoteIf you are in Talkdesk Workspace, you can access Studio and all features described below by navigating to the Studio app. For more information, please refer to this article.
This use case describes the process of setting up a Studio Flow using the "Execute action" component with an action containing arrays. Here, the external API will return an array containing the customer’s name and VIP status, and we will use that information to route the call.
Setting up the Custom Integration
-
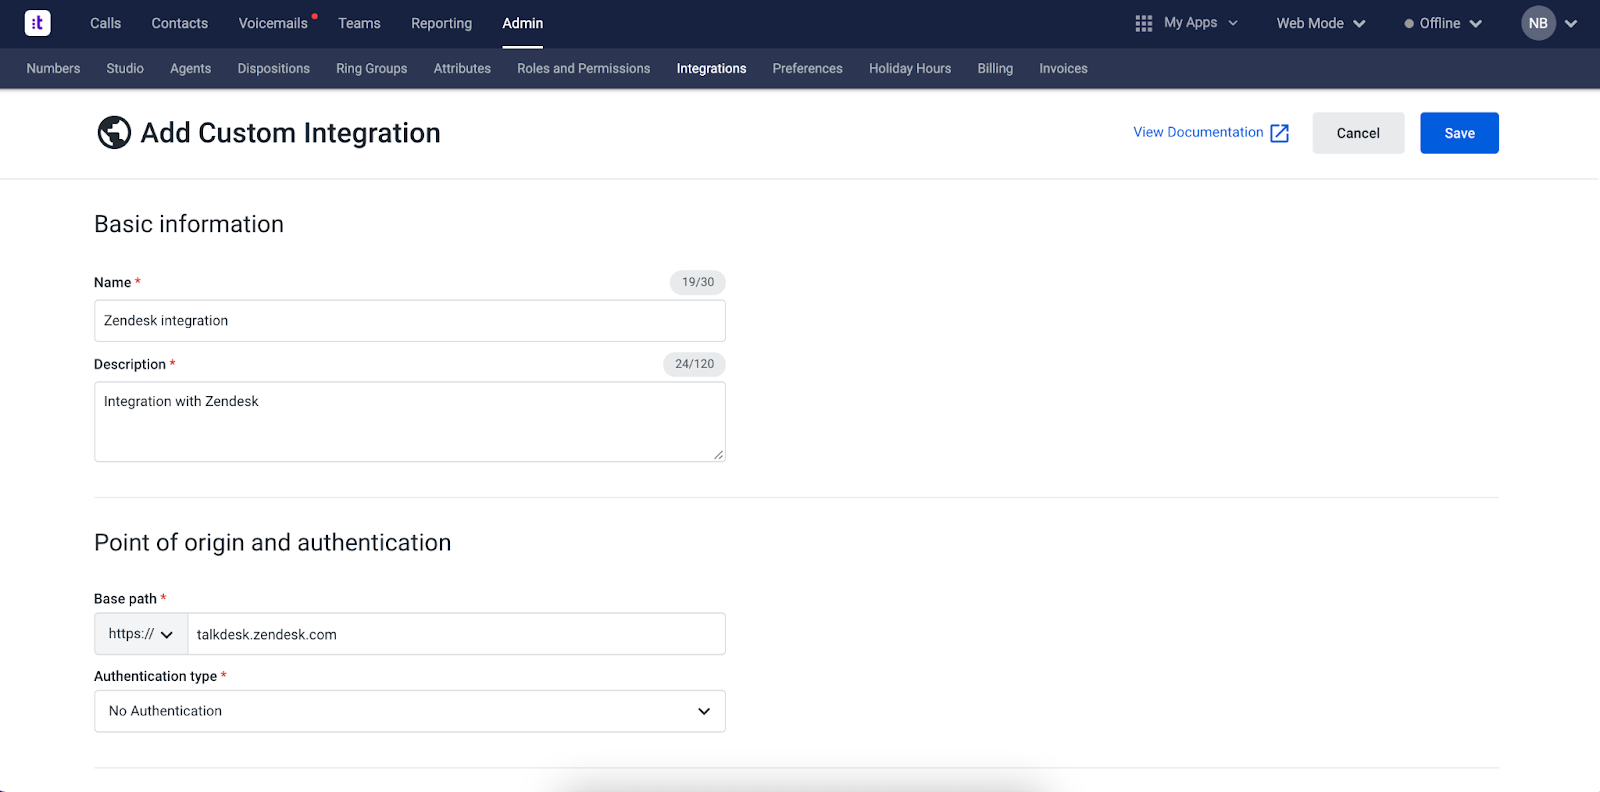
Create a custom integration. In our example, we will be creating a custom integration with Zendesk.
-
Then, create an action. To do it, go to the “Integrations Manager” page, select the newly created custom integration, and proceed to add the action.
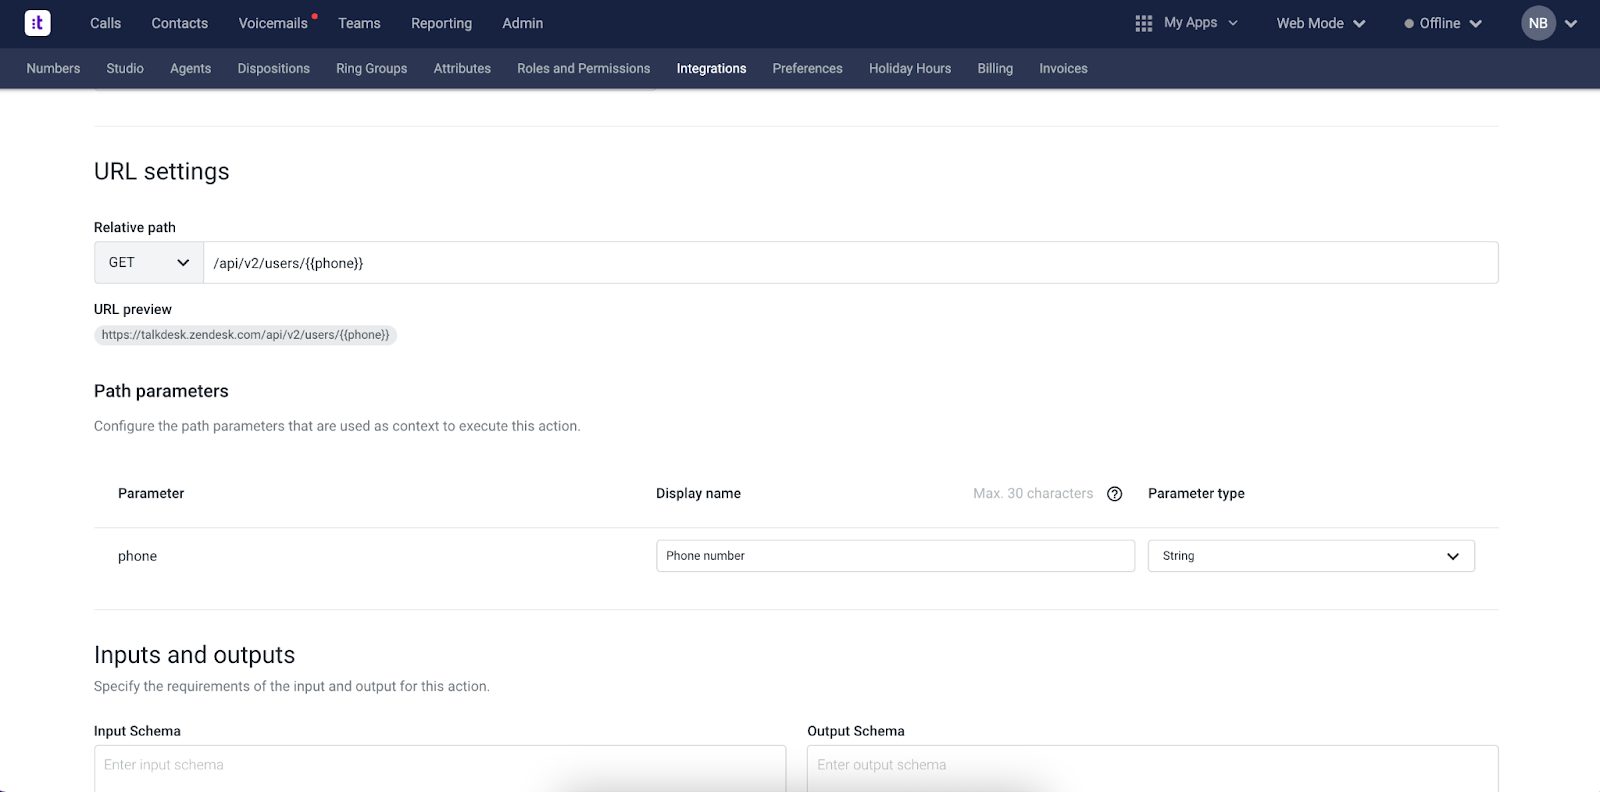
- Give it a name and a description, and fill out the “URL Settings” fields. In this example, we want to get information from the CRM system about our customers: their name and their VIP status, so we will fill in the URL settings as shown above. The path parameter will be the phone number, which will be used to retrieve information. We will then name it “Phone number” and select the “String” type from the drop-down list.
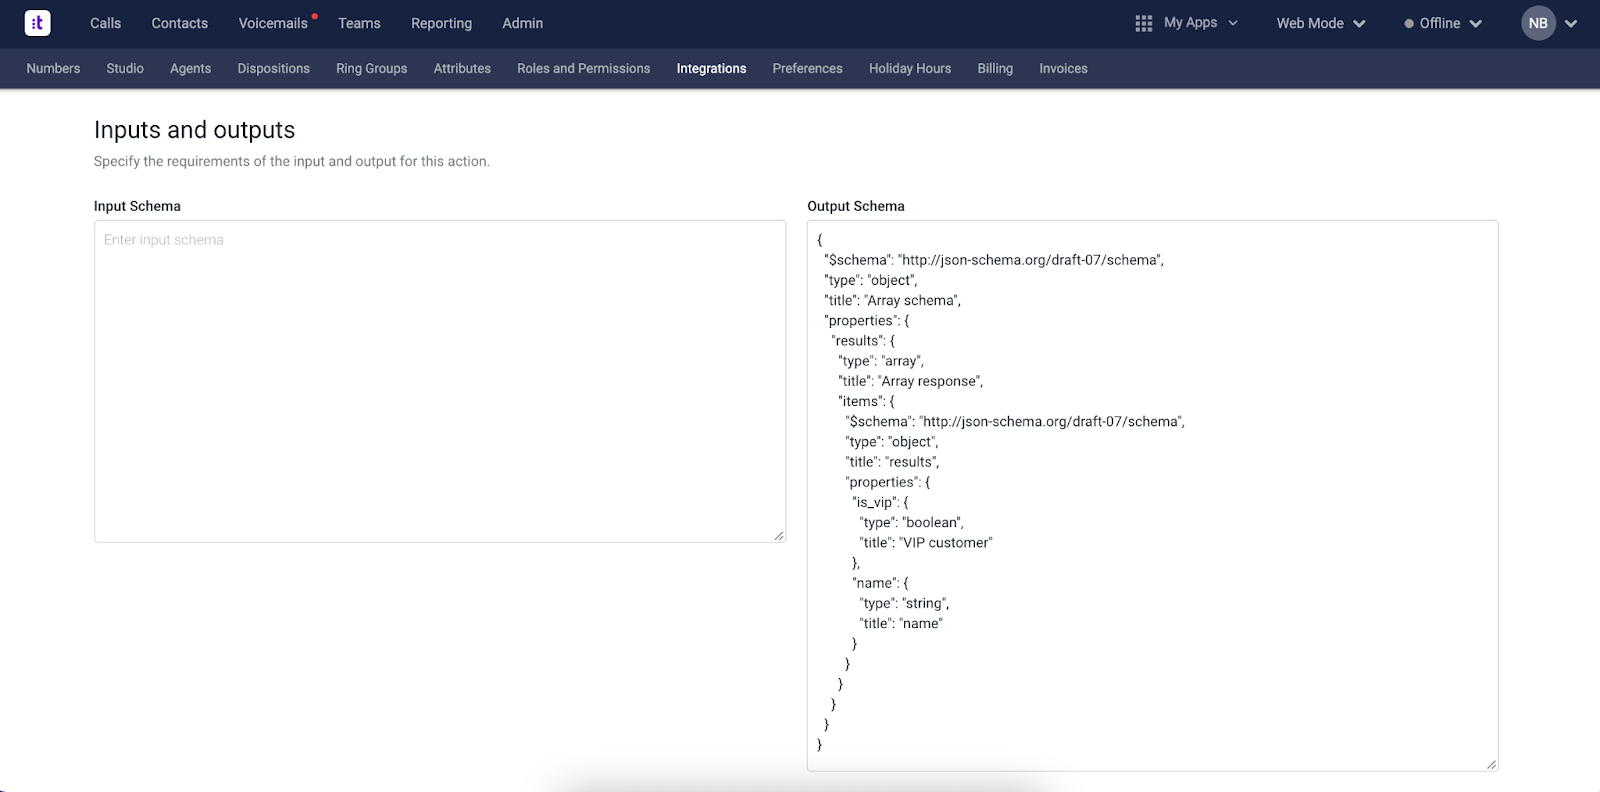
- Since we will be making a data dip onto the CRM system, we need to define the output schema. For our example, we will use the schema shown here.
{
  "$schema": "http://json-schema.org/draft-07/schema",
  "type": "object",
  "title": "Array schema",
  "properties": {
    "results": {
      "type": "array",
      "title": "Array response",
      "items": {
        "$schema": "http://json-schema.org/draft-07/schema",
        "type": "object",
        "title": "results",
        "properties": {
          "is_vip": {
            "type": "boolean",
            "title": "VIP customer"
          },
          "name": {
            "type": "string",
            "title": "name"
          }
        }
      }
    }
  }
}
Setting up the Studio Flow
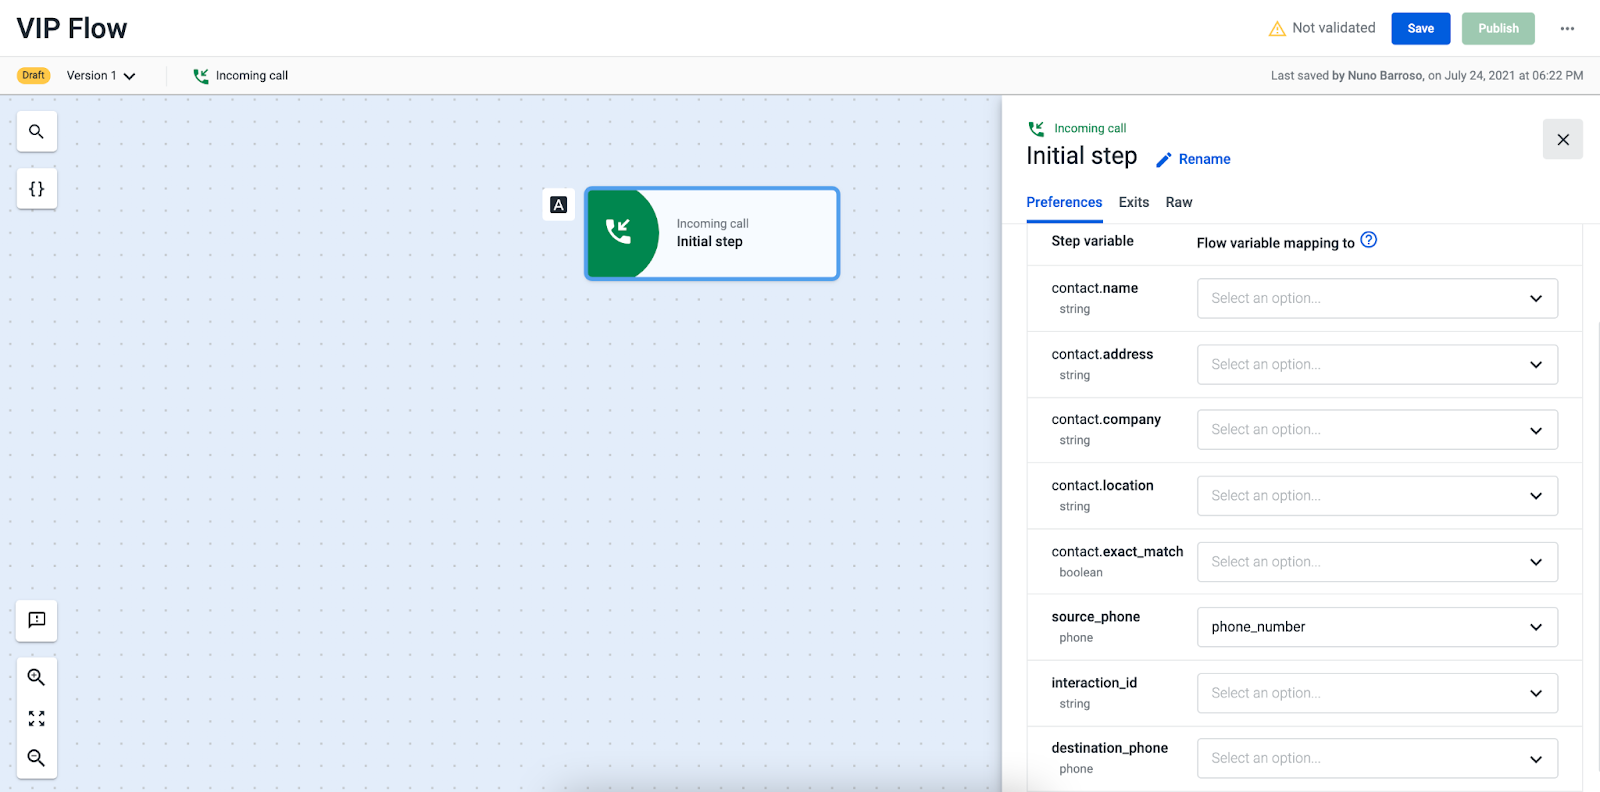
- Once that our custom integration and action are created, we will create a Studio inbound flow. In the initial step, we will define the phone number as a variable to be used in the current Studio flow.
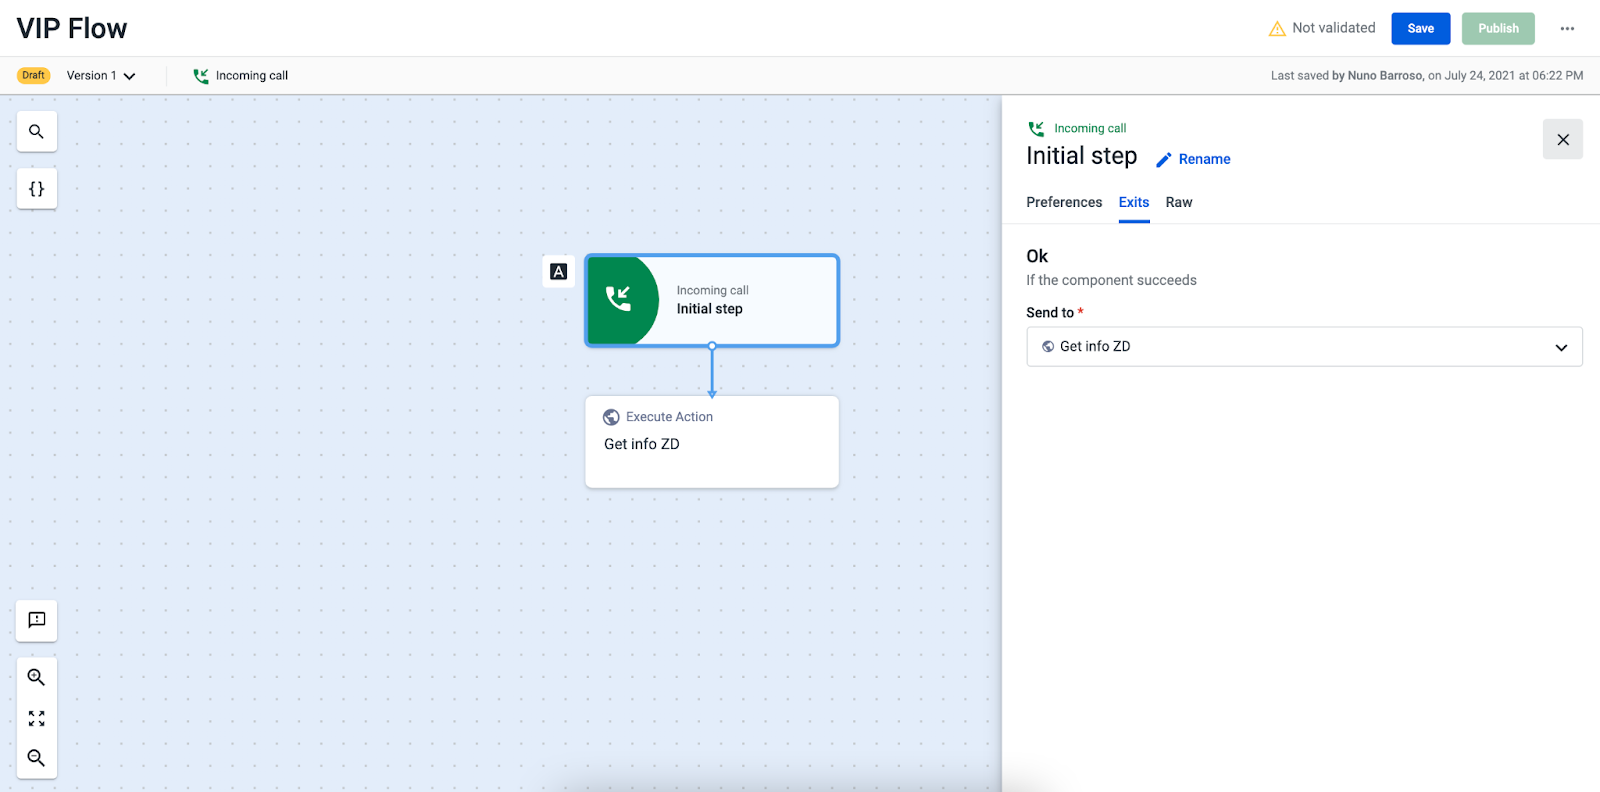
- Then, we can add the “Execute action” component, which will allow us to make a data dip using the custom integration and action that we previously created.
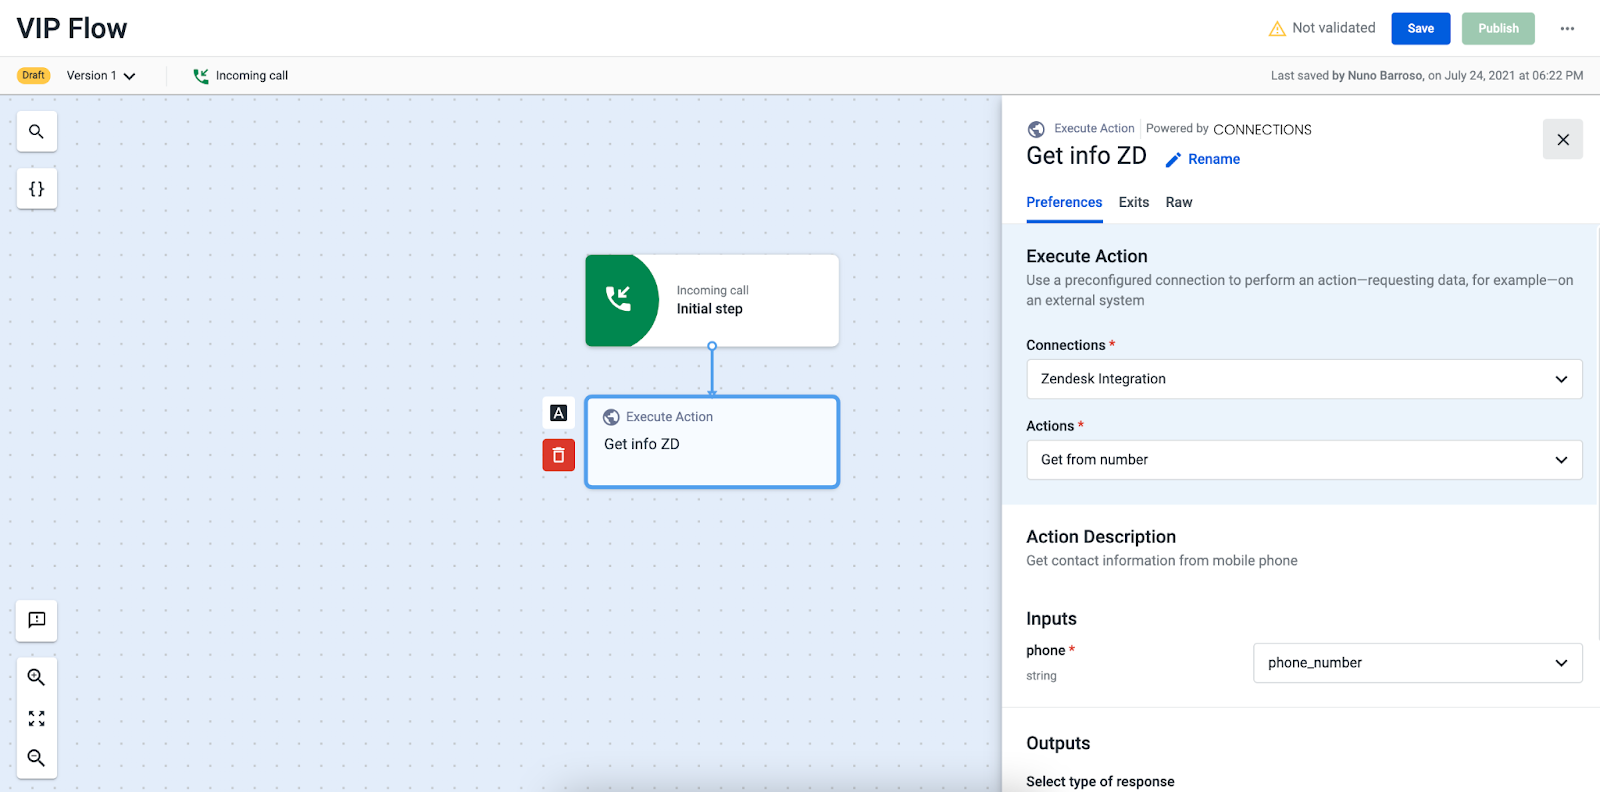
- Fill in the Preferences tab of the "Execute action" component as detailed below:
- Select a custom integration - in this case, we select the one we previously created - “Zendesk Integration”.
- Select an action - in this case, we also select the action we previously created - “Get from number”.
- Define the inputs - in this case, we will use the caller’s phone number.
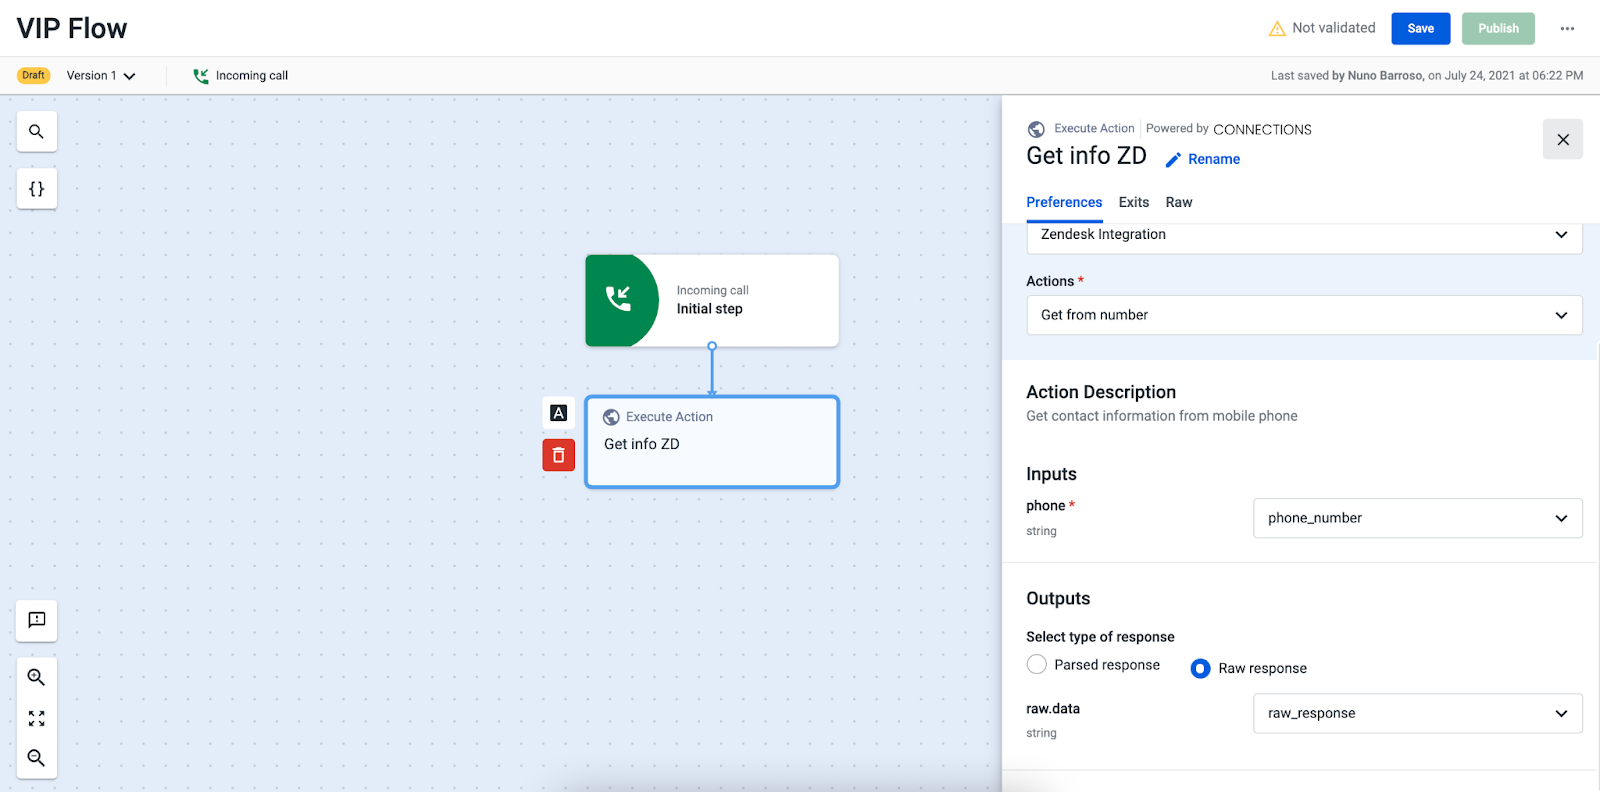
- Since the output returns an array, we must select the “Raw response” option for the outputs. This will convert the whole response into a string variable (including the array field), that can later be parsed using the “Run function” component*. For that, we selected the “Raw response” option and then created a variable named “raw_response”.
Setting up the Studio Function
NotePlease be aware that to set up the Studio Function, you will need to use the Run Function component. If you wish to start using it, please get in touch with your CSM (Customer Success Manager).*
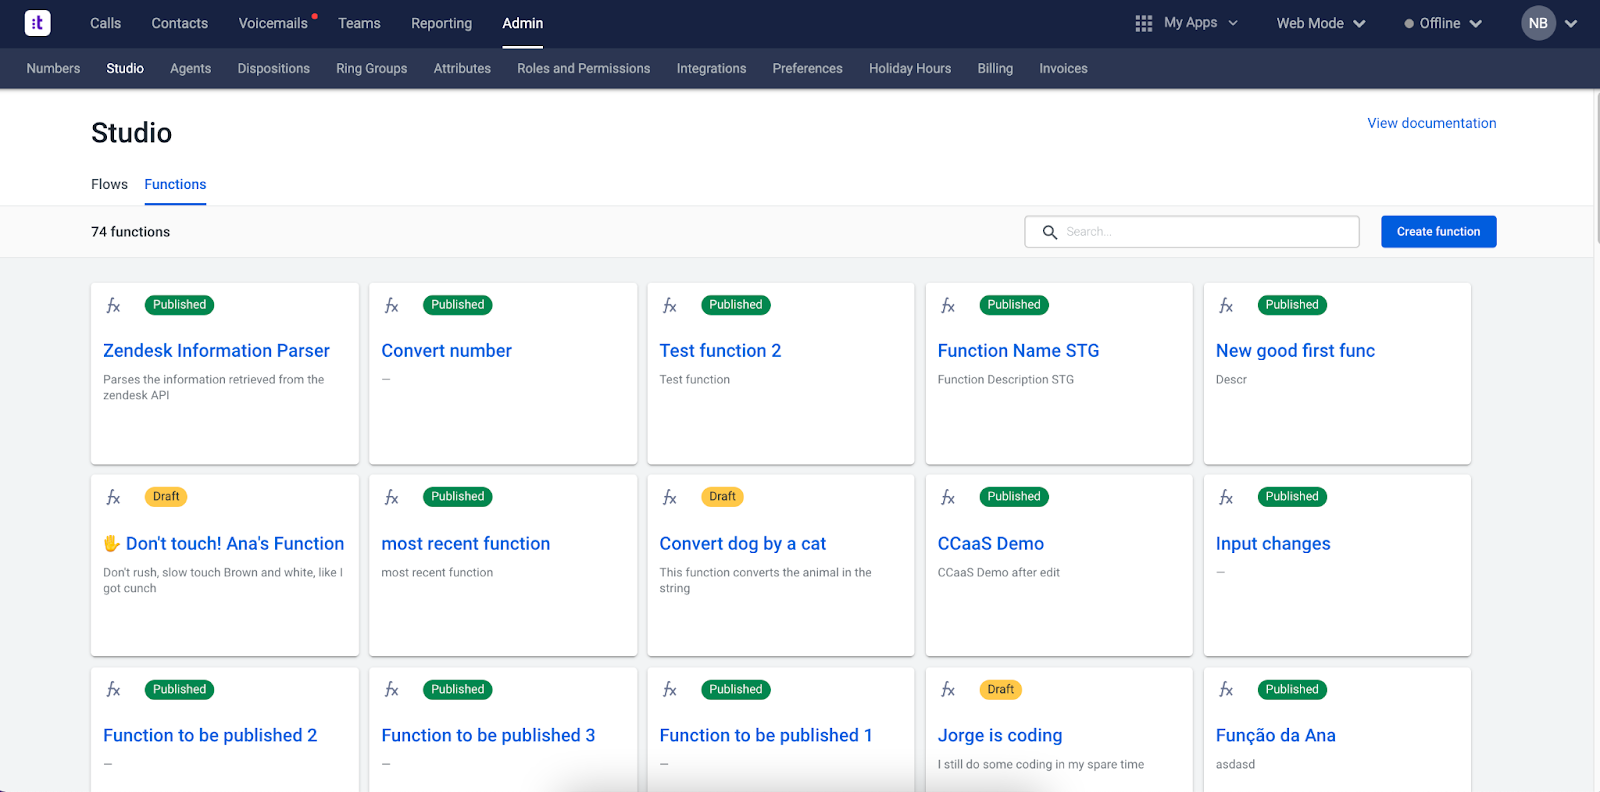
- To be able to use the “Run function” component, we need to create a Function. For this, we need to go to Admin > Studio > Functions > Create Function.
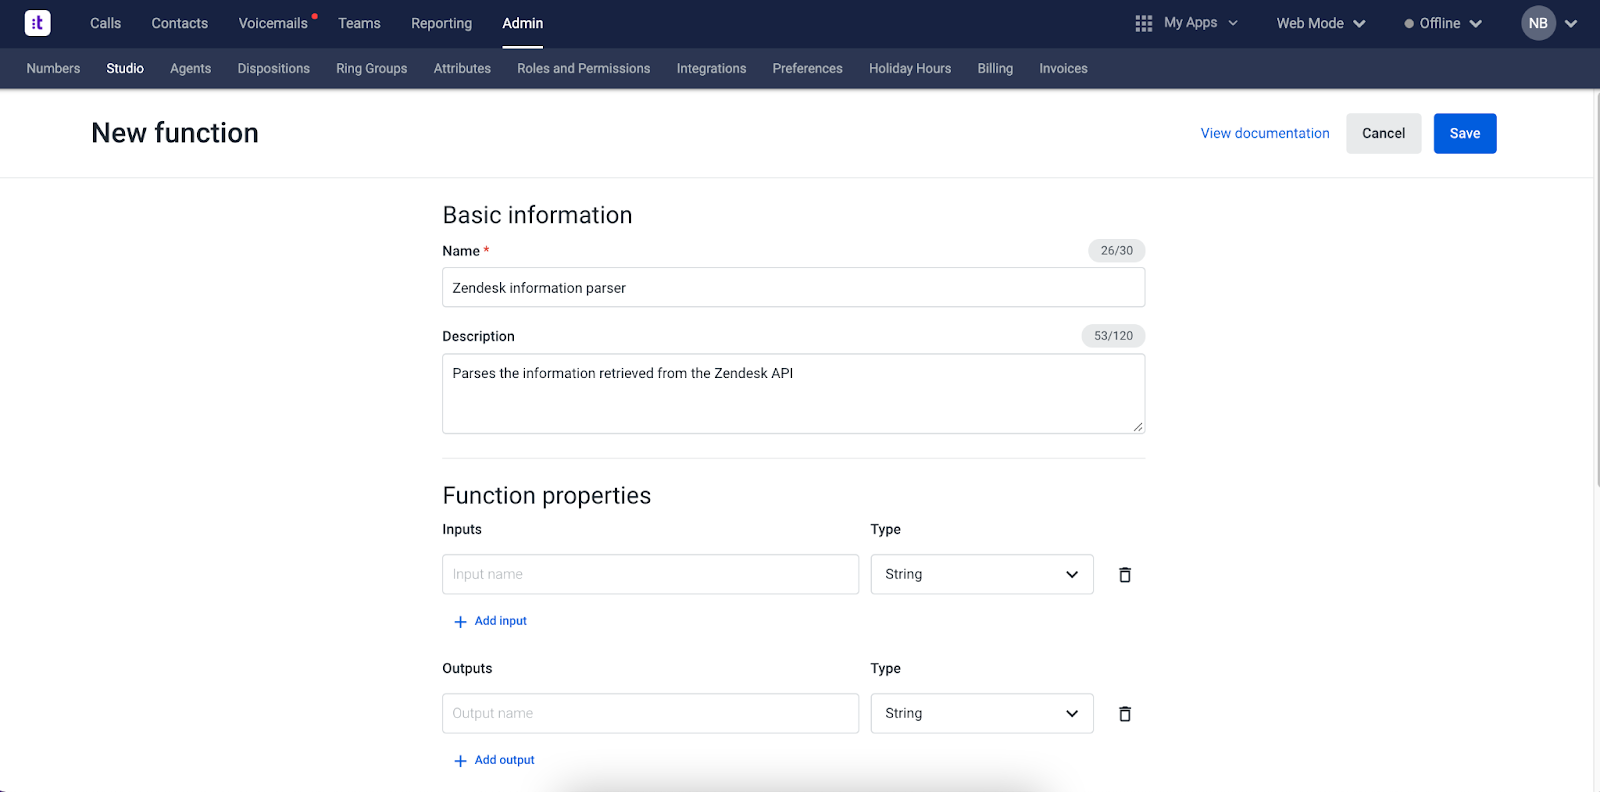
- Add a name and a description to your Function and fill in the “Function properties” section:
- “Inputs”: this will be the field that will be populated with the output from the “Execute Action” component. In our example, we will name the input as “raw_response” and set it as “String”.
- “Outputs”: we will set up the information that we want to parse. In our example, we will parse the name and the customer VIP status - we will set the first output as “is_vip” and set the type as “Boolean” and after pressing Add output to add the second output, it will be set as “name” and its type will be “String”.
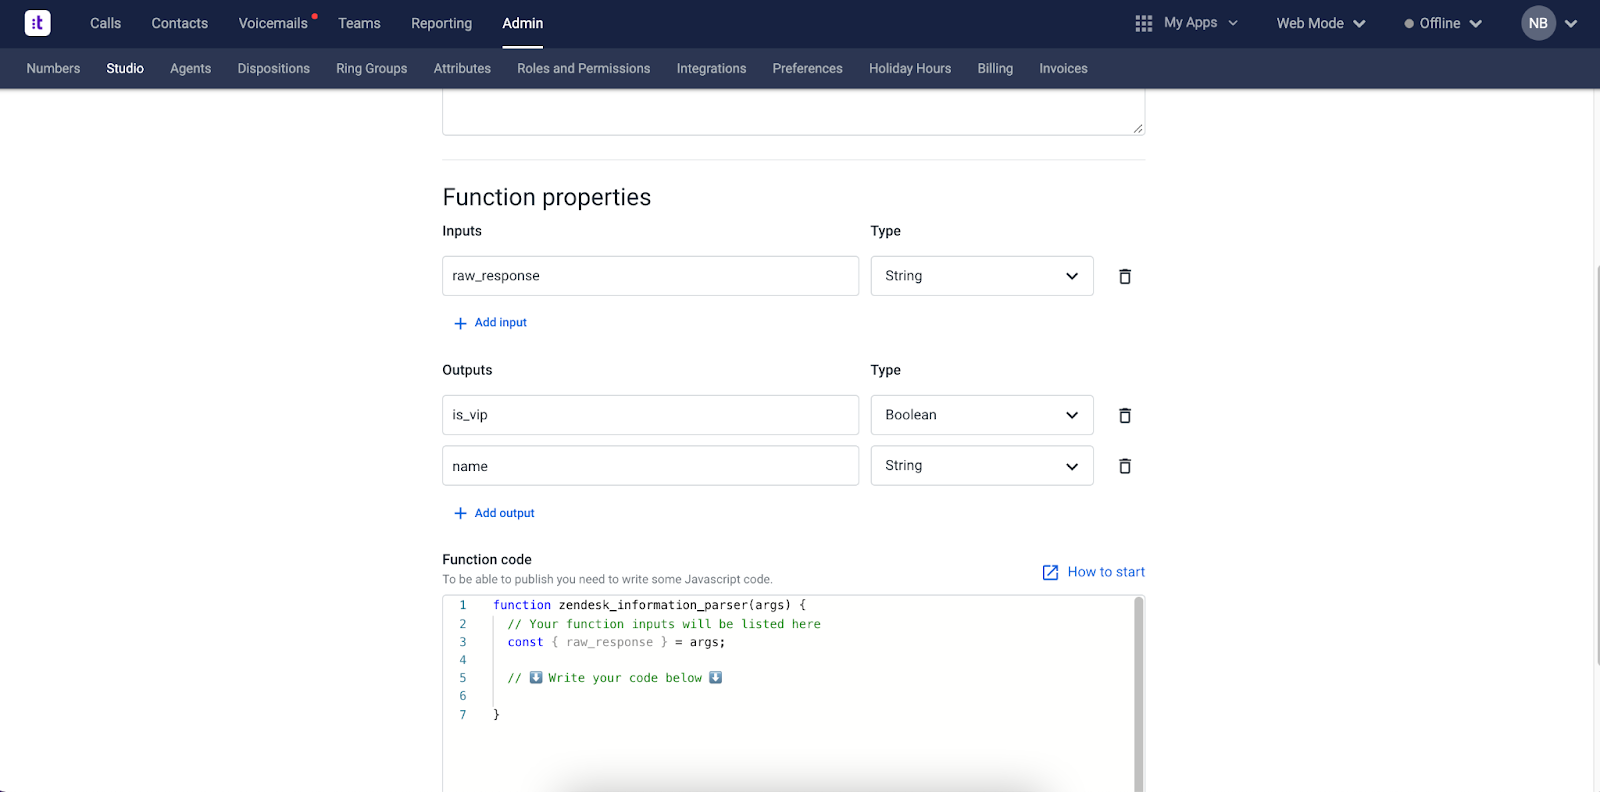
- Then, we will need to define the “Function code” by writing the desired lines of code after the line that says “Write your code below”. For our example, this is the code we will be using:
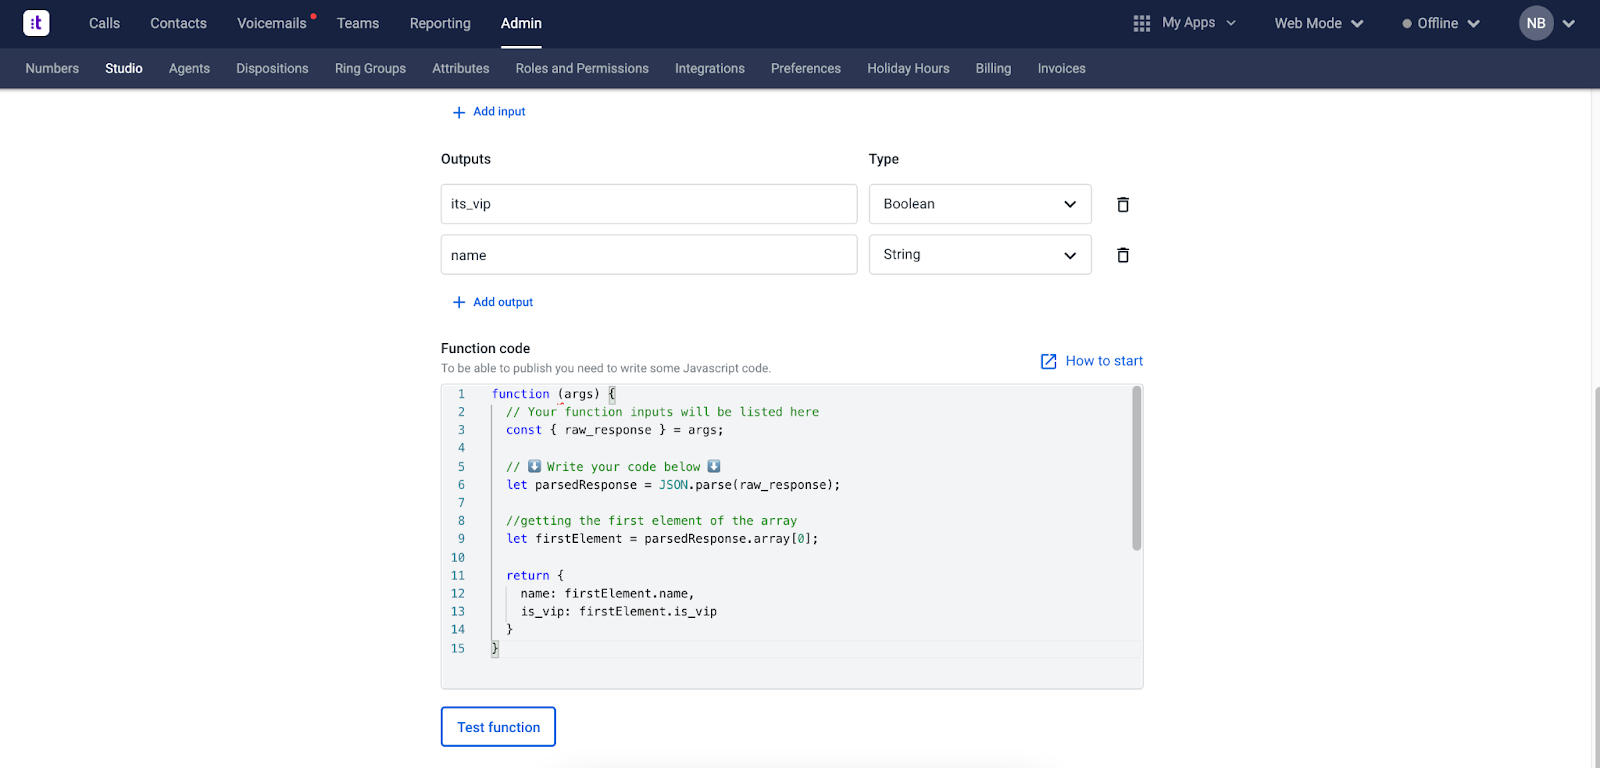
function zendesk_information_parser(args) {
  // Your function inputs will be listed here
  const { raw_response } = args;

  // ⬇️ Write your code below ⬇️
  let parsedResponse = JSON.parse(raw_response);

  //getting the first element of the array
  let firstElement = parsedResponse.array[0];

  return {
    name: firstElement.name,
    is_vip: firstElement.is_vip
  }
}-
You can then test the function, by clicking on “Test Function”. When you do so, a modal appears, allowing you to insert a custom value to test your function. You can see the Function’s result on the result box to the right side of the modal. We advise you to test your function with a real result (by selecting “Custom Value” on the dropdown), as well as other different scenarios to make sure that the expected behavior is retrieved successfully. After testing, you can now save and publish your Studio Function, so that you can start using it in your Studio Flow.
-
Go back to the Studio flow and proceed as follows:
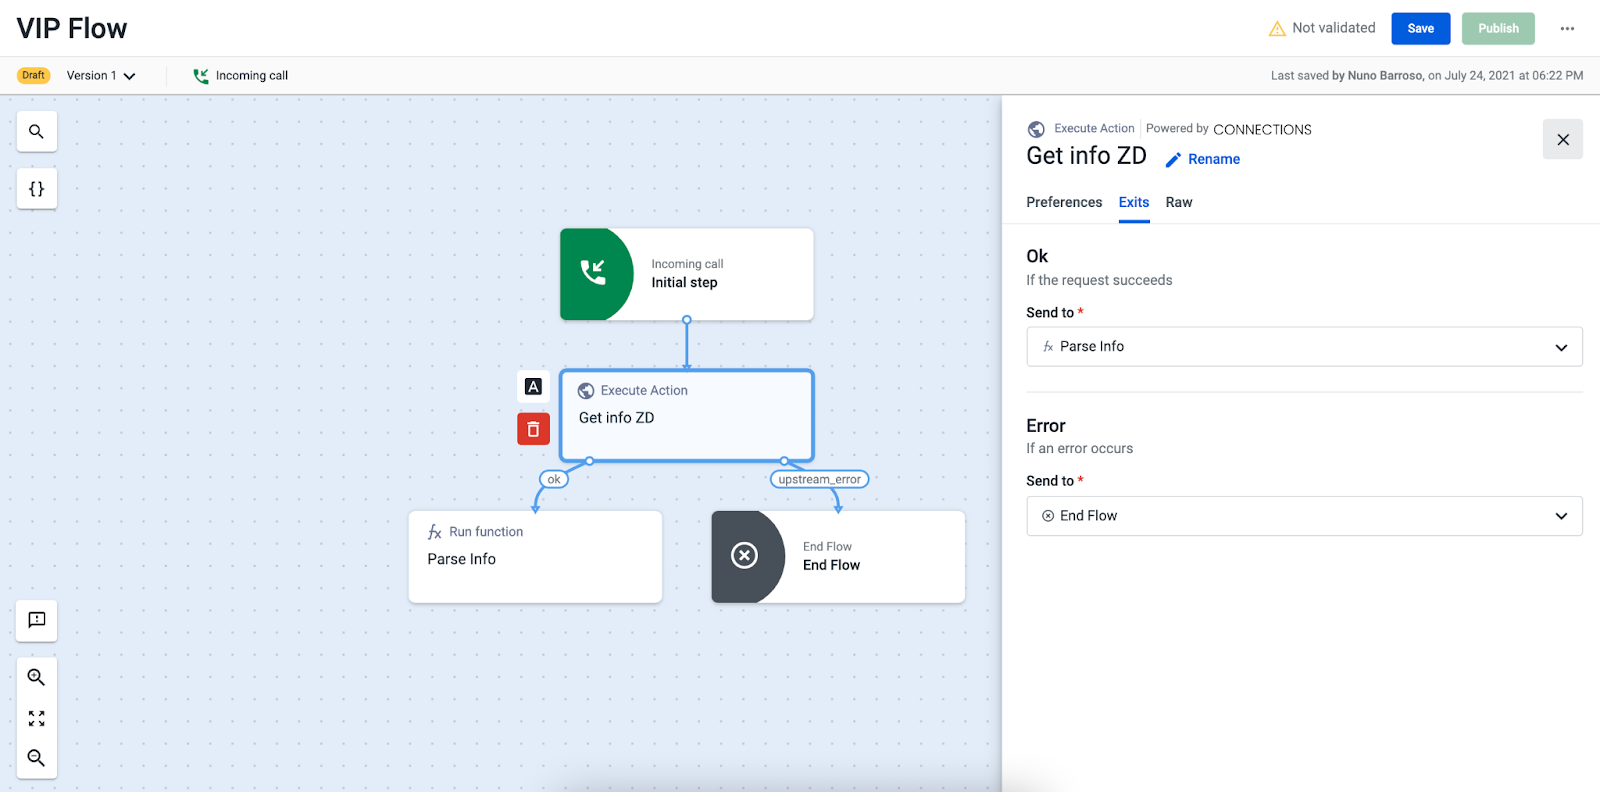
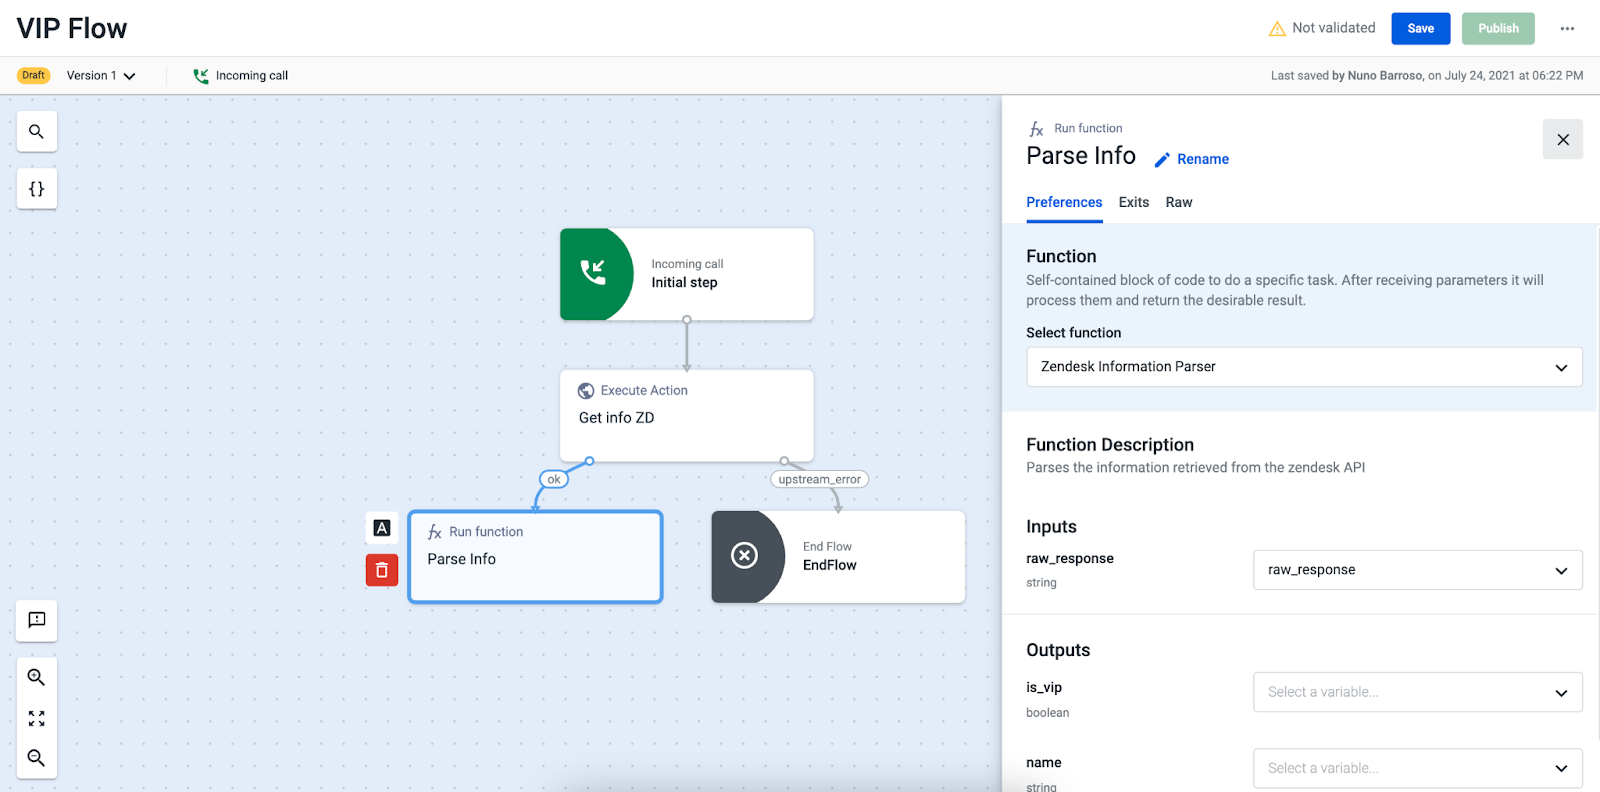
- For the “Execute action” component’s exit, we defined the “Run function” (which will parse information retrieved from the execute action component) for the OK exit. In our example, if a connection error occurs, the flow ends.
-
Add the “Run function” component and on “Preferences”, select the function that you have recently created and published.
-
In the “Inputs”, we will use the context variable that we defined in the “Execute action” component (raw_response). We just need to select it from the dropdown.
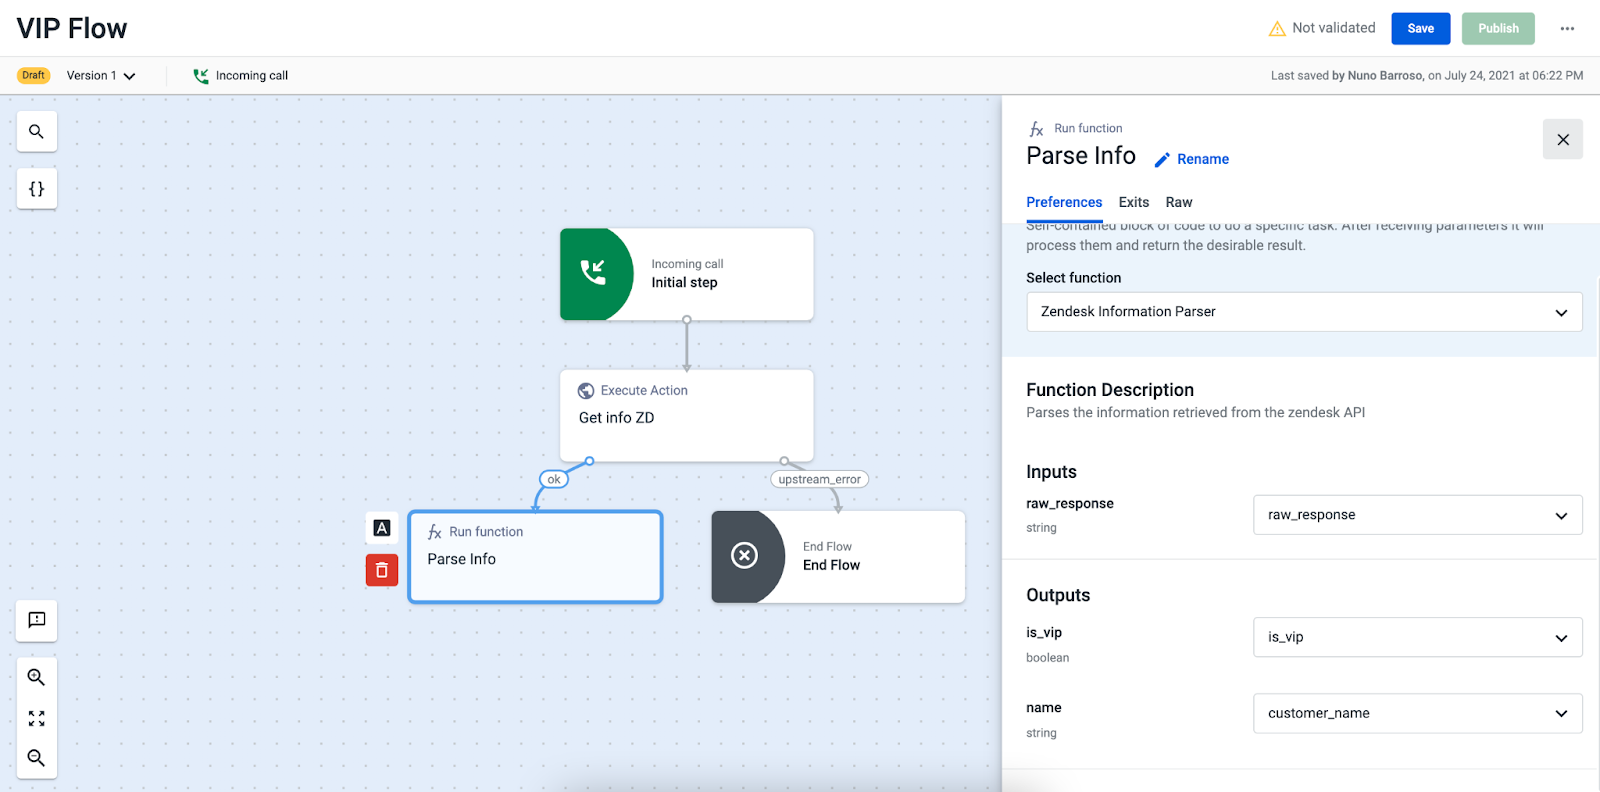
- As we want to use the values retrieved from the array, on the rest of the flow we will be creating variables for the “its_vip” and “name” outputs. Click on the dropdown and select Create variable for each of the outputs. Give names to those variables (we used “is_vip” and “customer_name”, respectively) and click on Create variable.
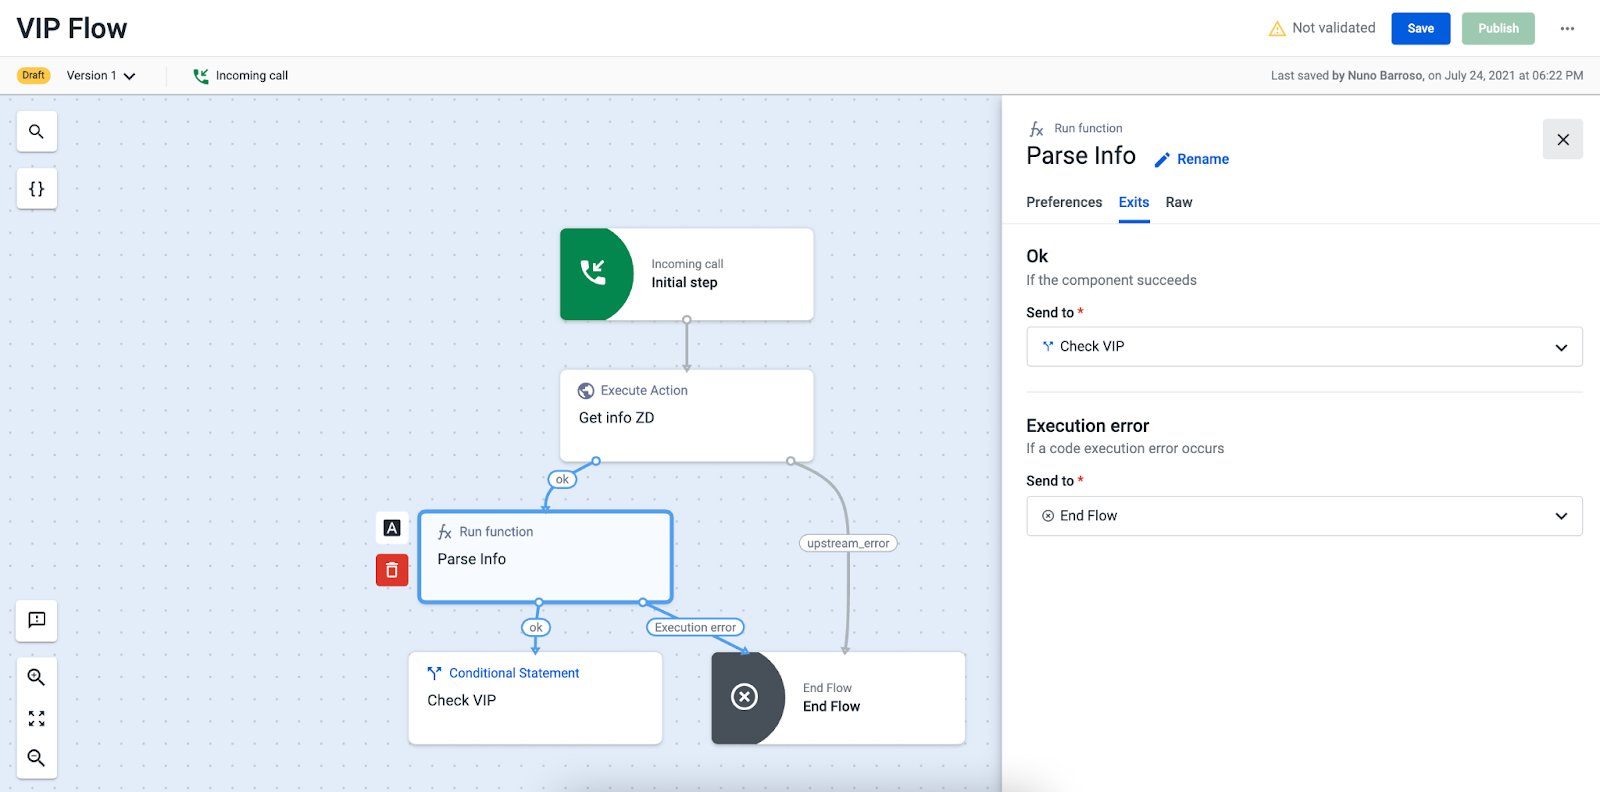
- Now, we need to define the exit variables for the “Run Function” component. For the “OK” exit, we will select “Conditional statement”, which will allow routing the call based on the customer’s VIP status. For the “Execution error” exit, we will end the flow.
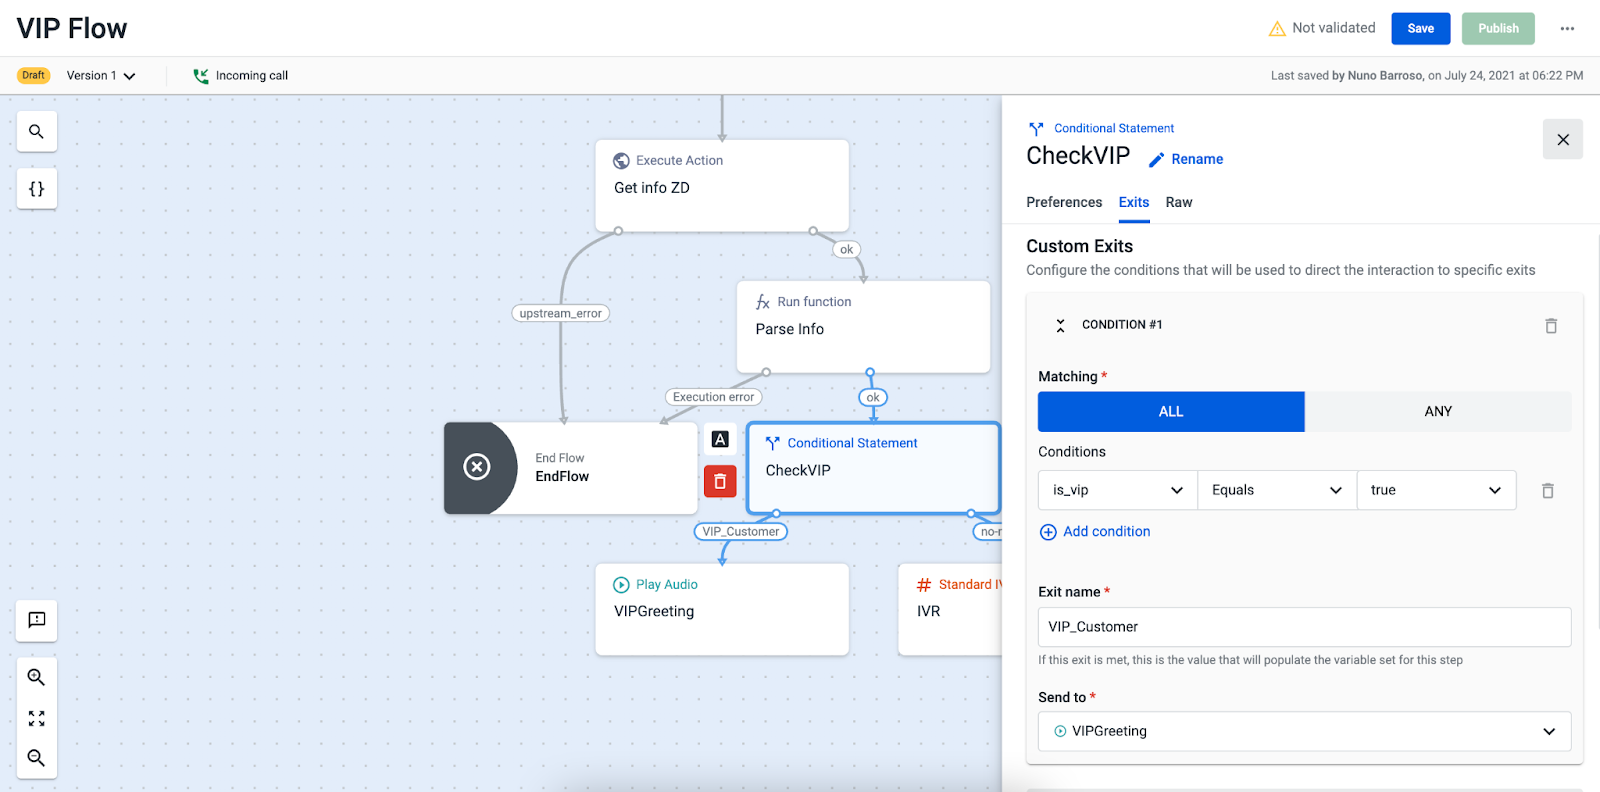
- We want for a VIP customer to be assigned to an agent, and non-VIP customers to go through a “Standard IVR”. Now, in the “Conditional statement” component’s exit, we need to define those rules. If the variable “its_vip” is equal to “true”, then the flow should follow through a “Play audio” component (to greet the customer, and thank them for being a VIP member), and an “Assignment and dial” component so that the caller can speak to an agent. If not, then it should follow through a “Standard IVR”.
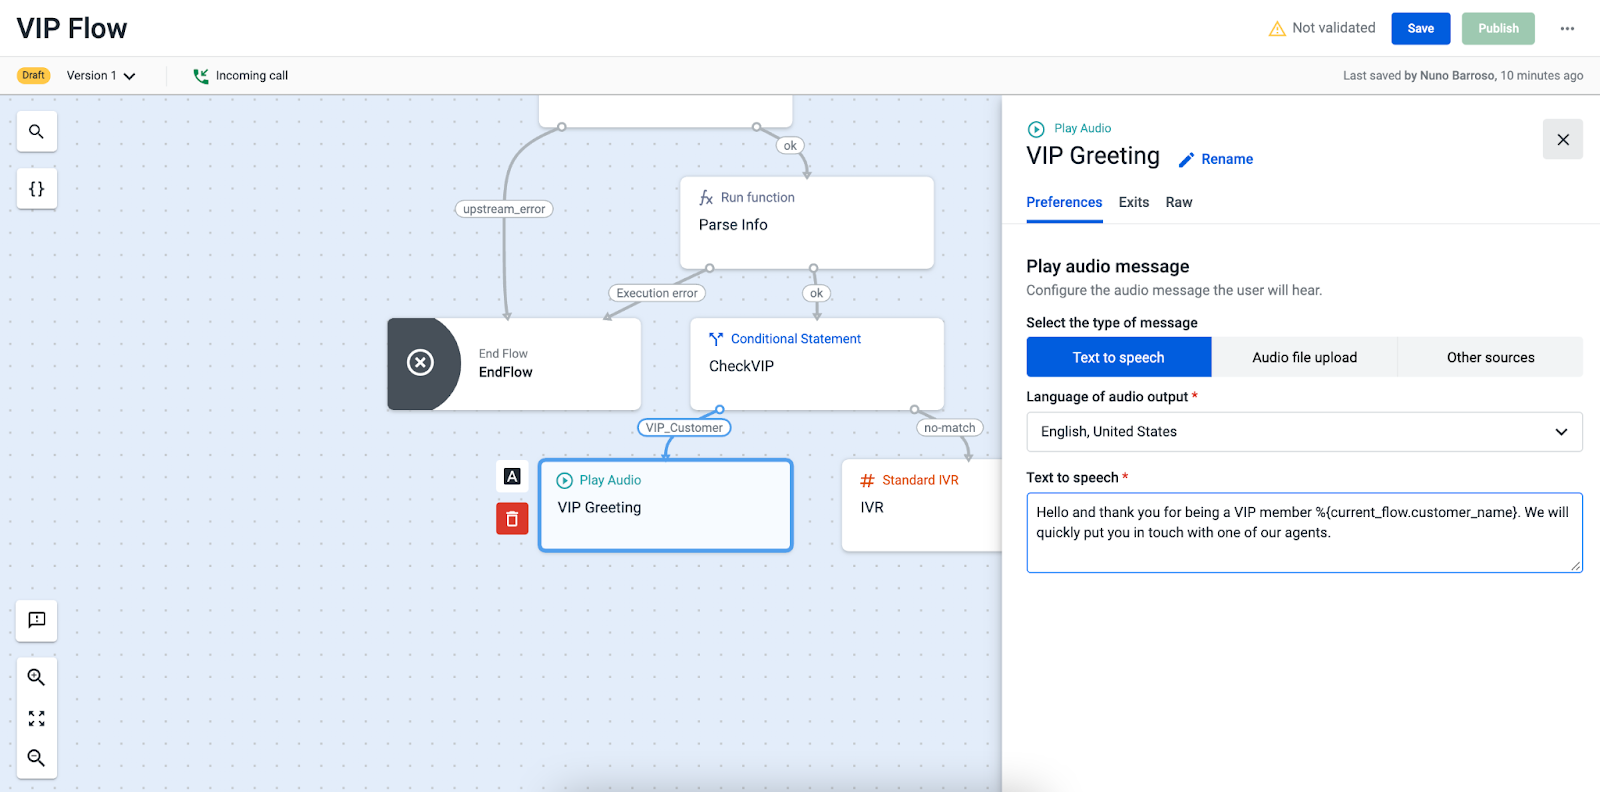
- In the “Play audio” component, we can define a message to greet our VIP customer before directing the call to go through the “Assignment and dial” component. In this message, we will be using text-to-speech and include the name of the customer that has been previously retrieved, through the use of the previously defined variable.
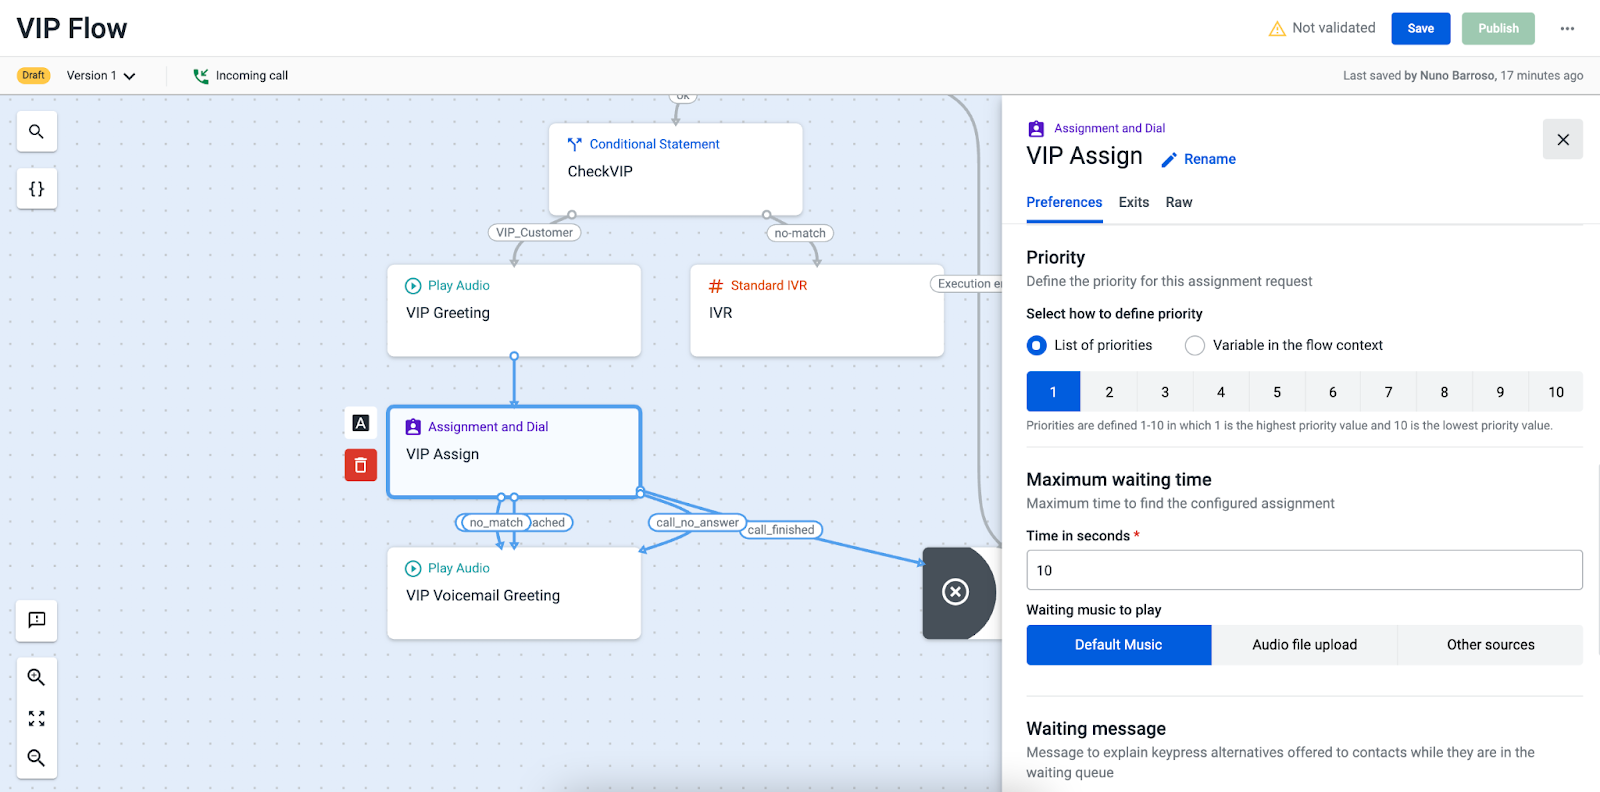
- We can then configure the “Assignment and dial” component. We define the assignment type (in this example we use ring groups), define the settings regarding Agents to ring, as well as the priority (in this example, we attributed 1), and set the maximum waiting time to 10 seconds. For the exits, we want the flow to finish after the call. If the agent does not answer, the maximum waiting time is exceeded or if there is no match, then we will allow for our VIP caller to leave a voicemail.
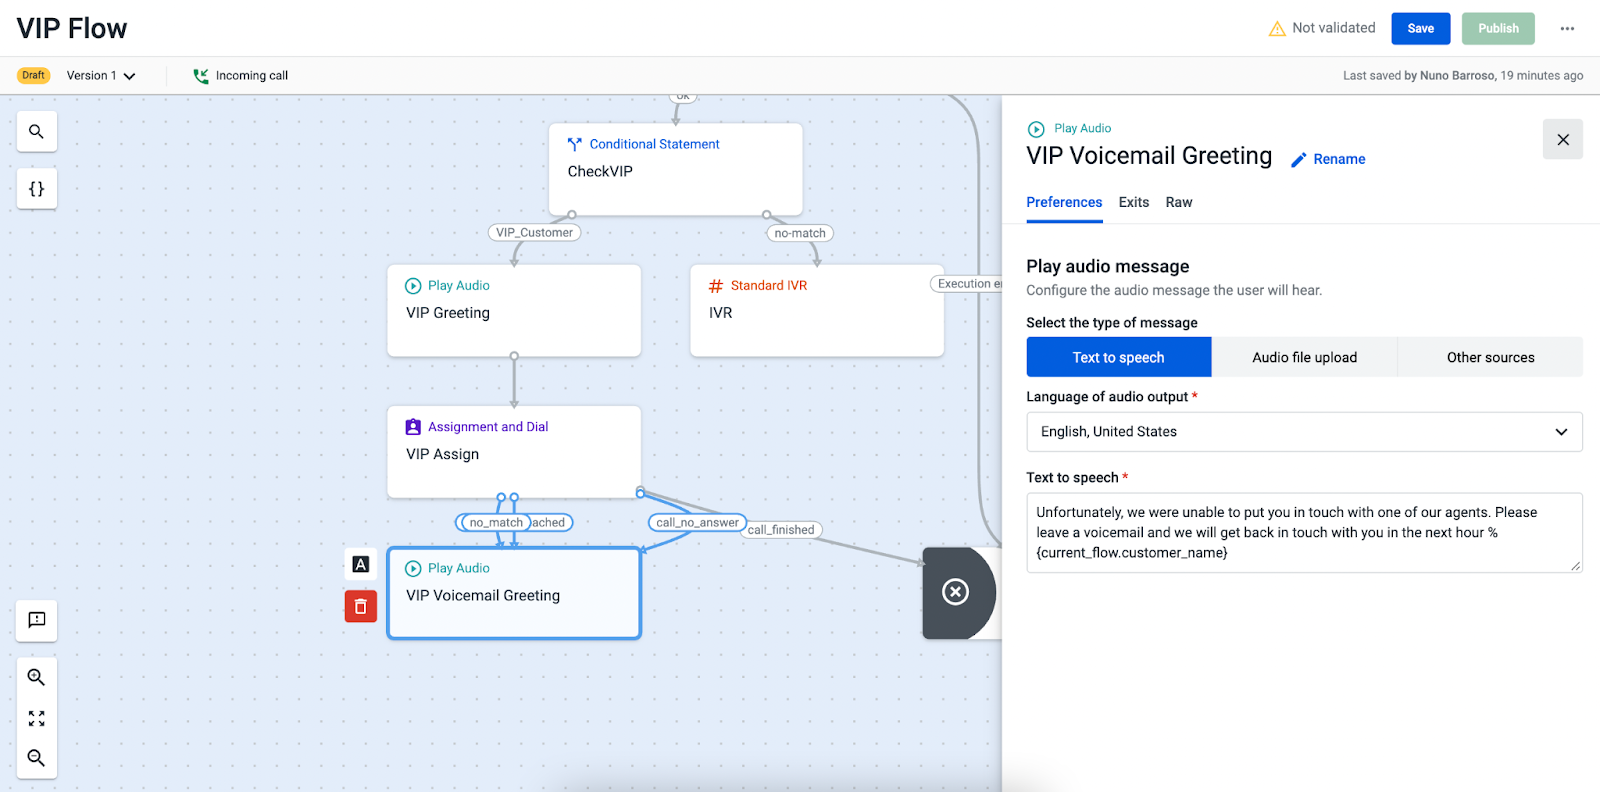
- Before reaching the voicemail, our VIP customers will hear a brief audio message soliciting them to leave a voicemail. We will also use our customer’s name in this message.
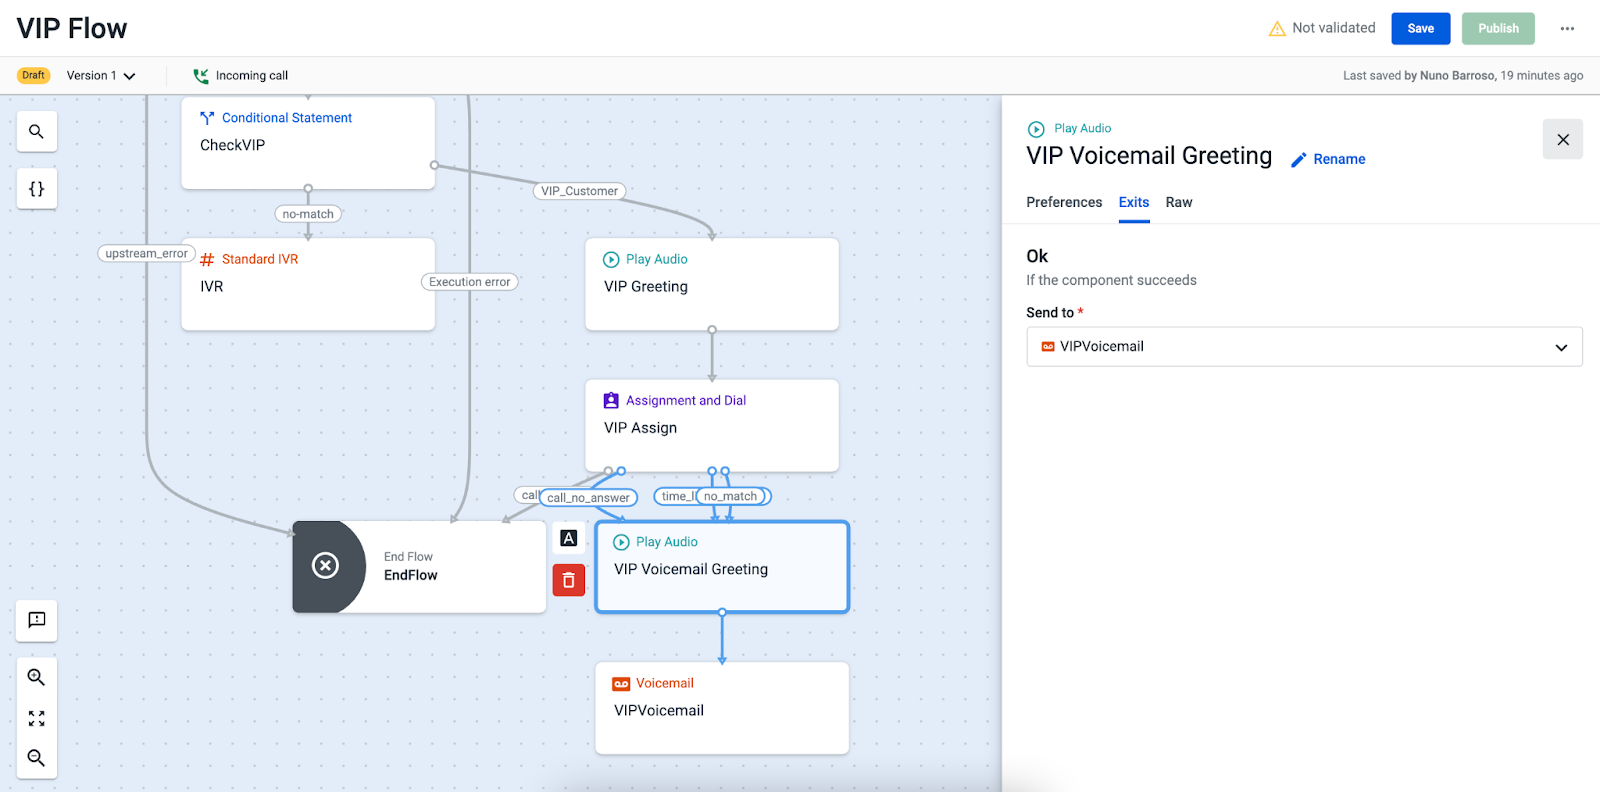
- Then, we just need to configure the Voicemail component in order to finish the setup for the VIP Customer branch.
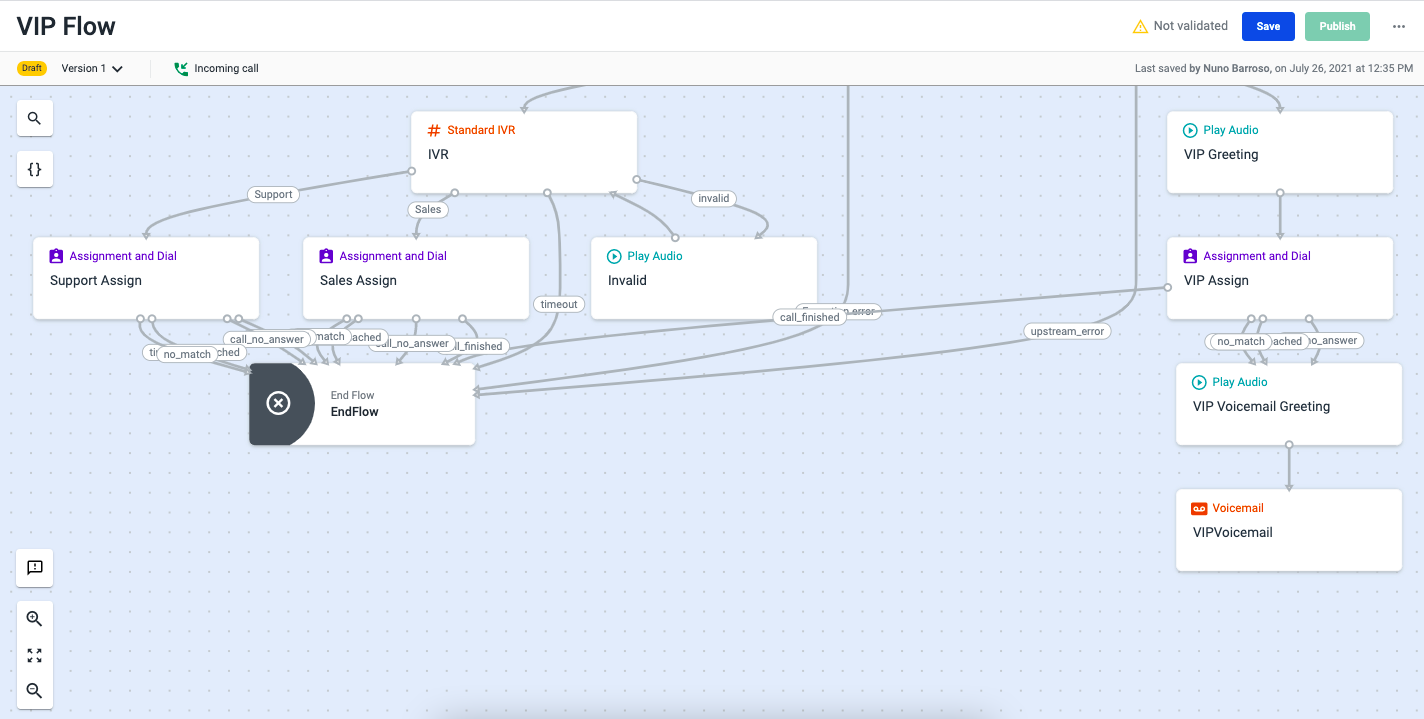
- As for the “Standard IVR” that our non-VIP customers will go through, we will define two options: 01 for Sales and 02 for Support. In that sense, we will only have to define the IVR message and configure the respective exits. For this example, we will define all exits pointing towards the “End Flow”. For the “Invalid” exit, we will go through a “Play audio” component requesting the customer to insert a valid option and go back to the IVR menu.
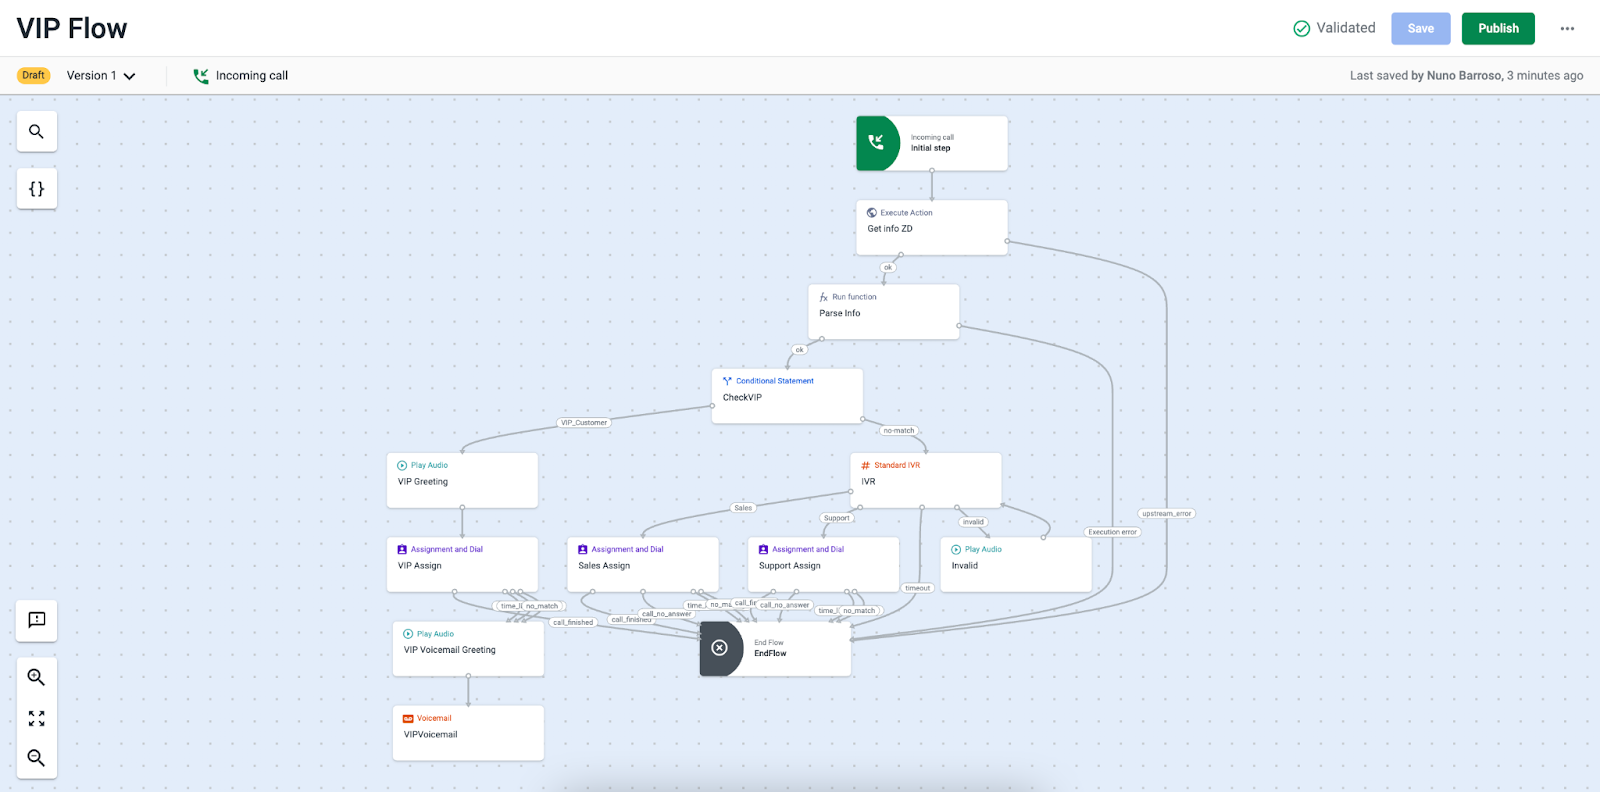
- When you finish configuring the flow, it will have the same appearance as the one shown above.
Updated 3 months ago