Transferring context between a module and the referencing flows
With Studio Modules, it is possible to transfer context bi-directionally, between the module and the flows that are using it.
This is extremely valuable in case you need to transfer inputs and outputs to and from the module, in scenarios such as the following:
- Passing in the Dialed Number Information Service (DNIS) for customized/unique Hours of Operation.
- Passing in the Automatic Number Identification (ANI) for data dips in a centralized/single place.
- Passing in the ring group for a centralized priority management system across all flows.
Please follow these instructions to learn in detail how to define the module’s input arguments and outputs and how data between the module and the parent flows can be interchanged through the "Run module" step.
In this example, you will see how to define a contact phone number as an input argument of the module so it can be used in a Salesforce data dip query to retrieve the owner email of the contact, which can then be used in a Studio flow to route the call directly to the contact’s owner:
- Create or edit an existing Module.
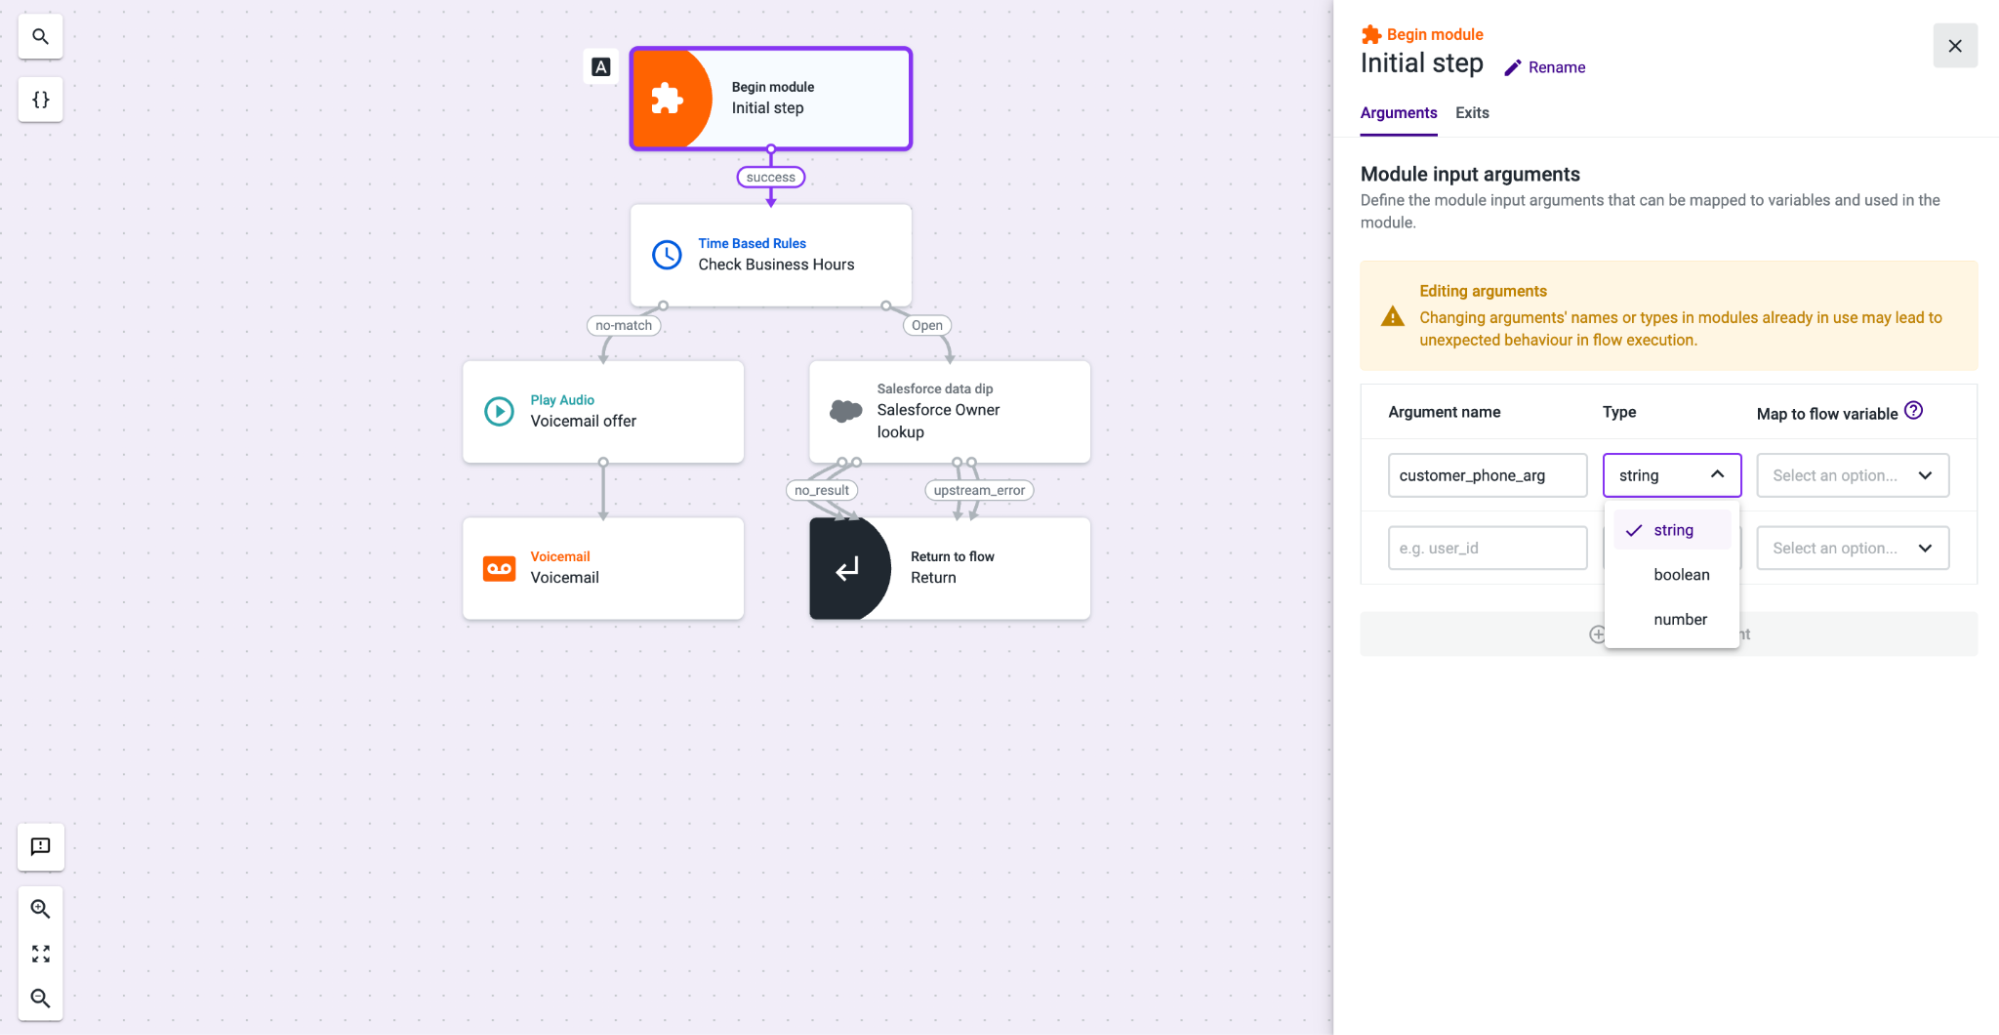
- Select the "Begin module" initial step and, in the Arguments tab, type in the name of the argument you want to define as an input of your module. Example: “customer_phone_arg”. The argument name is the one that is going to be exposed in the Run module step of the flow referencing the module, under the Input arguments section.
- Select the data type of your input argument. Available data types in a module’s input arguments are string, boolean, and number. For this scenario, select the “string” type.
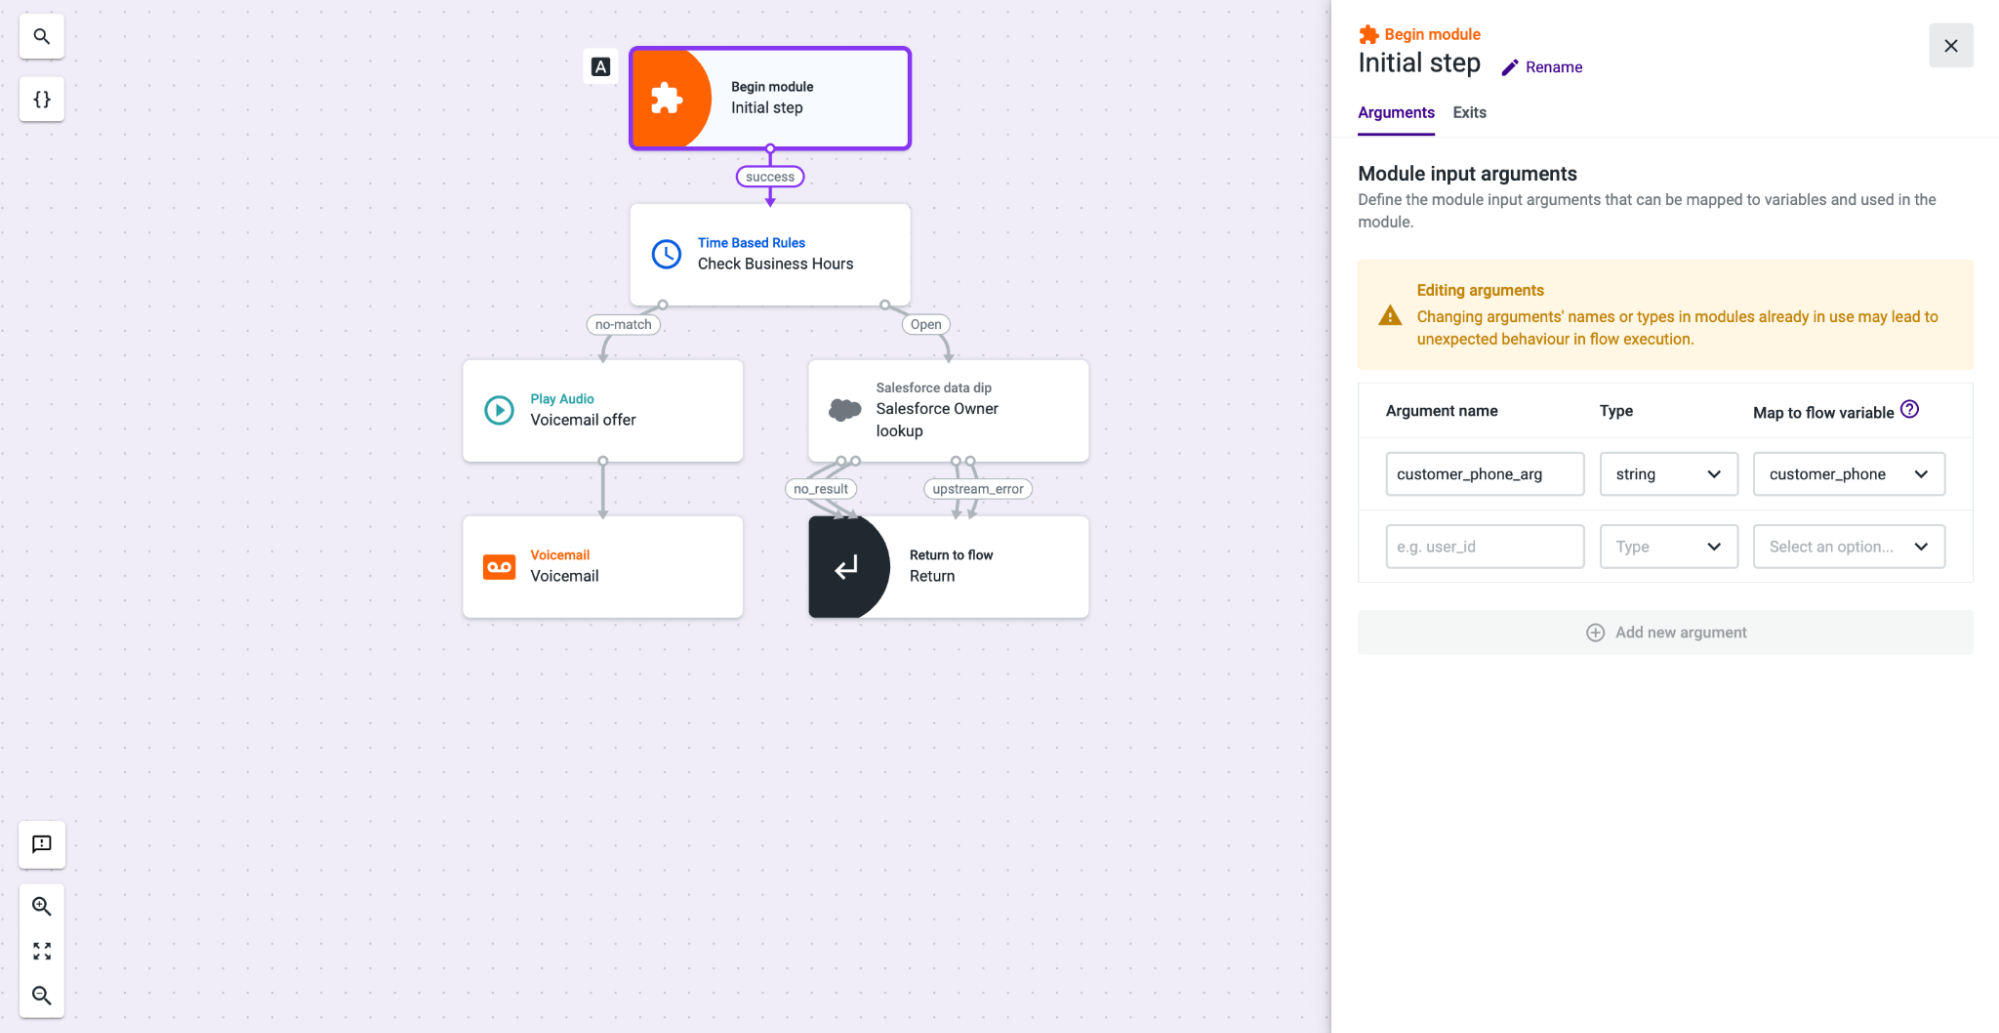
- In the “Map to flow variable” field, click on the drop-down and then select an existing variable from the list or create a new one with the Create variable option.
- Give a name to the variable. This variable will store the value of the input argument previously defined. In this case, it will be the phone number of the contact that places an inbound call, so we’ve named it “contact_phone”.
- If needed, you can add a new argument name, select the data type and map it to a flow variable to be later used in the module.
NoteChanging arguments' names or types in modules already in use may lead to unexpected behavior in the flow execution.
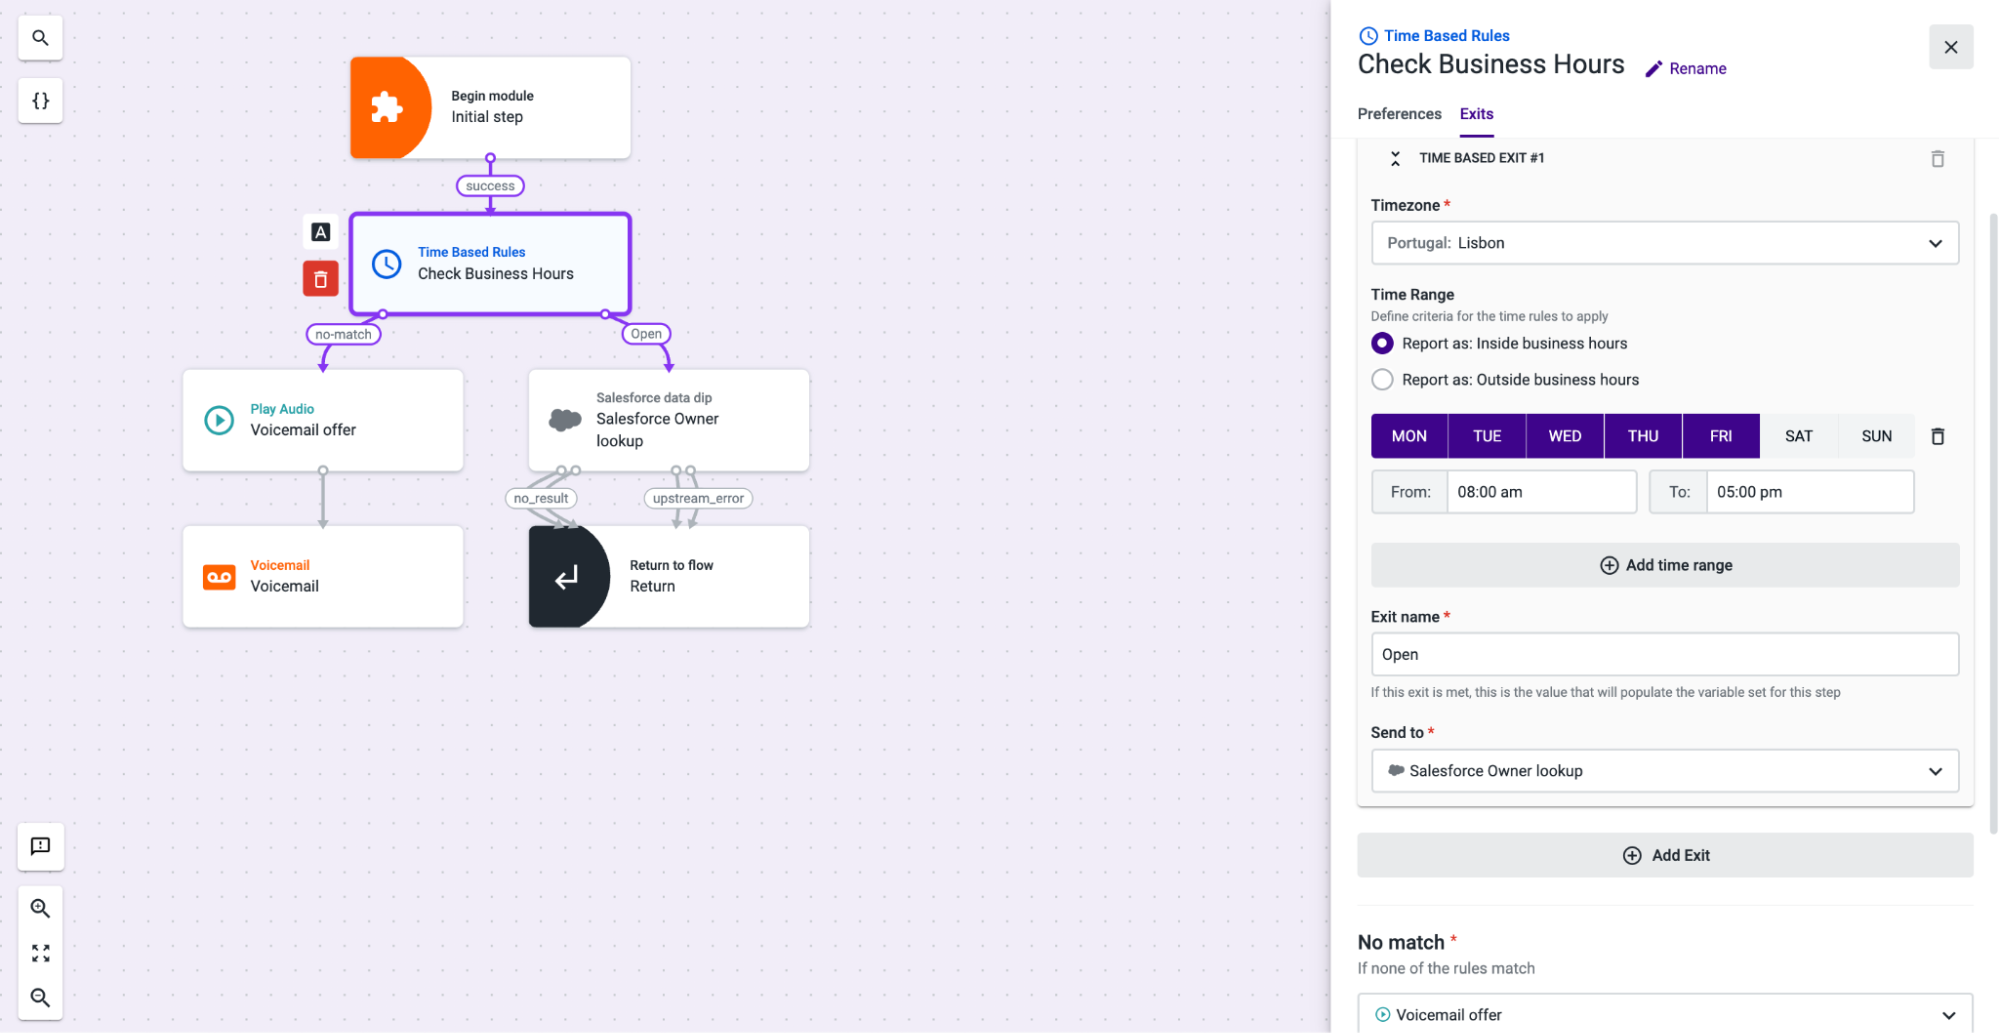
- Add a Time Based Rules component to your module.
- Open the Time Based Rules component and, on the Exits tab, in the “Time Based Exit #1”, define the “Timezone”, the inside business hours “Time Range”, Monday to Friday, from 08:00 am to 05:00 pm.
- Provide a proper name for the “Time Based Exit #1”, which will be used when the Contact Center is “Inside Business Hours” and, under “Send to”, add a Salesforce data dip component and name it “Salesforce Owner lookup”.
- Connect the “No match” exit of the Time Based Rules component to a Play audio component, which will announce the Voicemail option.
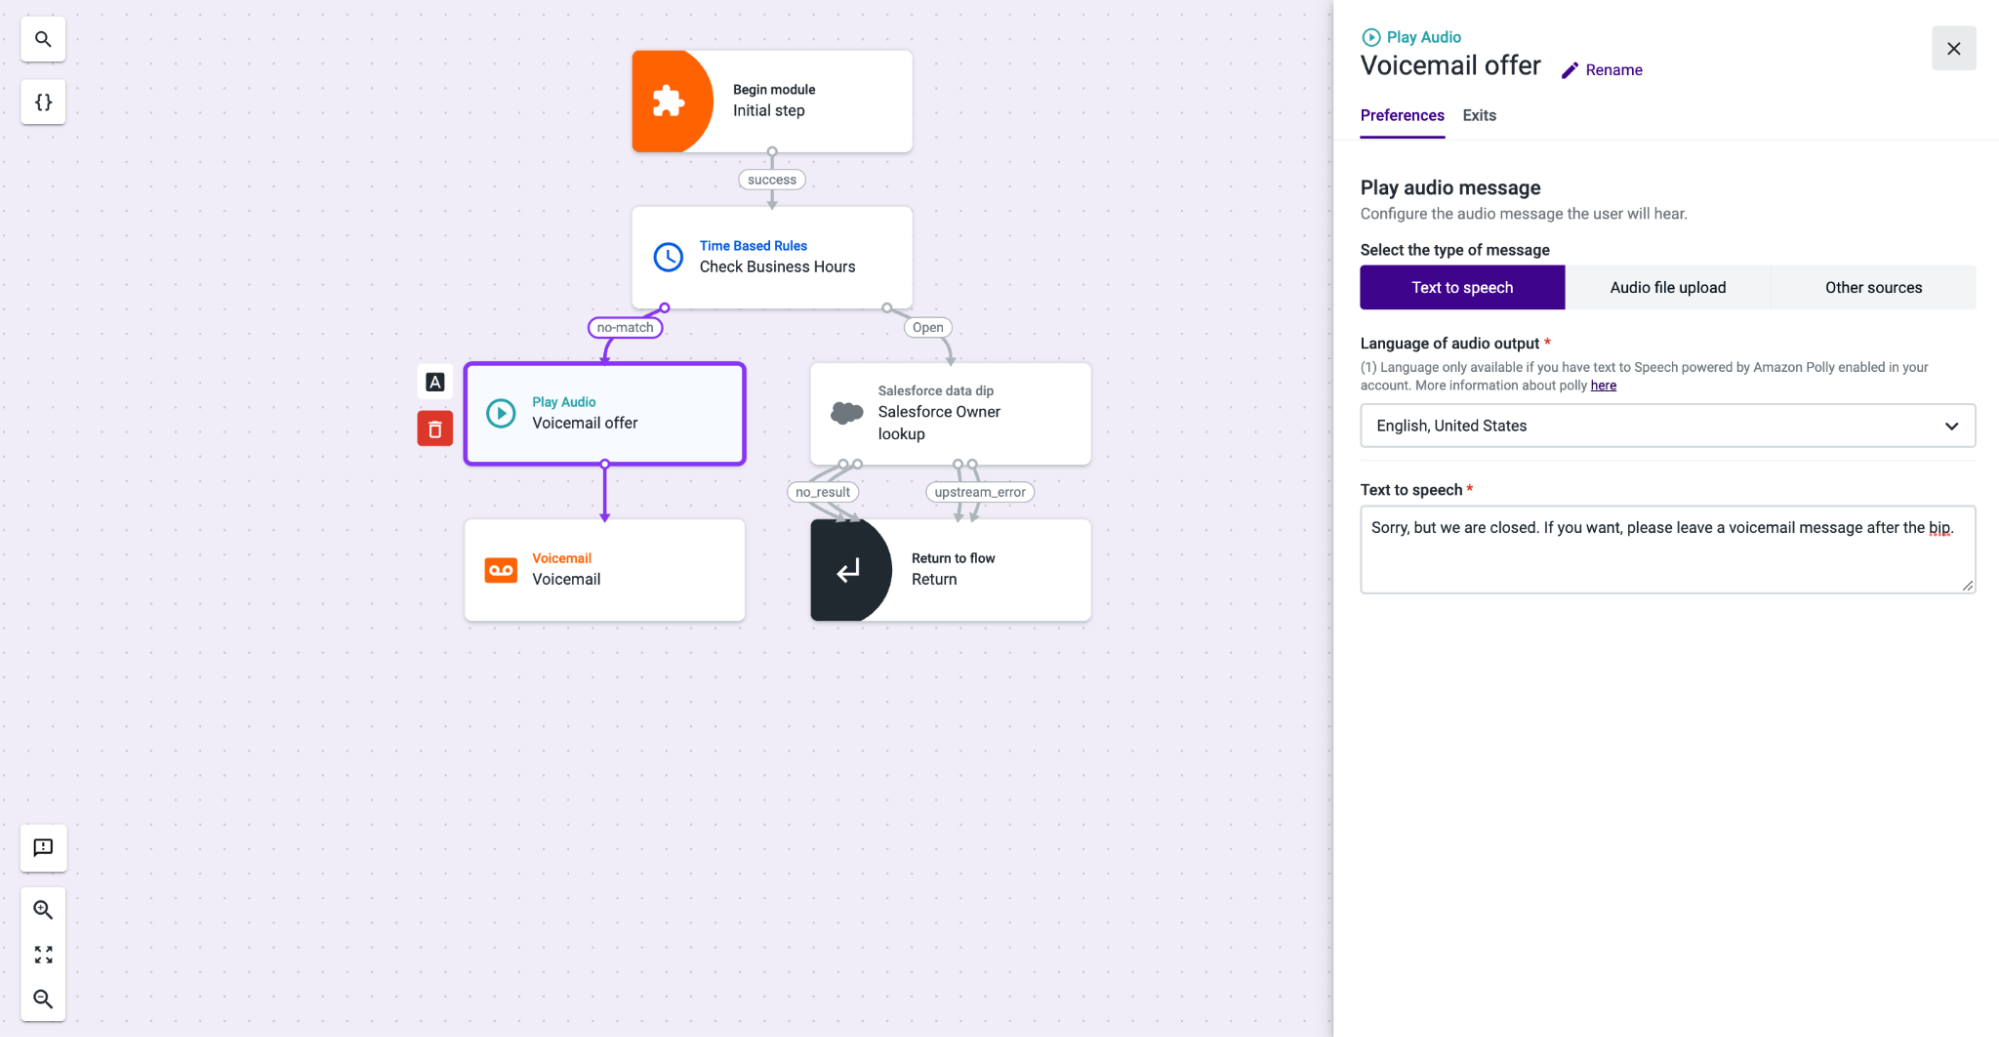
- Add the Play audio component to your flow.
- Open the Play audio component, and on the Preferences tab, choose Text to speech as the message type.
- Select the language in which you will write your message.
- In the “Text to speech” field, type in the message that will be played when the flow reaches the Play audio component. Example: “Sorry, but we are closed. If you want, please leave a voicemail message after the beep .”
- The “Ok” exit of the Play audio component should be connected to a Voicemail component.
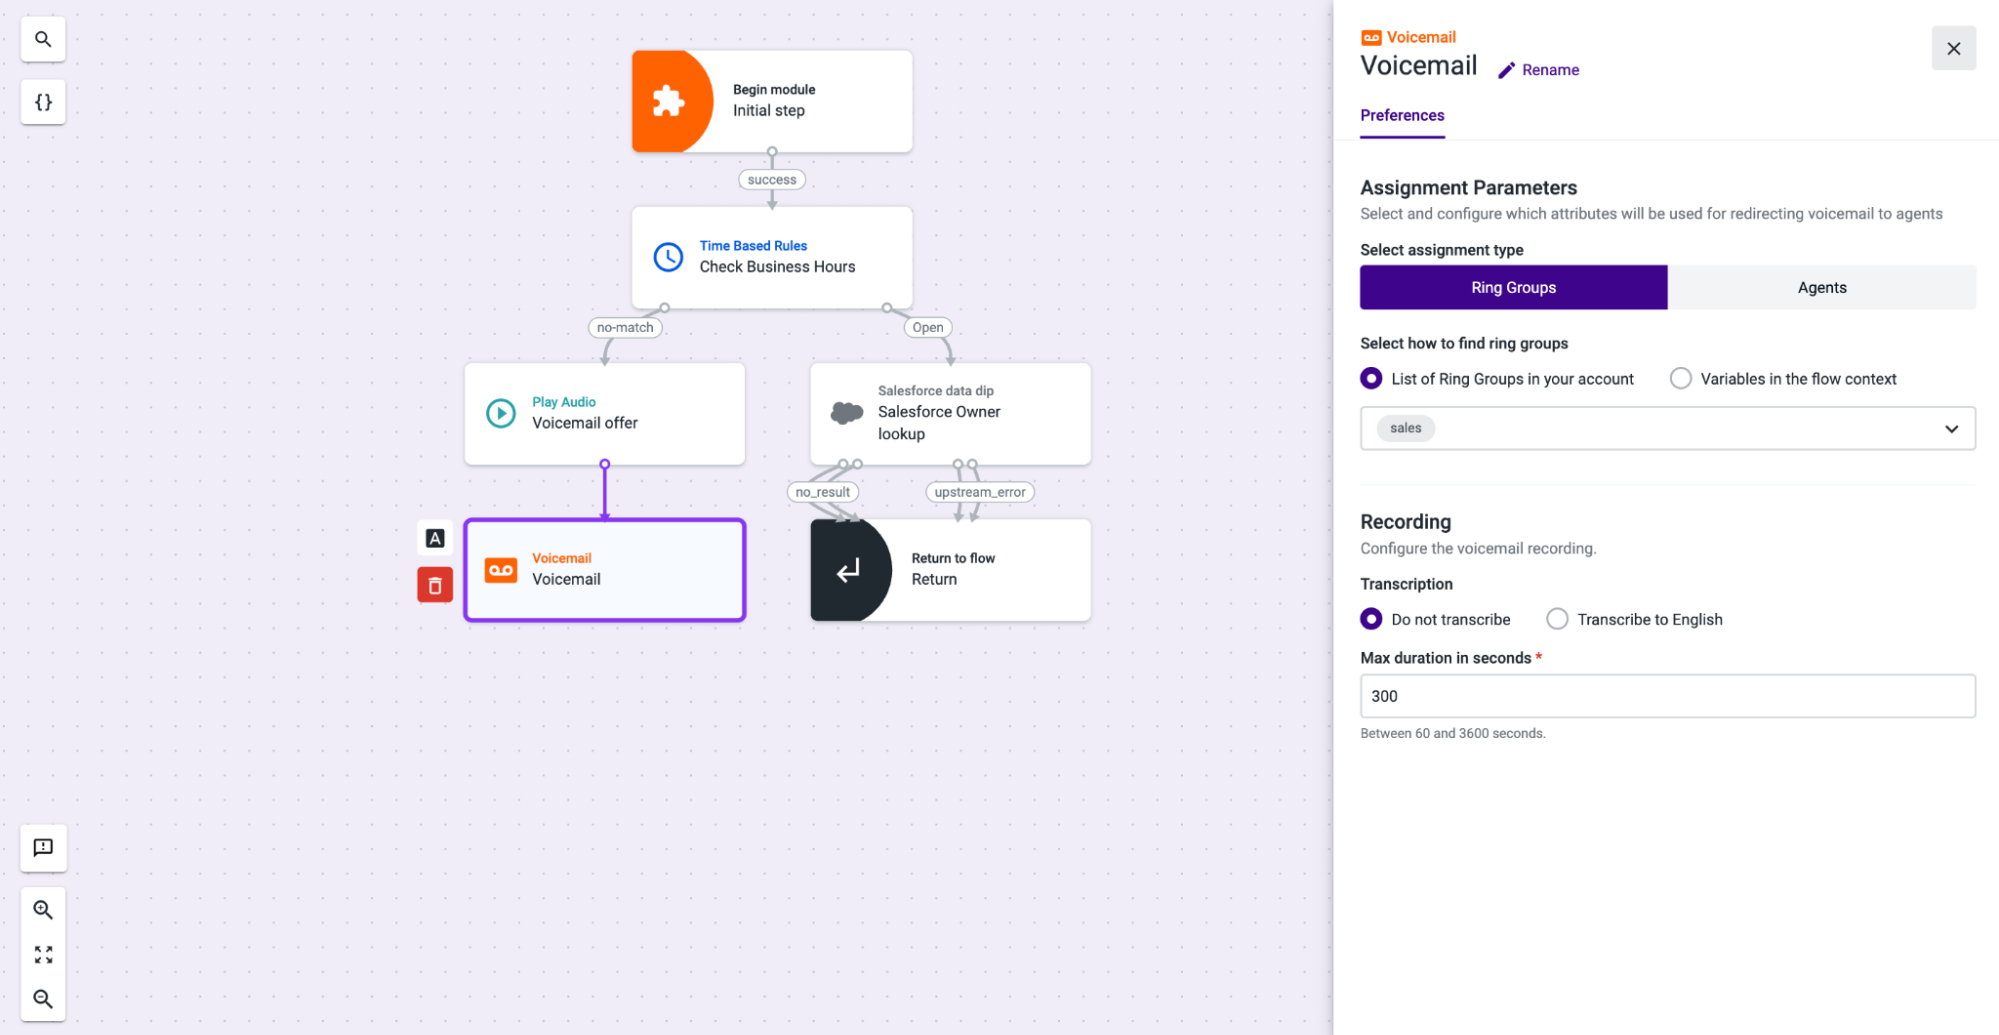
- Add a Voicemail component to your module.
- Open the Voicemail component and, in the Preferences tab, select the assignment type - in this case, “Ring Groups” - and select how to find ring groups or agents - in this case, select the “sales” ring group from the list of ring groups in your account.
- Under the “Recording” setting, define whether you want the voicemail recording to be transcribed. In the example, we selected the option Do not transcribe.
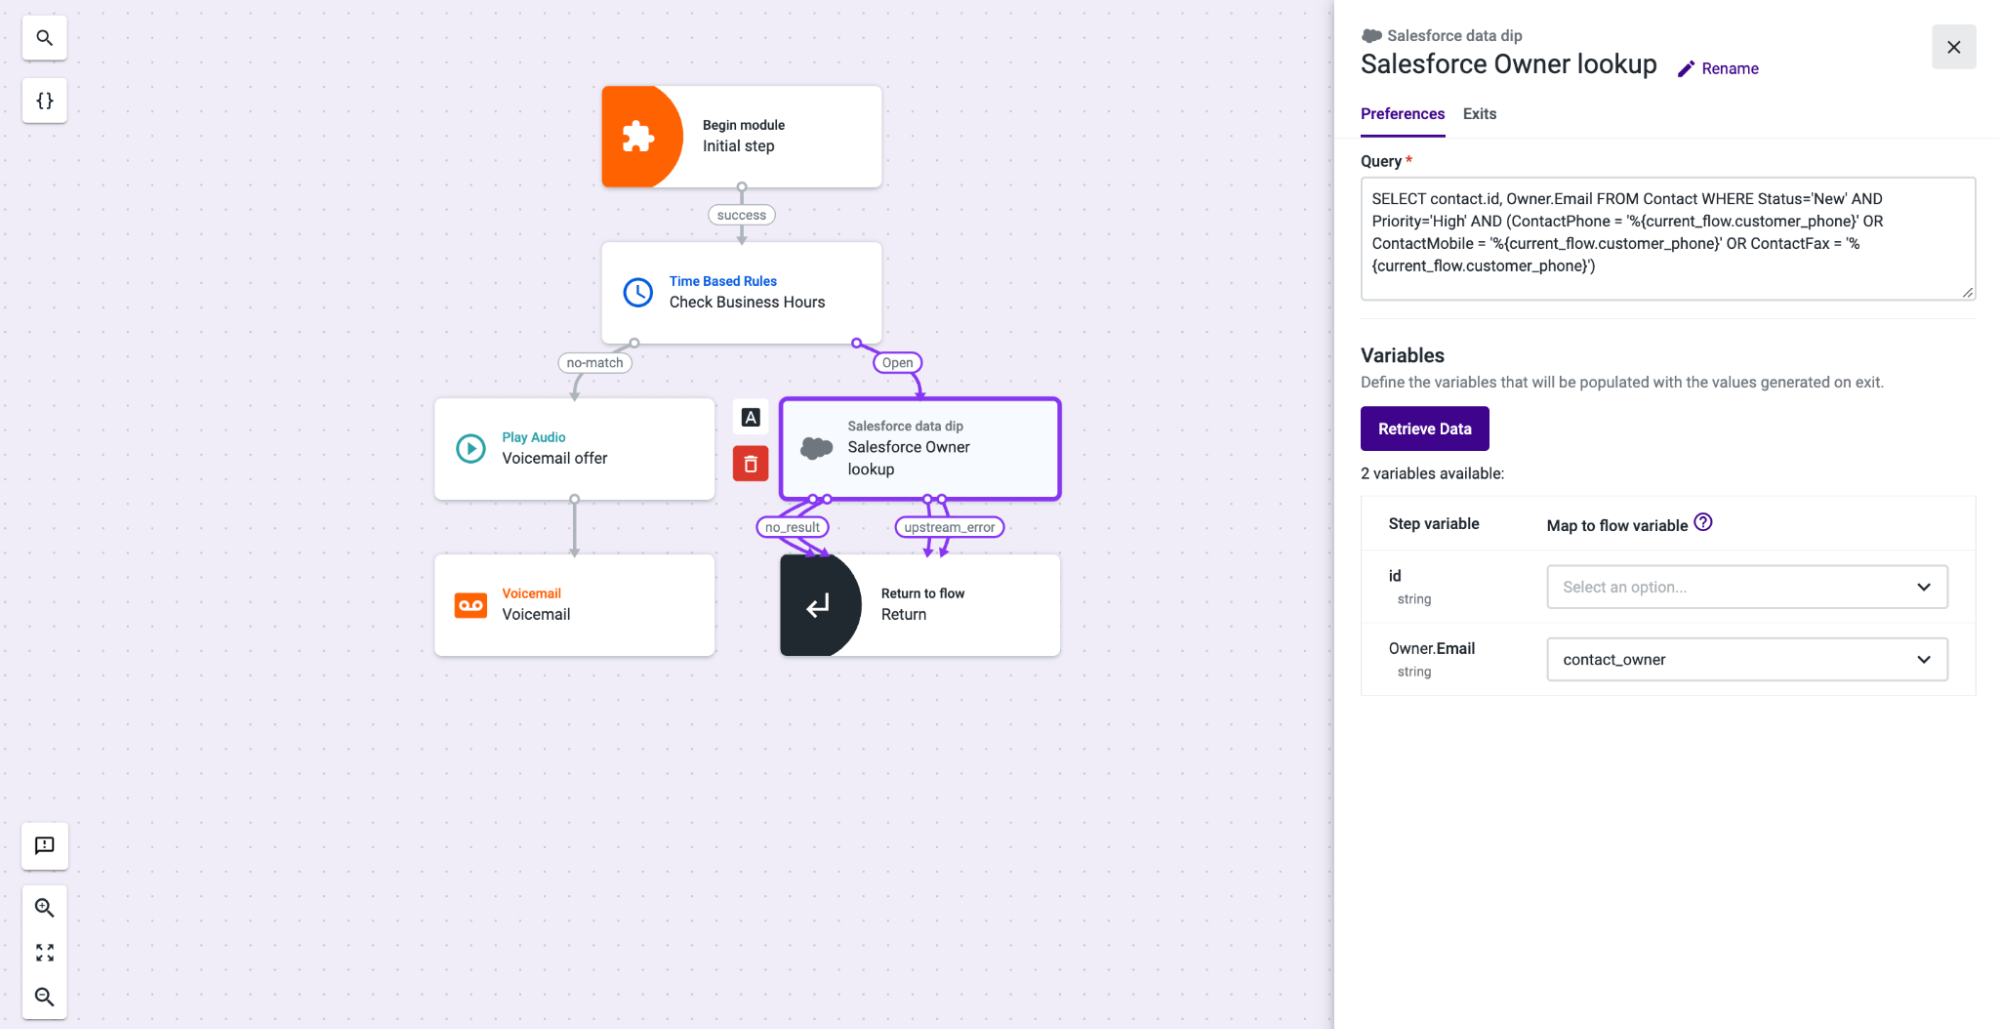
- Back to the “Salesforce Owner lookup” Salesforce data dip component that you’ve added in step 9, open its Preferences tab, and paste the following query: SELECT contact.id, Owner.Email FROM Contact WHERE Status='New' AND Priority='High' AND (ContactPhone = '%{current_flow.customer_phone}' OR ContactMobile = '%{current_flow.customer_phone}' OR ContactFax = '%{current_flow.customer_phone}')
- Click on Retrieve Data.
- Under Variables, click on the Owner.Email drop-down and add a new variable with the name “contact_owner”. Note: The contact phone number you defined in the module’s input arguments (and that was stored in the “customer_phone” variable) will be used to find in Salesforce the agent who owns the contact. The agent’s information (email) will be stored in the “contact_owner” variable, which will be used in the Return to flow step to define the value of the defined module input you want to later use in your flow referencing the module.
- Open the Exits tab and connect all exits to a Return to flow component.
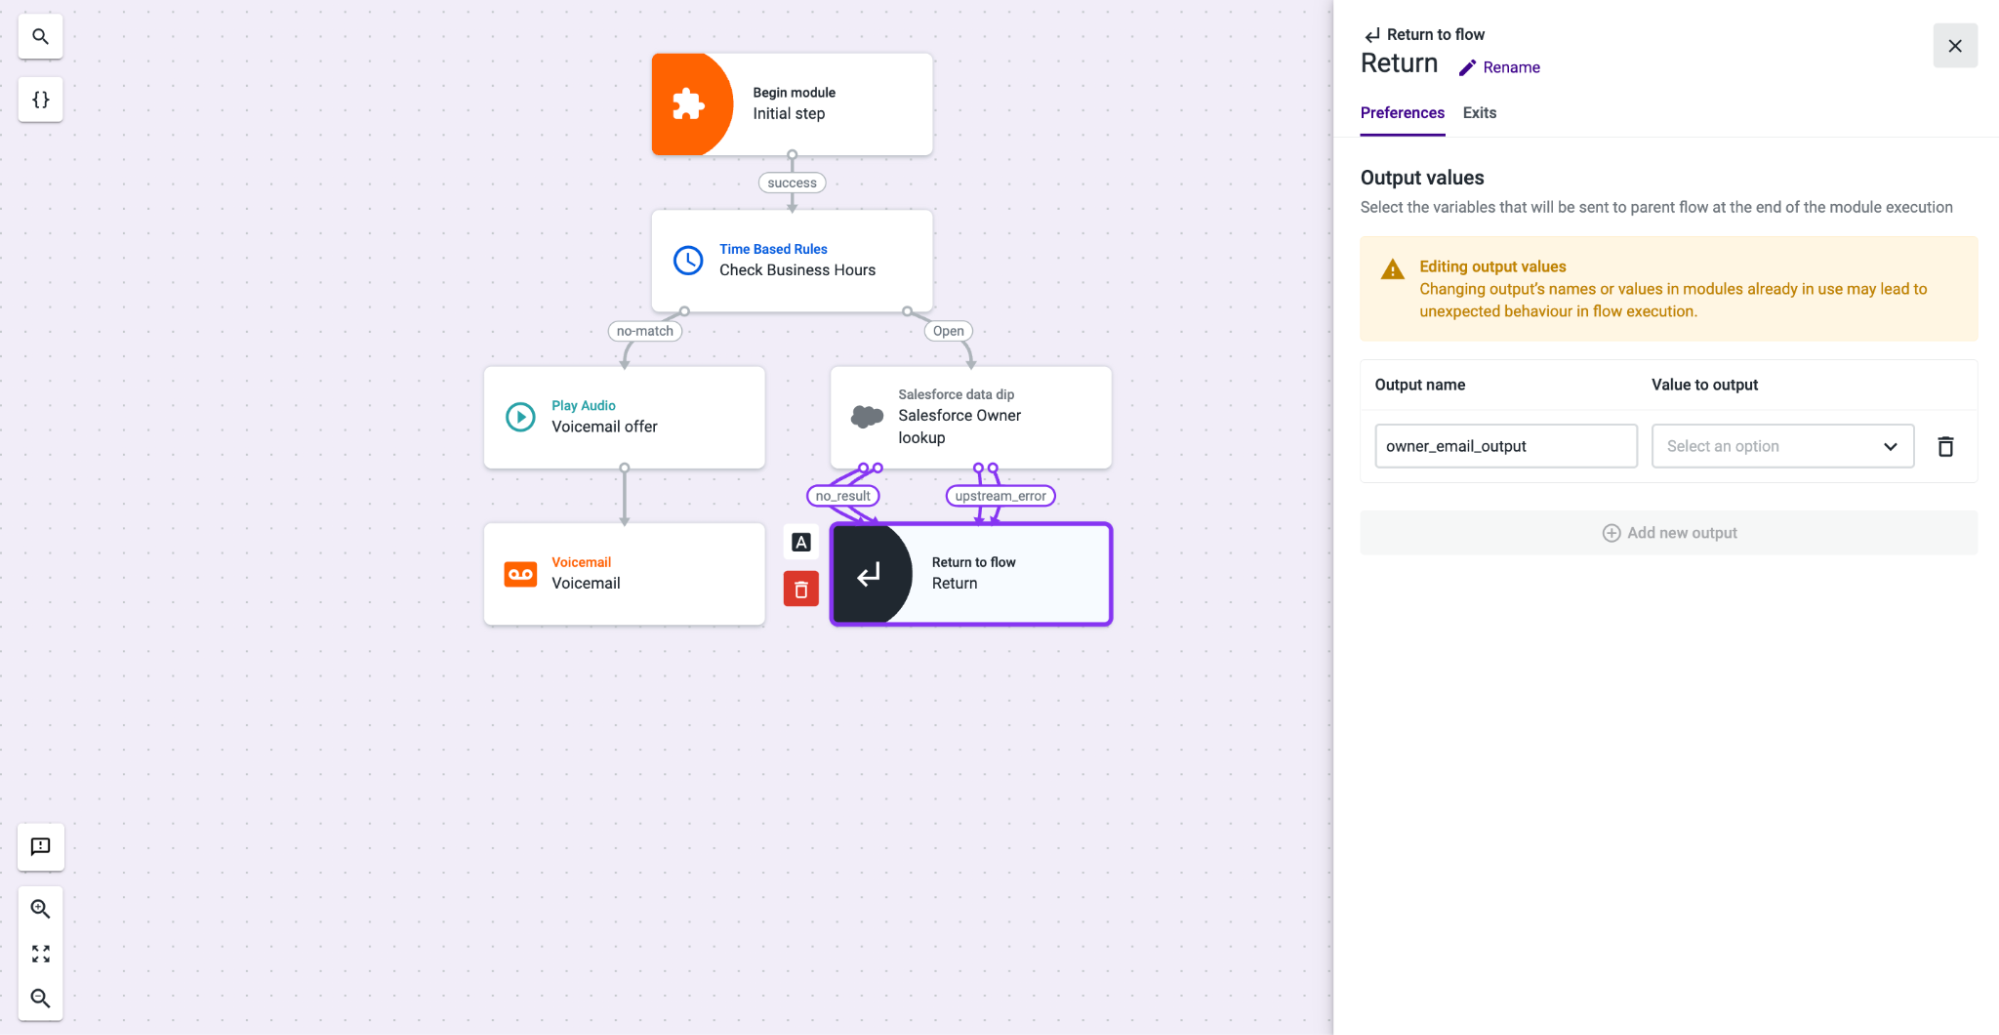
- Within it, in the Preferences tab, type in the name of the output you want to define as an output of your module. Example: “owner_email_output”. The output name is the one that is going to be exposed in the Run module step of the flow referencing the module, under the Outputs section.
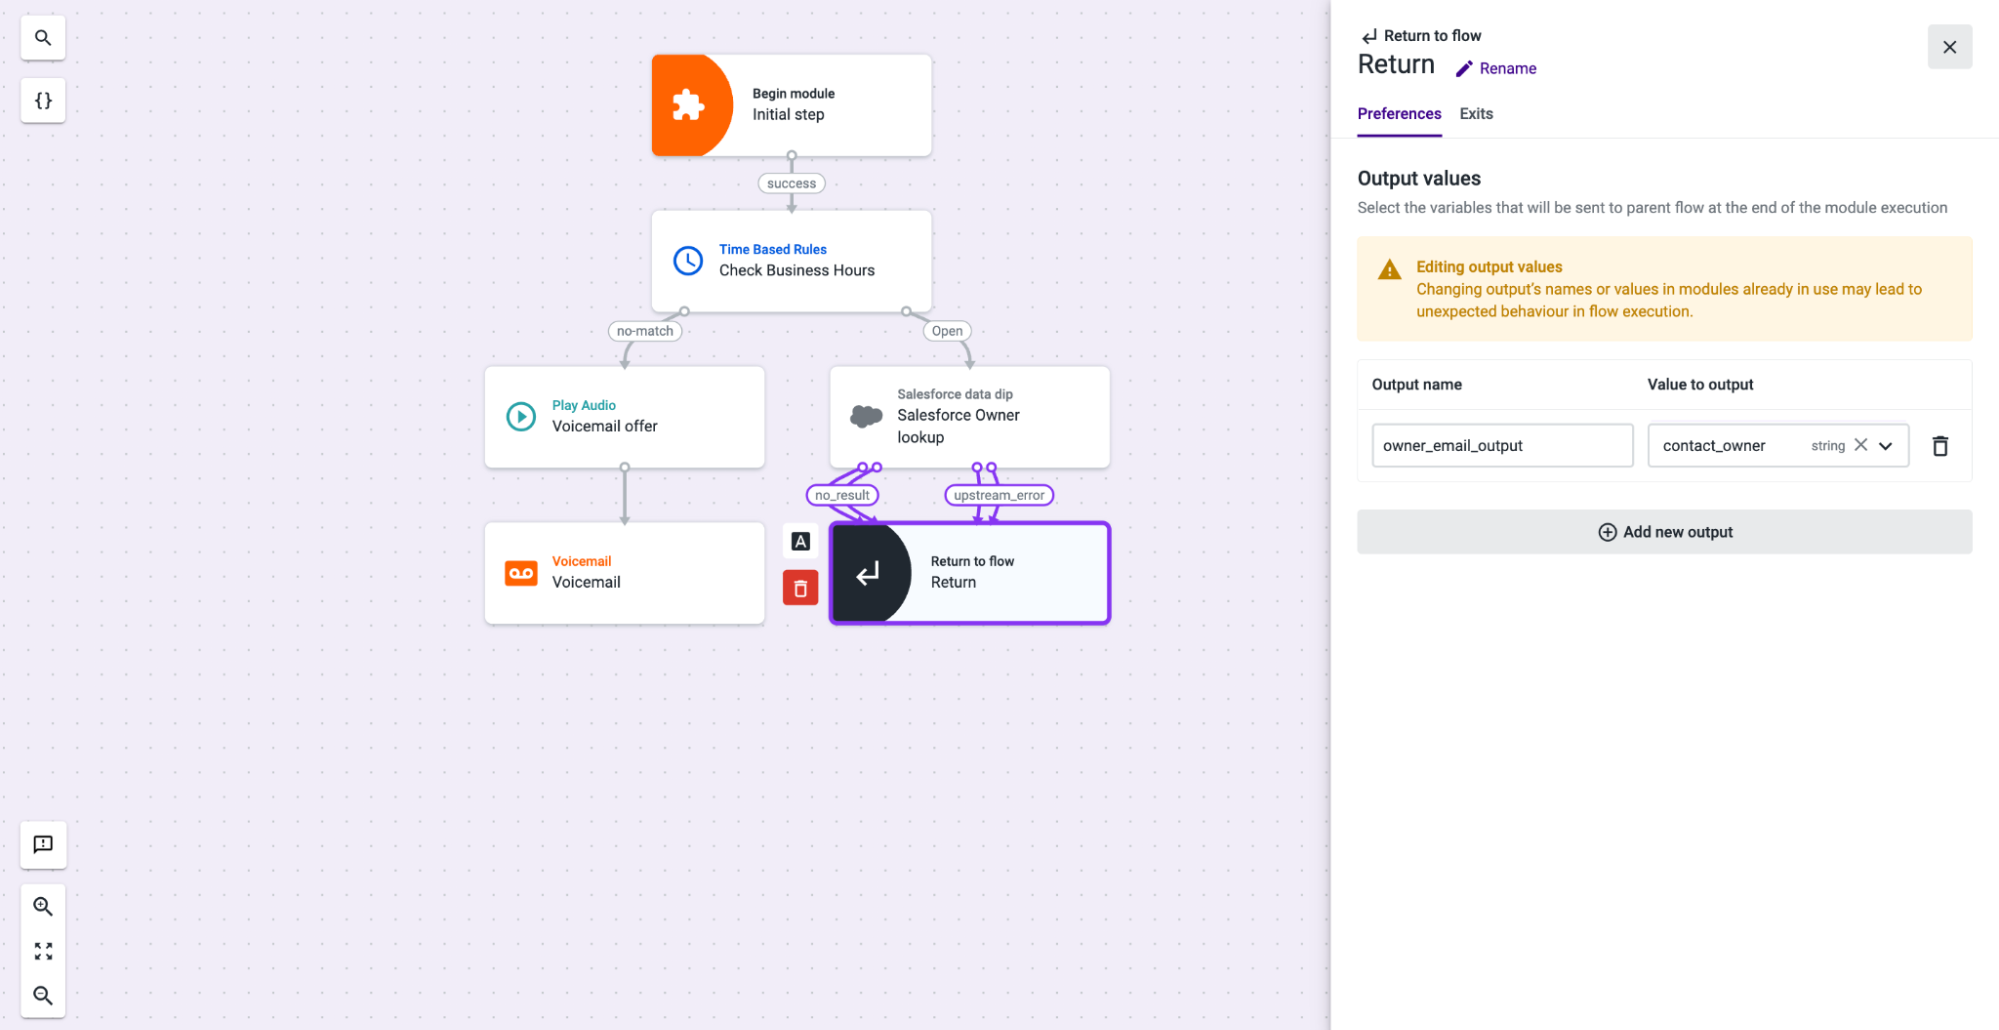
- In the “Value to output” field associated with the output name recently created, select an existing variable from the list. We have selected the “contact_owner” variable, which has the “string” data type that was previously assigned to the “Owner.Email” field, retrieved from Salesforce through the Salesforce Data Dip component.
- You can add new output names and match them with variables from the module, as needed.
NoteChanging outputs’ names or values in modules already in use may lead to unexpected behavior in the flow execution.
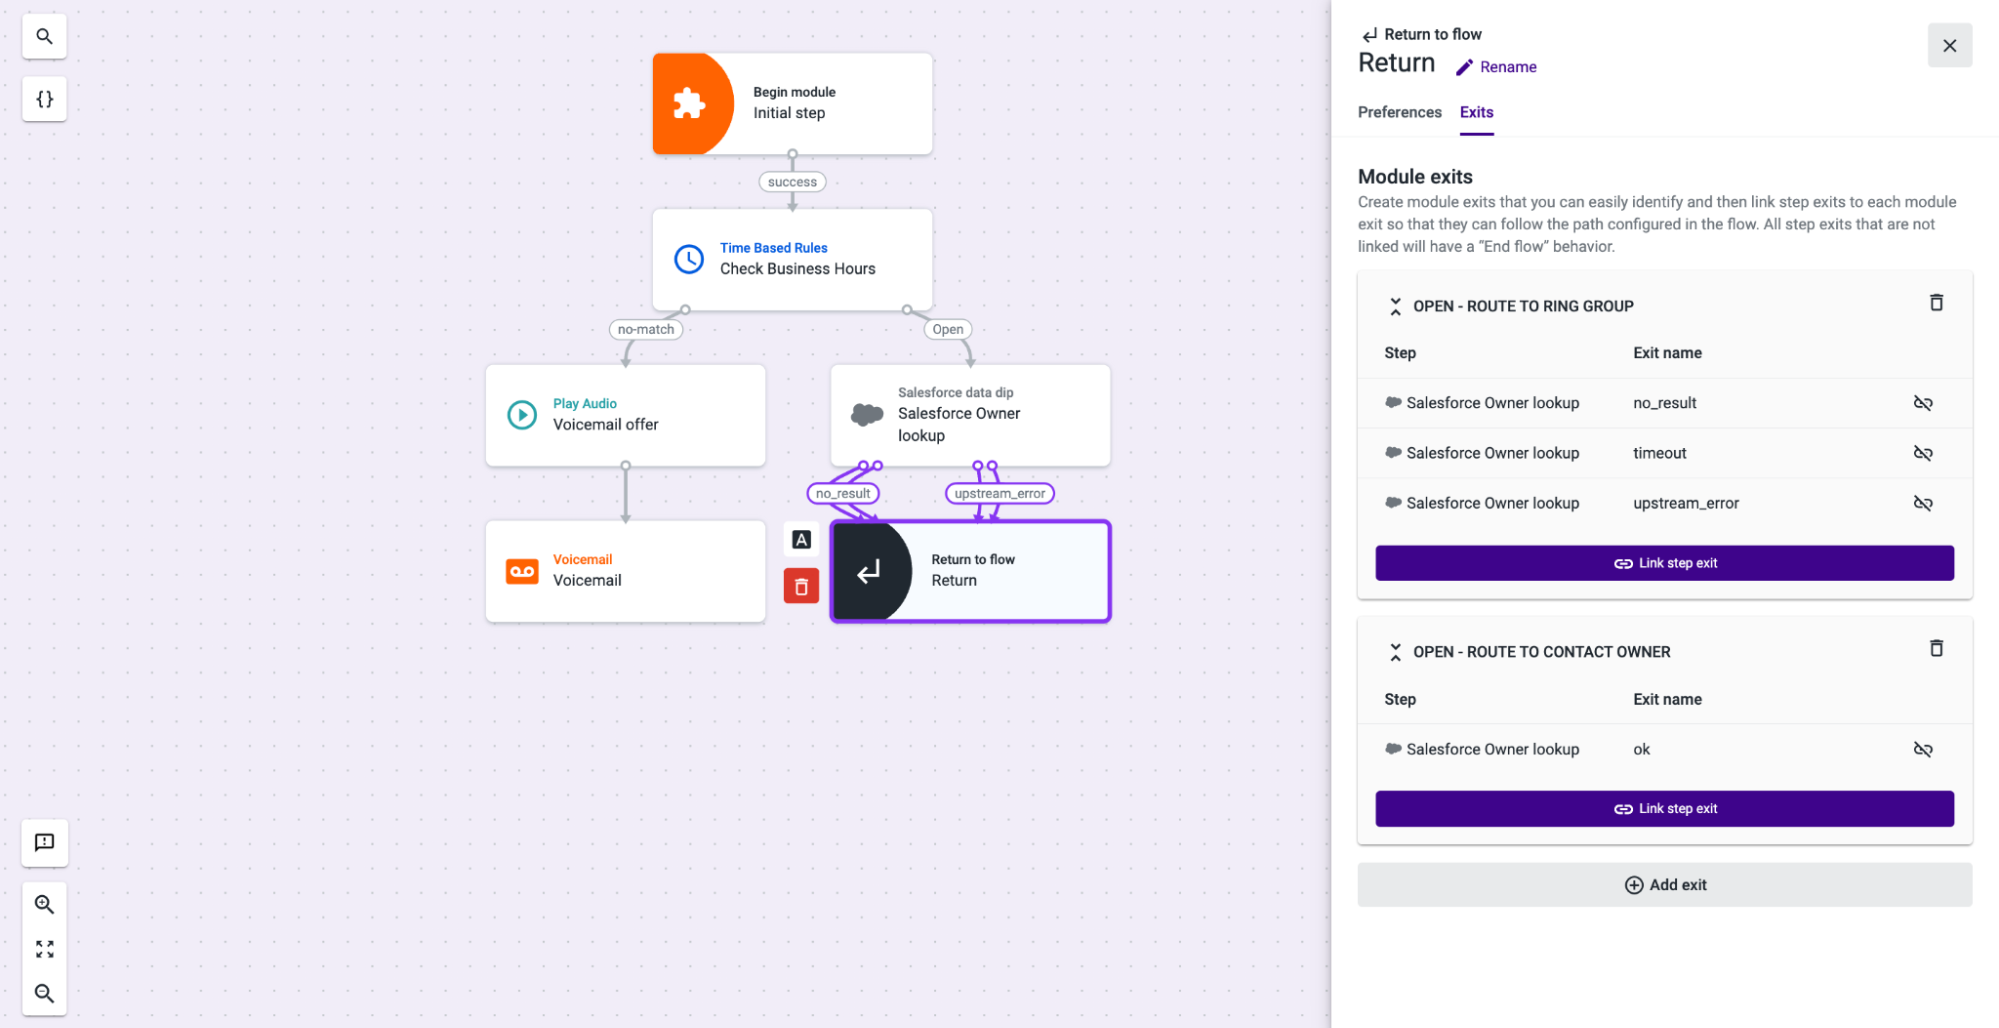
- In the Return to flow step, select the Exits tab.
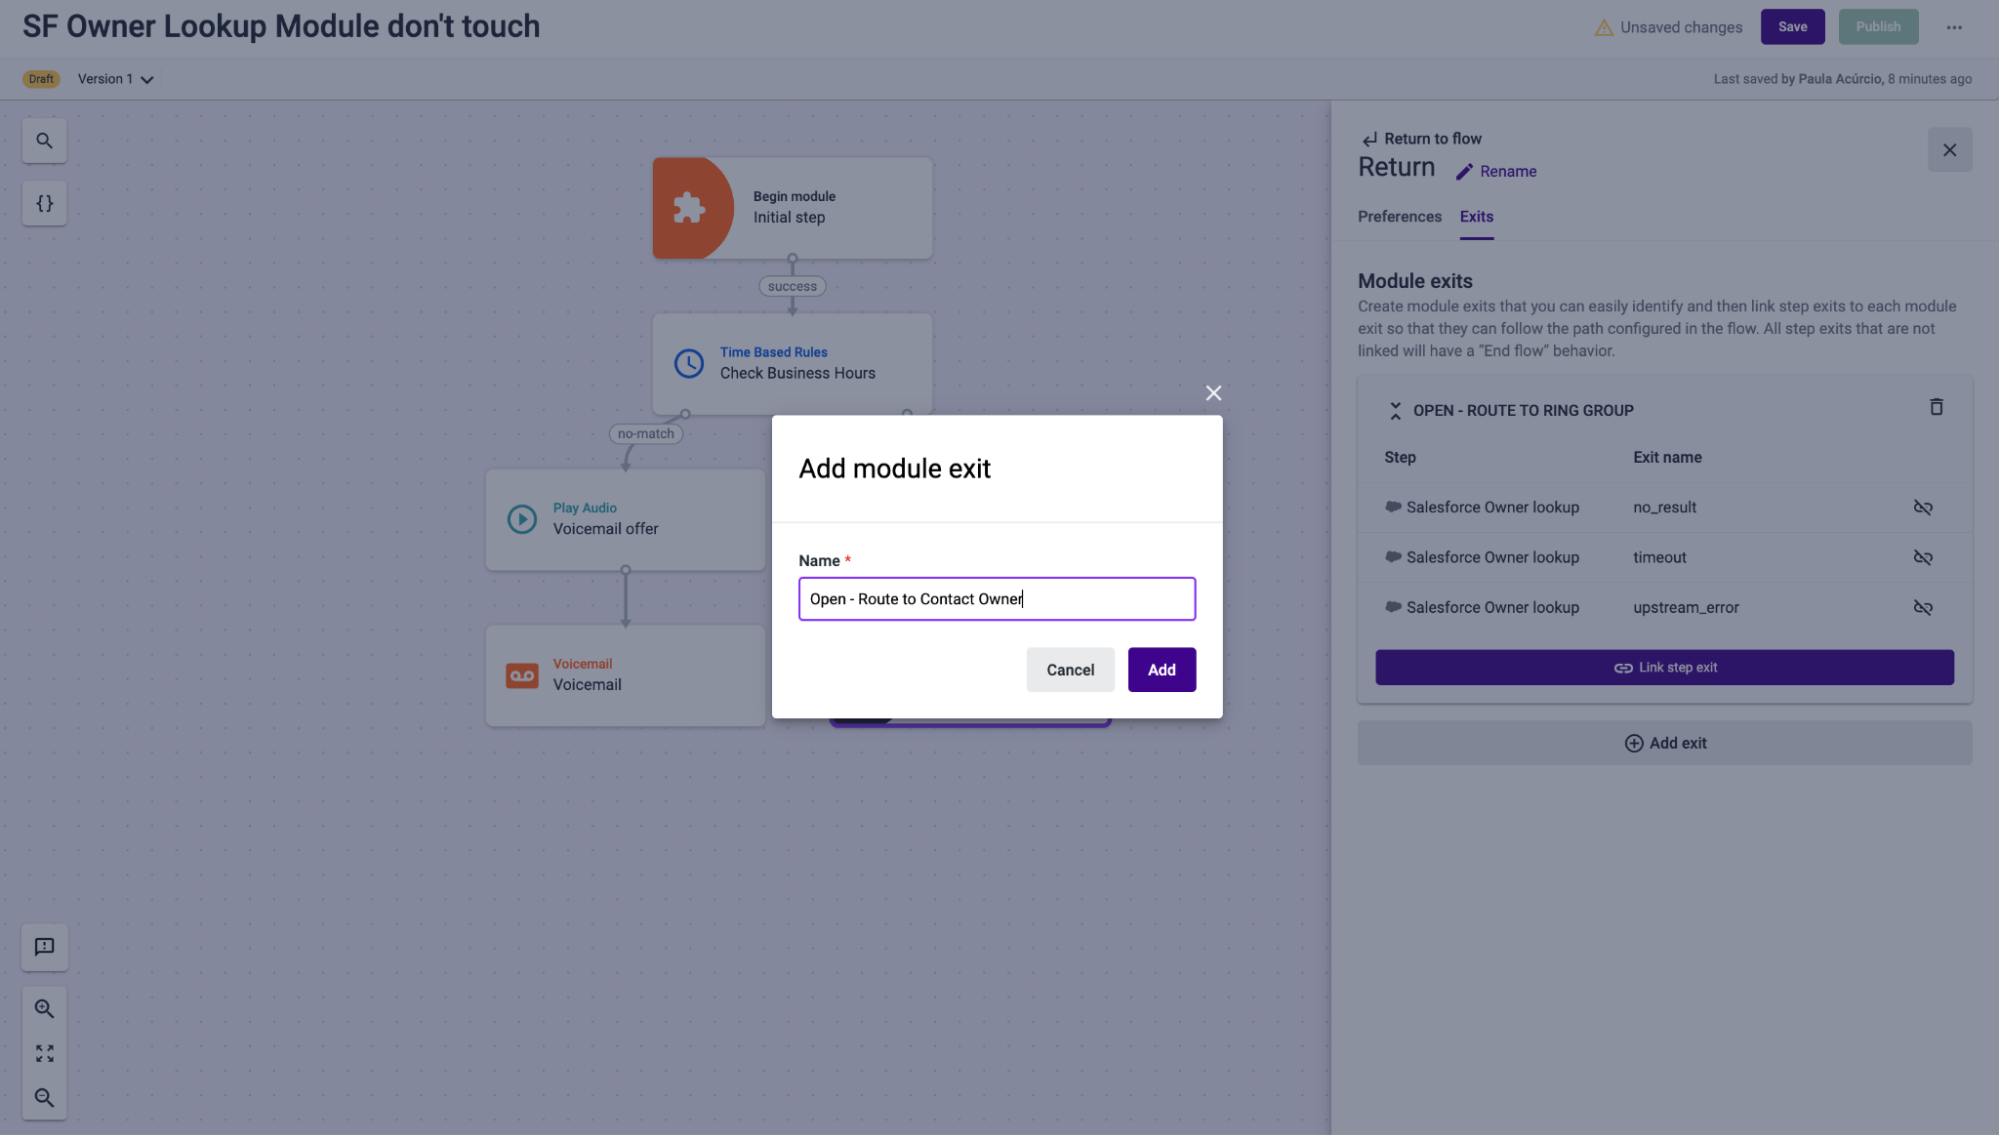
- Click Add exit to add a new module exit. Name it “Open - Route to Contact Owner”.
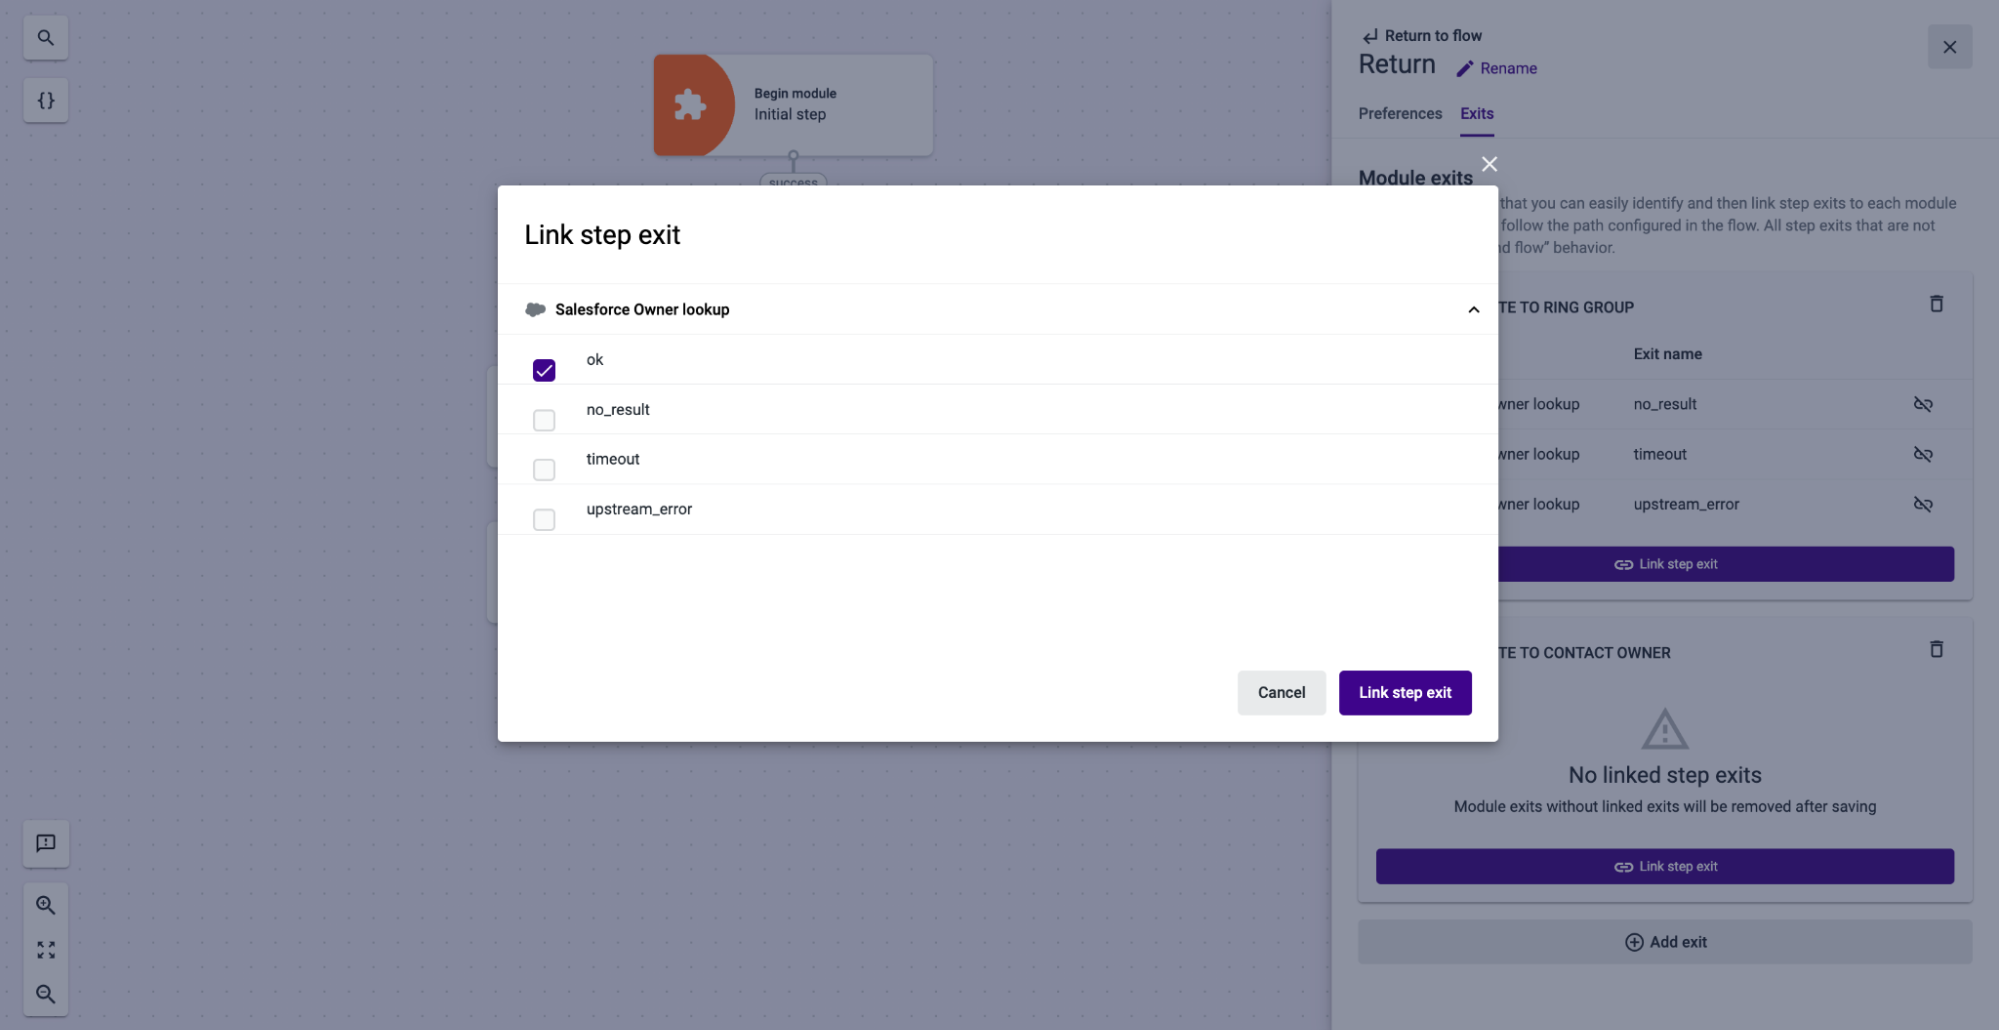
- Link the “ok” exit of the “Salesforce Owner Lookup” step to the recently created “Open - Route to Contact Owner” module exit. Note that the other exits from the “Salesforce Owner Lookup” step are already connected to the module exit “Open - Route to Ring Group”, which was already created with steps linked to it. Here you can find more detailed information on module exits.
- Save and Publish your Module.
The Module input arguments and outputs configured will be dynamically displayed in the “Run module” step of a Studio Flow that is referencing a Module, depending on the module that is selected. You can find more information on the Preferences tab of the "Run Module" component page.
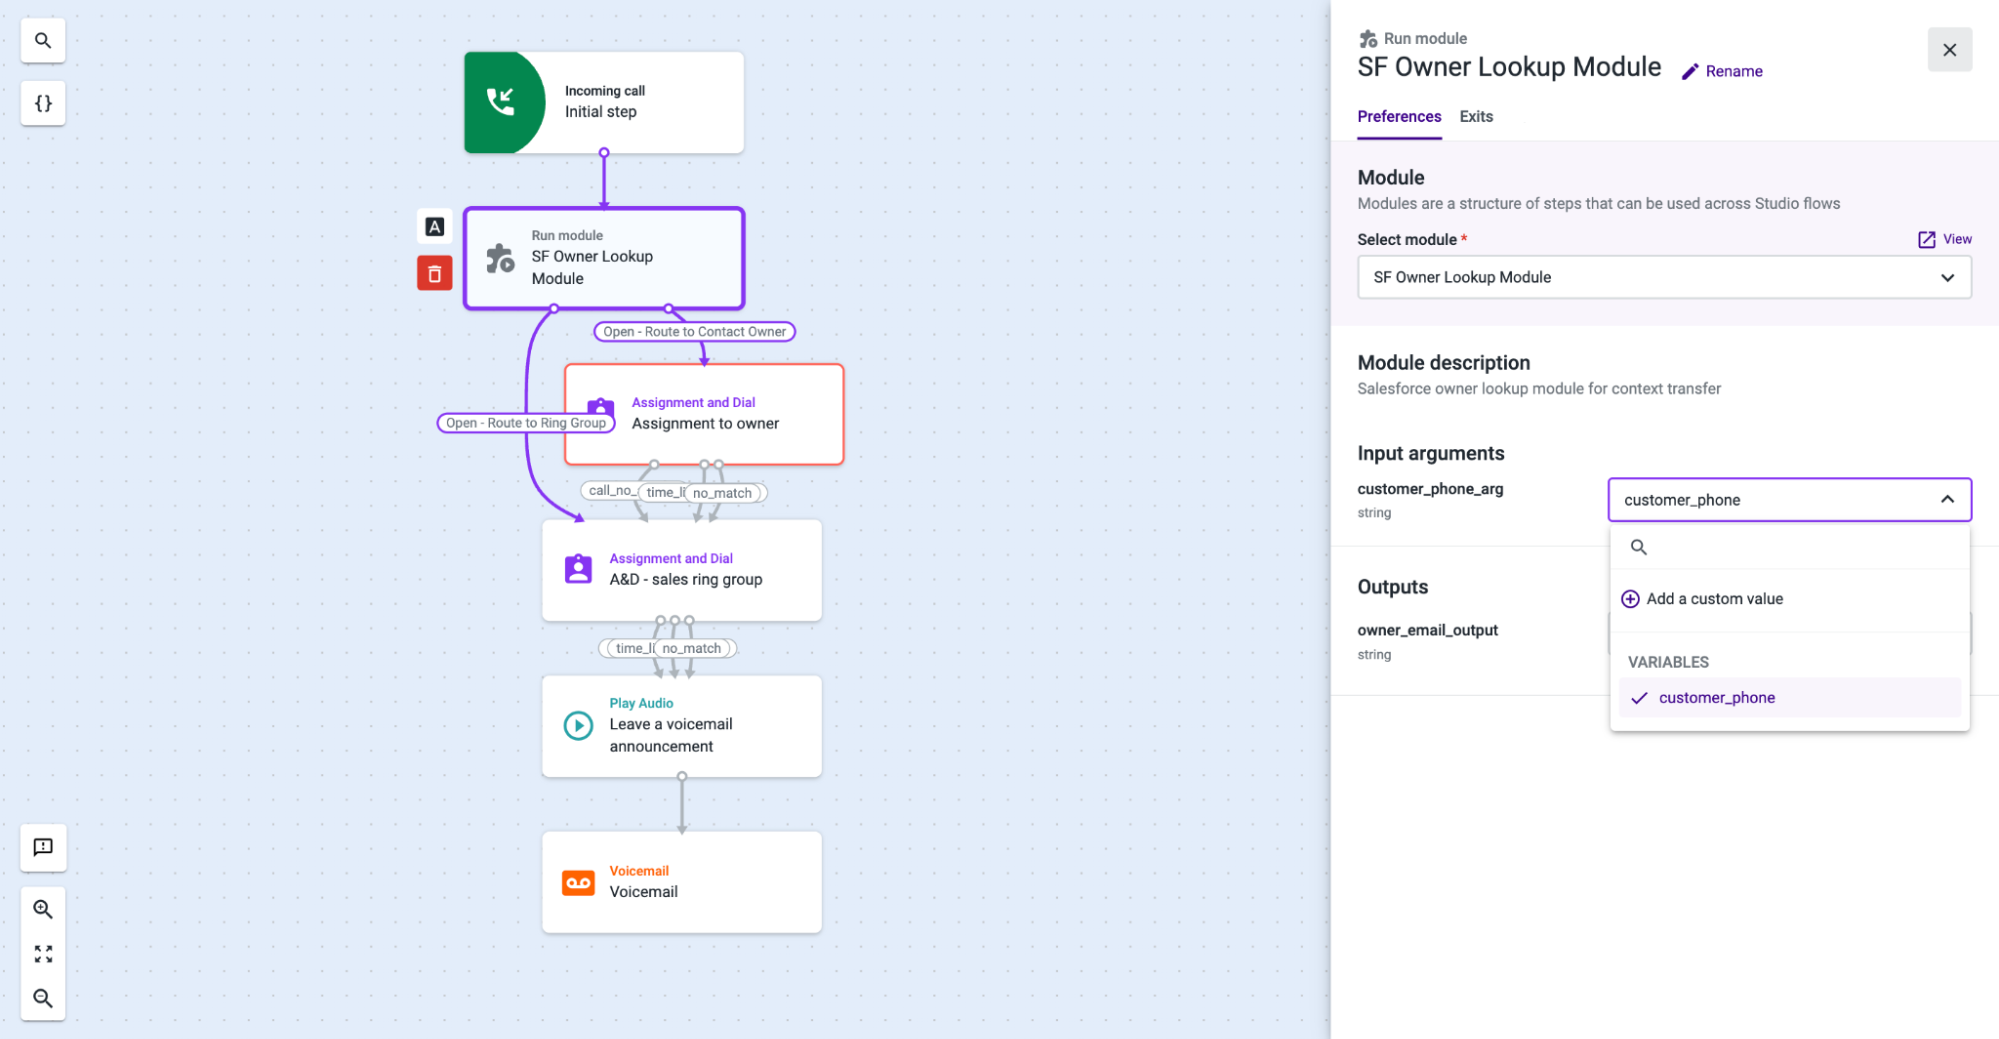
-
In the Run module step of the flow where you are using the module previously created, under the "Input arguments" section, the previously defined module’s argument name, called “customer_phone_arg” is displayed, along with its data type, which is “string”. This input can be mapped to a custom value or to a variable from the list.
-
In this case, we are going to select the variable “customer_phone”, which was associated with the contact phone number in the flow’s Incoming call initial step.
-
In the Run module step of the same flow, under the Outputs section, the previously defined module’s output name, called “owner_email_output” is displayed, along with its data type, which is “string”. This input can be mapped to a variable from the list.
-
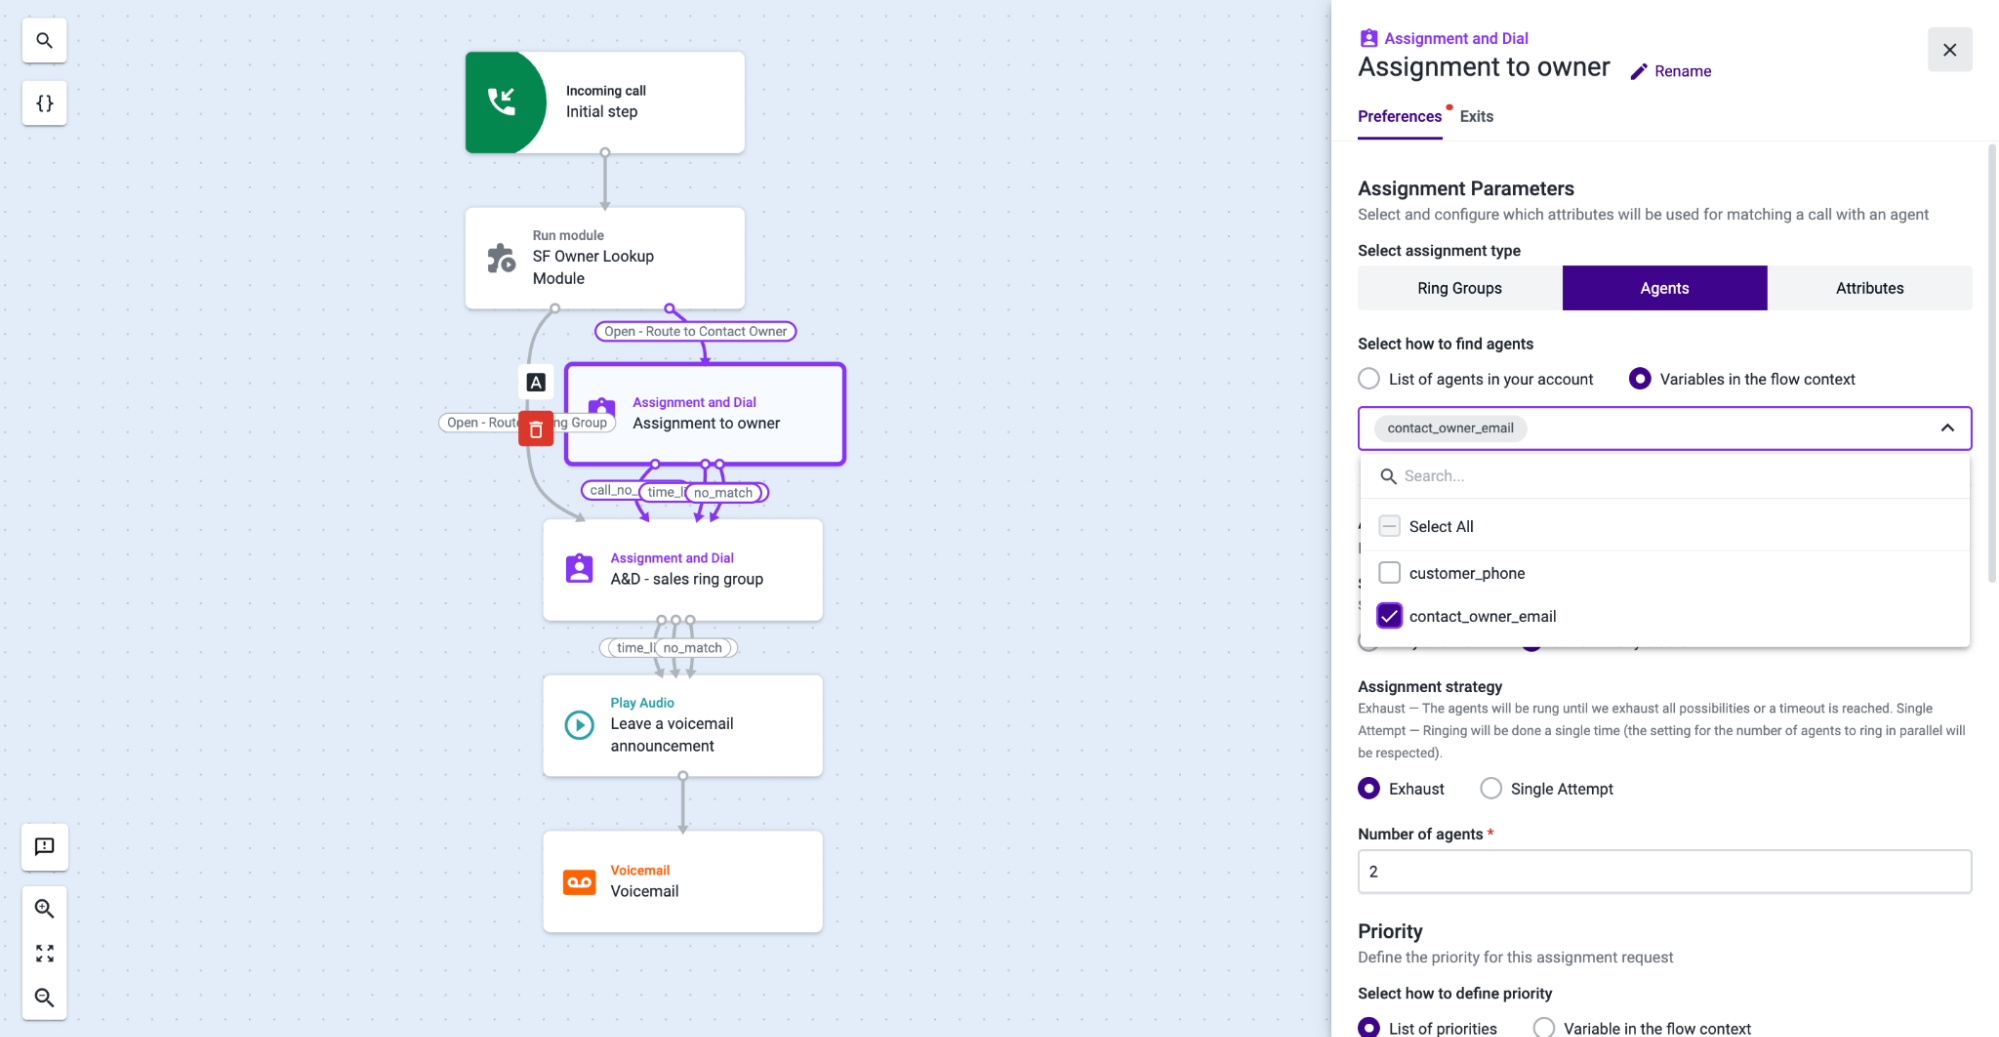
In the Assignment and Dial component of the flow, which step is named “Assignment to owner”, select “Agents” as the assignment type and select the variable “contact_owner_email” from the list of “Variables in the flow context”. Complete this step’s configuration by filling in the mandatory fields and exits for this step. We have connected “No answer”, “Maximum waiting time reached” and “No match found” exits to another Assignment and dial component that is assigning the call to the “sales” ring group, to be possible to route the call to another agent in case it is not possible to retrieve the contact’s owner from Salesforce.
-
Save and publish your flow.
Updated 3 months ago