Configuring a Contingency Routing Plan
Studio makes it easy for you to build contingency call routing directly within your existing Studio Flows, allowing your Administrators to quickly enable alternate behavior for inbound voice calls. This may be valuable when unexpected events impact your contact center operations, such as
- A disaster that requires the evacuation of your agents’ workplaces.
- A cyber attack that prevents your agents from accessing your network or systems.
- A technology outage that severely reduces your contact center’s effectiveness.
A preconfigured Studio Module template can be installed & customized directly from the Smart Help application. This example demonstrates how to use the template to provide contingency routing that will deflect all inbound voice calls to a voicemail inbox when activated.
Setting Up the Contingency Routing Module
- In Talkdesk Workspace, open the Smart Help application.
- Select the Templates Library and then filter by “Studio flow” type.
- Locate the Module - Contingency Routing template and select Install. The template will be available in the Studio Modules tab in draft status.
- Open the draft Module and select the Play Audio step. Replace the default text-to-speech contents with your preferred voicemail greeting message, or select and configure one of the additional audio preferences options.

- Select the Voicemail step, and configure your assignment parameters.
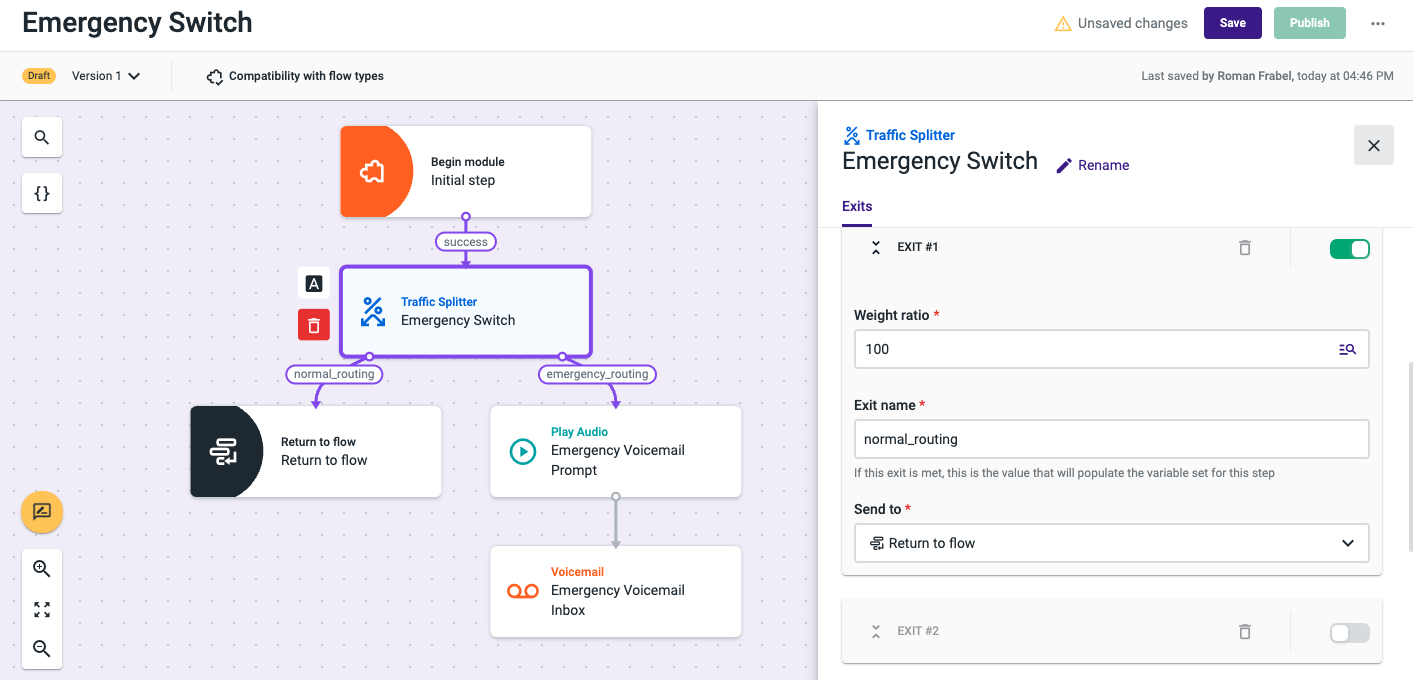
- In the Traffic Splitter step, ensure that Exit #1 (normal_routing) is enabled, and Exit #2 (emergency_routing) is disabled.
- Save and Publish the module.
NoteFor Contingency Routing modules, ensure that only a single exit is enabled at any given time. Enabling multiple exits may cause unexpected behavior.
Referencing the Module in a Studio Flow
NoteYour Contingency Routing module will only influence inbound voice calls on Studio Flows that reference this module using a Run Module component.
Before using your new module, you will need to ensure that it is referenced in at least one Studio Flow using a Run Module component. You can follow the steps provided below, or see the Using a Module in a Studio Flow article for a complete description of the process.
- Select your desired Studio Flow and change the flow to Edit mode.
- Insert a new Run Module component in the desired location. In this example, the Run Module component is placed directly after the Initial Step.
- In the Run Module component, locate the Select module field (in the Preferences tab) and select Contingency Routing.
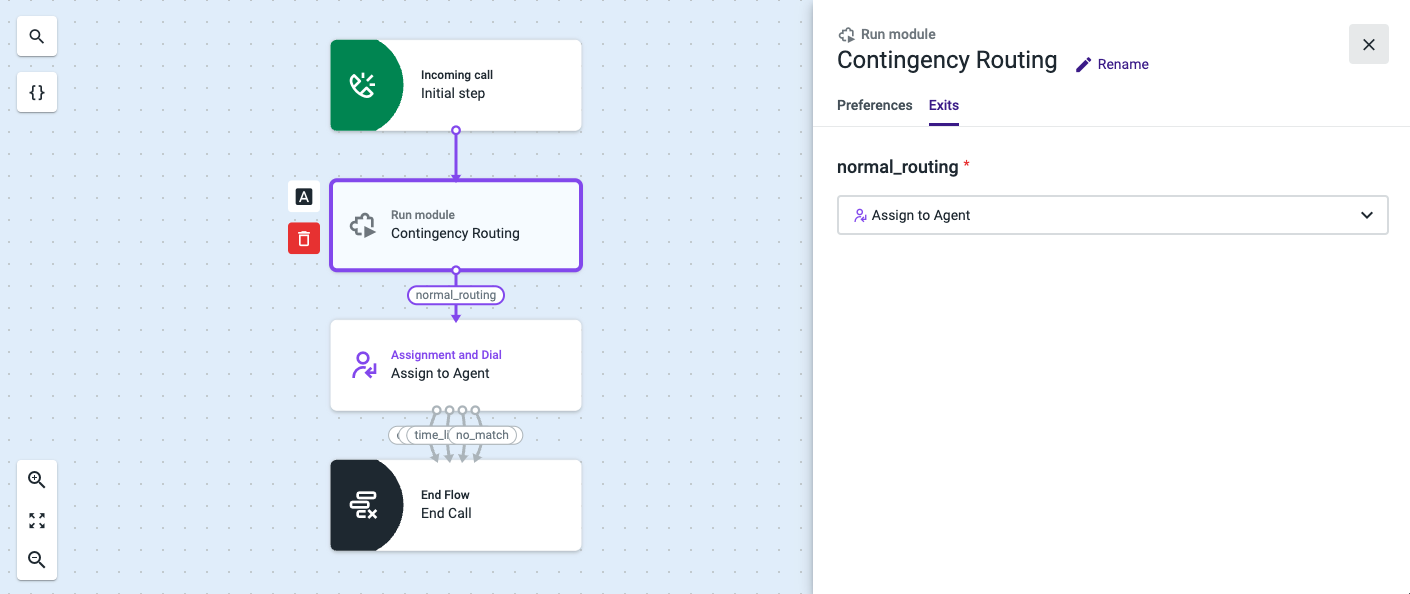
- Select the Exits tab. Only a single exit (normal_routing) will be displayed. Configure this exit so that all calls proceed to the desired component. In this example, calls that follow this exit go directly to the Assignment & Dial component.
- Save and Publish your flow.
- Your Contingency Routing module is now fully configured for use. In this state, with only the normal_routing exit enabled, all inbound voice calls simply pass through the module with no impact on your existing routing behavior.
Enable and Disable Contingency Routing
If you need to enable your Contingency Routing Module, simply follow these steps:
- In the Studio Modules tab, select your published Contingency Routing Module.
- Change the Module to Edit mode.
- In the Traffic Splitter component, set Exit #1 (normal_routing) to disabled.
- Set Exit #2 (emergency_routing) to enabled.
- Save and Publish the module.
Your Contingency Routing Module is now enabled. All inbound calls that enter the Module will be deflected to your Voicemail inbox. This behavior will persist until you manually disable the Contingency Routing Module by following these steps:
- In the Studio Modules tab, select your published Contingency Routing Module.
- Change the Module to Edit mode.
- In the Traffic Splitter component, set Exit #1 (normal_routing) to enabled.
- Set Exit #2 (emergency_routing) to disabled.
- Save and Publish the Module.
Your call routing has now been restored to its normal configuration.
Helpful Tips
- Place the Contingency Routing Module near the beginning of your Studio Flow. If you use Time-based rules or Calendar-based rules to manage your business hours, place your Module immediately following these steps. This will ensure that your contingency routing steps do not take effect outside of your normally scheduled business hours.
- There is no limit to the number of Modules that may be created or installed. This allows you to create flexible contingency plans where alternate routing can be turned on or off for any number of Flows based on your unique needs.